Fabian Hürzeler Tactics At Brighton 2025/2026: A New Model Of Dynamic Build-Up – Tactical Analysis

Brighton's build-up play under manager Fabian Hürzeler features some of the most interesting rotations being used in the Premier League today.
This tactical analysis examines how the 33-year-old has brought the club to the brink of qualifying for UEFA competition by utilising very dynamic build-up play.
Included in this Fabian Hürzeler tactical analysis are examples from recent Premier League games, including Brighton's thrashing of Chelsea, which ultimately resulted in Liam Rosenior leaving the West London Club.
We will examine how Brighton’s centre-backs step into midfield, how their central midfielders build out as makeshift centre-backs, and how they maintain a central overload.
Central Midfielders In Deep Positions
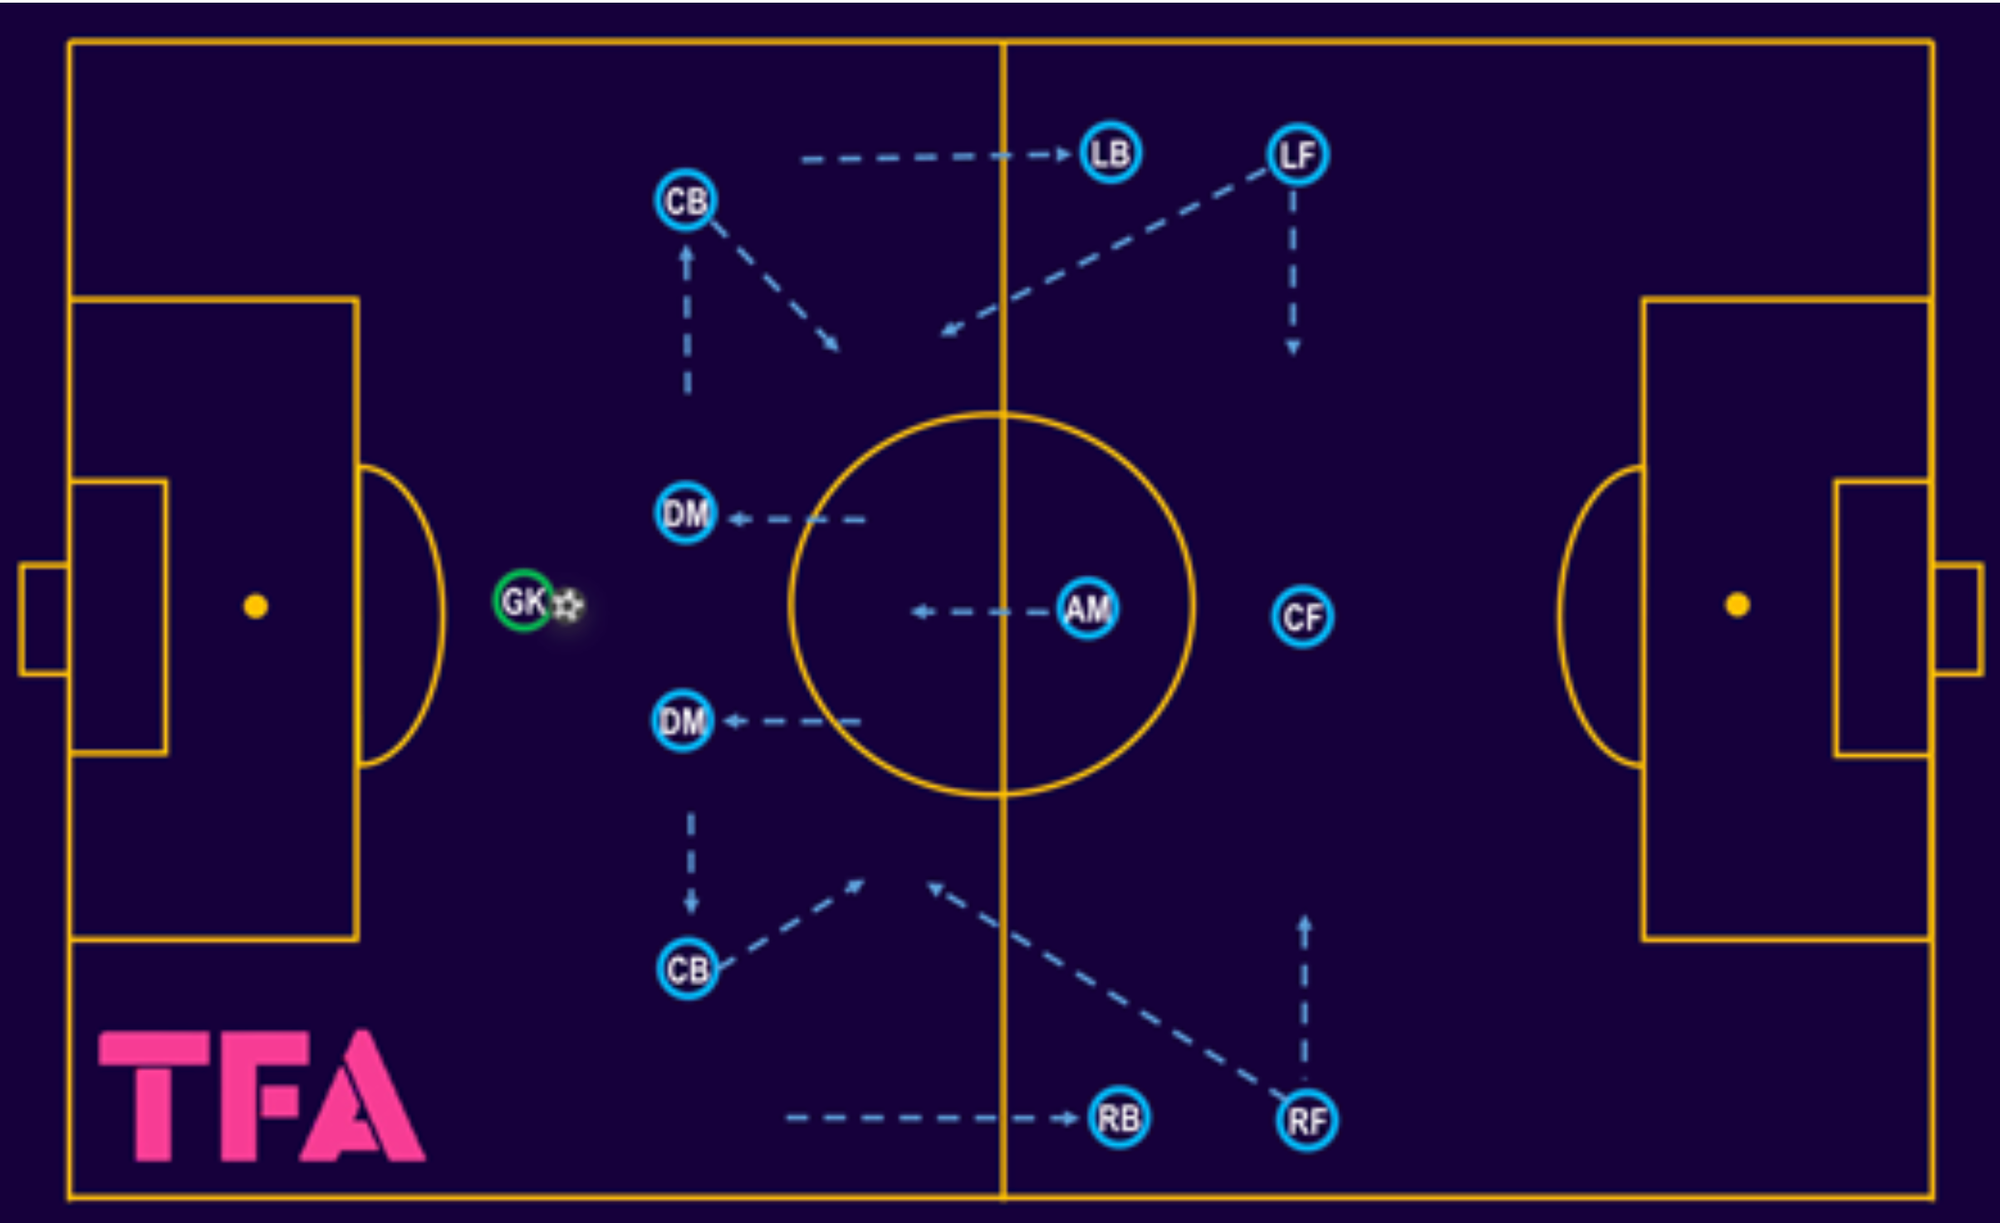
Brighton have played almost exclusively in a 4-2-3-1 this season, but with player rotations that are very dynamic.
Centre-backs become attacking midfielders, and central midfielders become temporary centre-backs.
As the tactical diagram above shows, Brighton’s centre-backs split wide, with either one or both central midfielders often dropping between them.
Although this may appear risky at first, logically it makes sense, as midfielders are typically the most comfortable players on the pitch.
This allows the best ball-playing players to receive under the most pressure and be the ones who progress it forward.
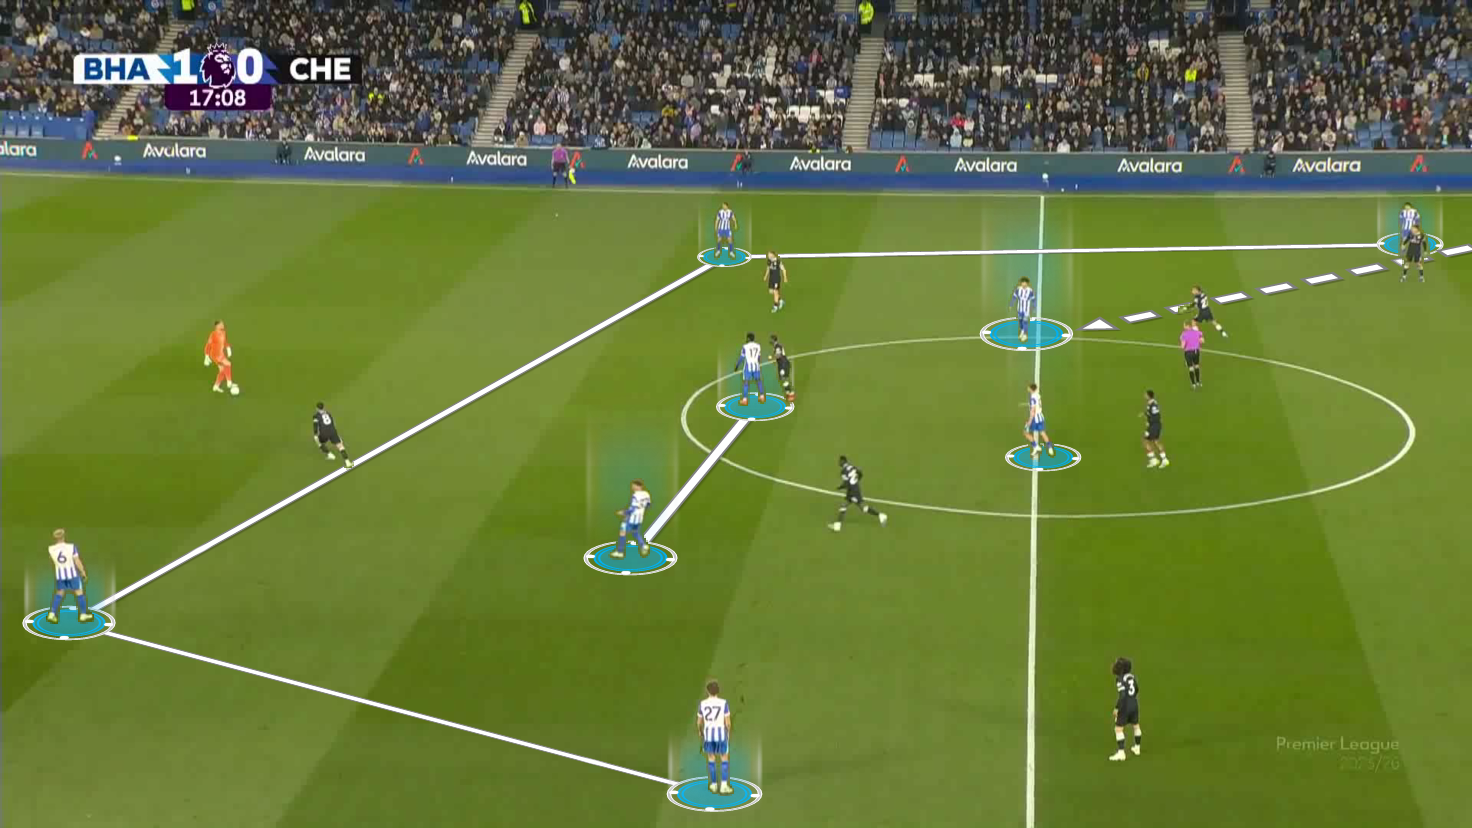
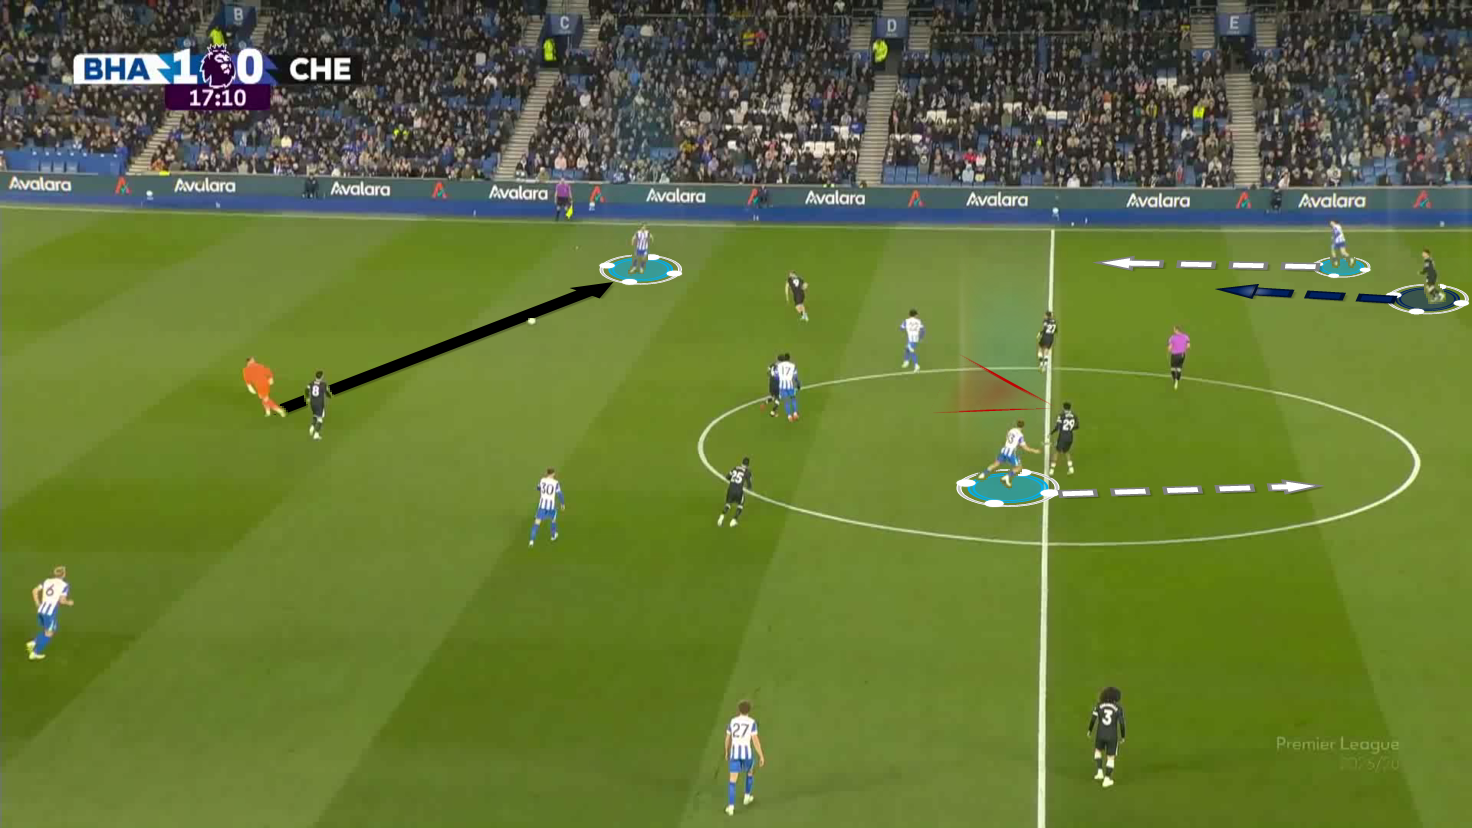
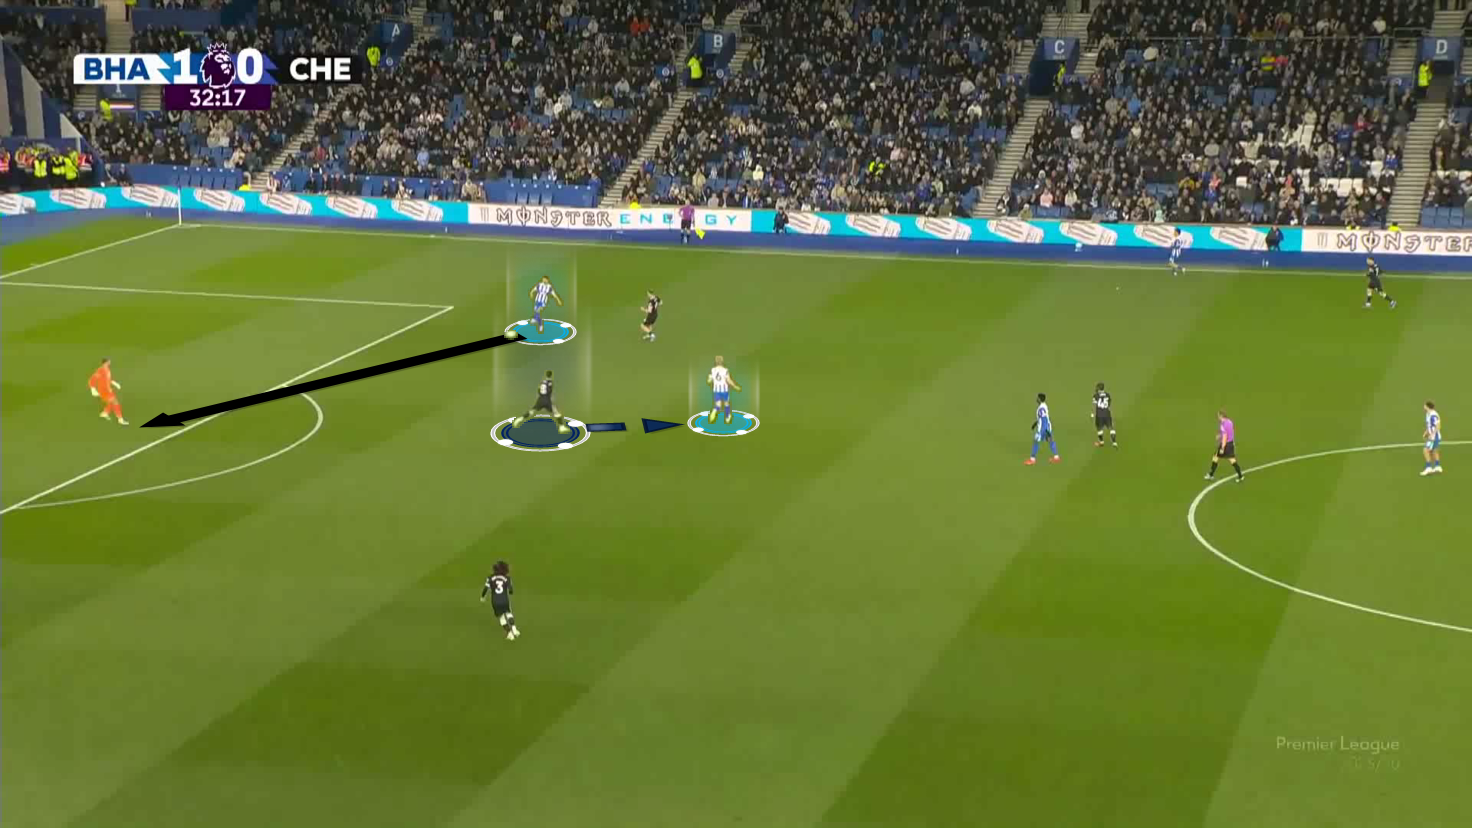
This image, from Brighton's 3-0 defeat of Chelsea, shows their central midfielders dropping deep to receive the ball from their highly positioned goalkeeper.
Whilst in this example, they are still behind the first line of pressure, and not quite as low as the right centre-back, they are still the first line of Brighton players in the central area.
The goalkeeper, Bart Verbruggen, has brought the ball forward after receiving it just outside his 18-yard box, and he has put his foot on the ball to attract Chelsea’s pressing forward.
This positioning of the goalkeeper effectively replaces a conventionally positioned centre-back, allowing the left centre-back, Micky van de Ven, to pull wide.
This allows Brighton to keep double width in the wide area with their left winger, Kaoru Mitoma (highlighted), having moved from his wide left position into an attacking midfielder position.
Mitoma dropping into this space provides a central overload, with Chelsea having to push members of their back five forward to make up the numbers.
Verbruggen passing the ball to his centre-back in the wide area triggers left-back Ferdi Kadıoğlu to move towards the ball.
With winger Mitoma already having brought Chelsea’s right wing-back into a central area, Kadıoğlu’s movement means Chelsea’s right-centre back has to jump with him.
This leaves a gap in the back line for attacking midfielder, Jack Hinshelwood, to run into.
As the pass wide is made, and his direct opponent's eyes are fixed on the ball, Hinshelwood begins his run unnoticed, on the blind side of the midfielder.
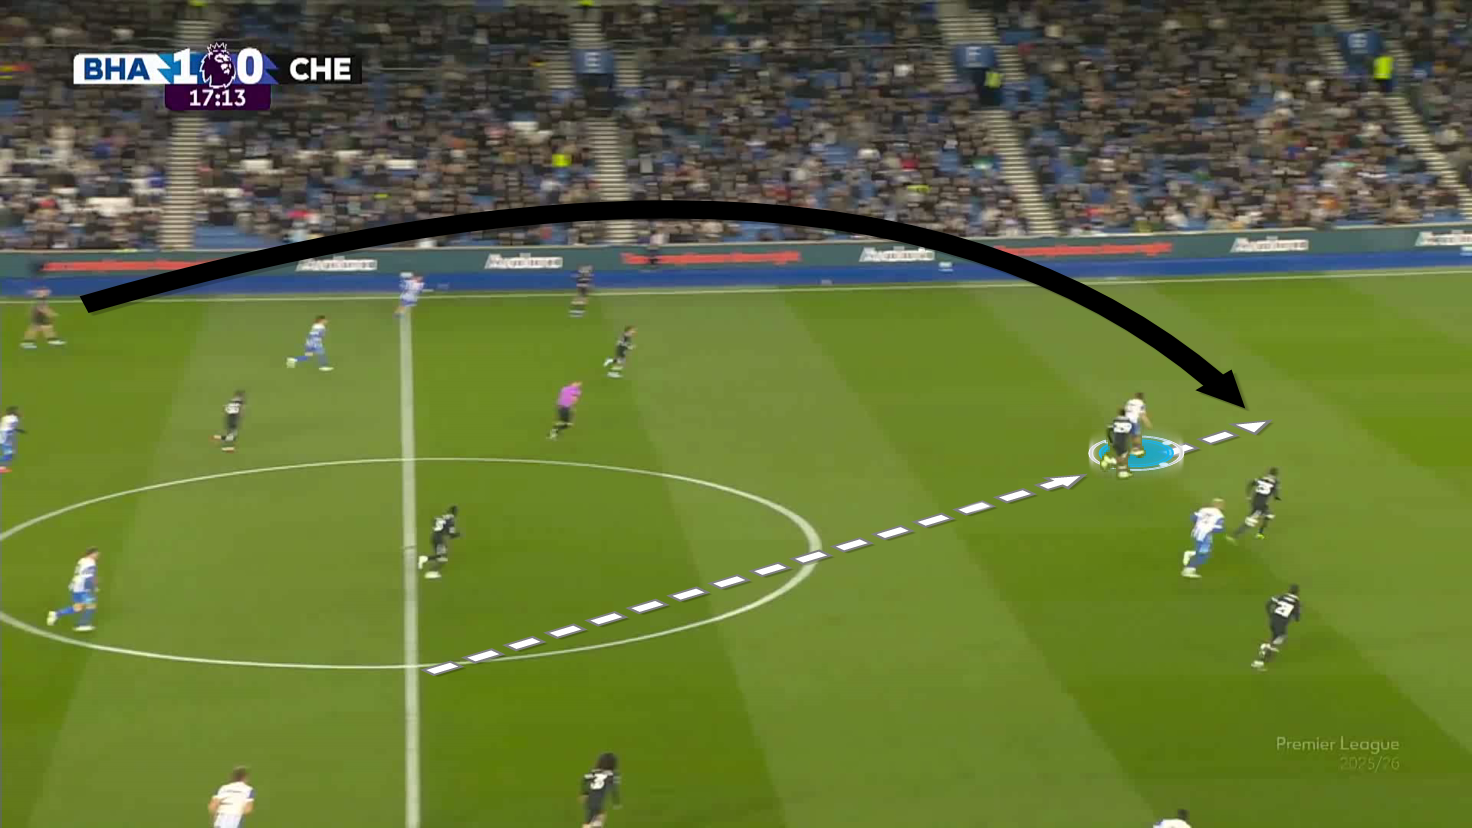
Hinshelwood manages to evade his marker and attack the space down the side of Chelsea’s central centre-back that was created by the movement of his wide teammates.
The attacking midfielder received on the goal side of the opposition defence in a move concluding with a dangerous opportunity for the Seagulls.
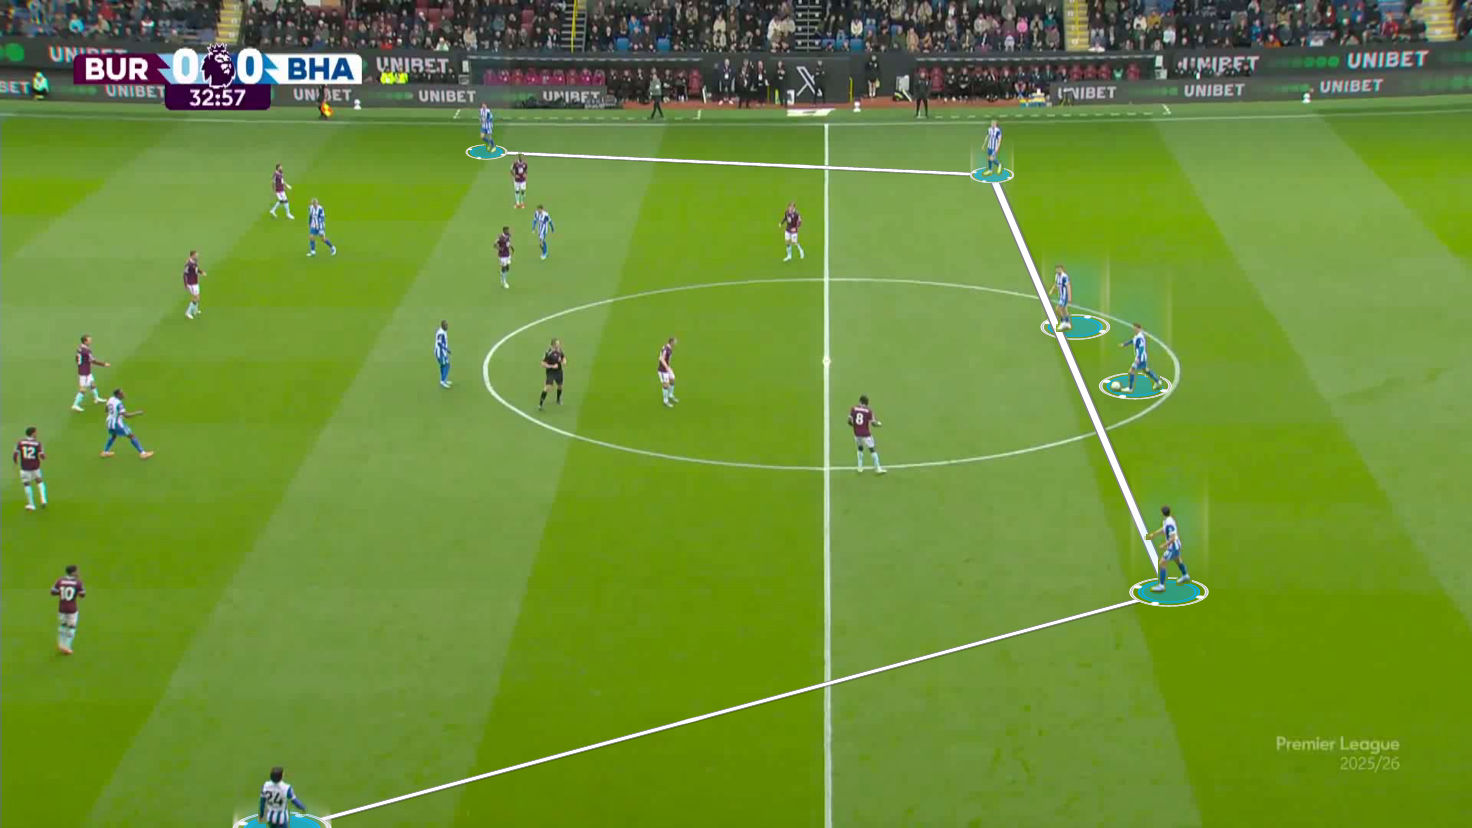
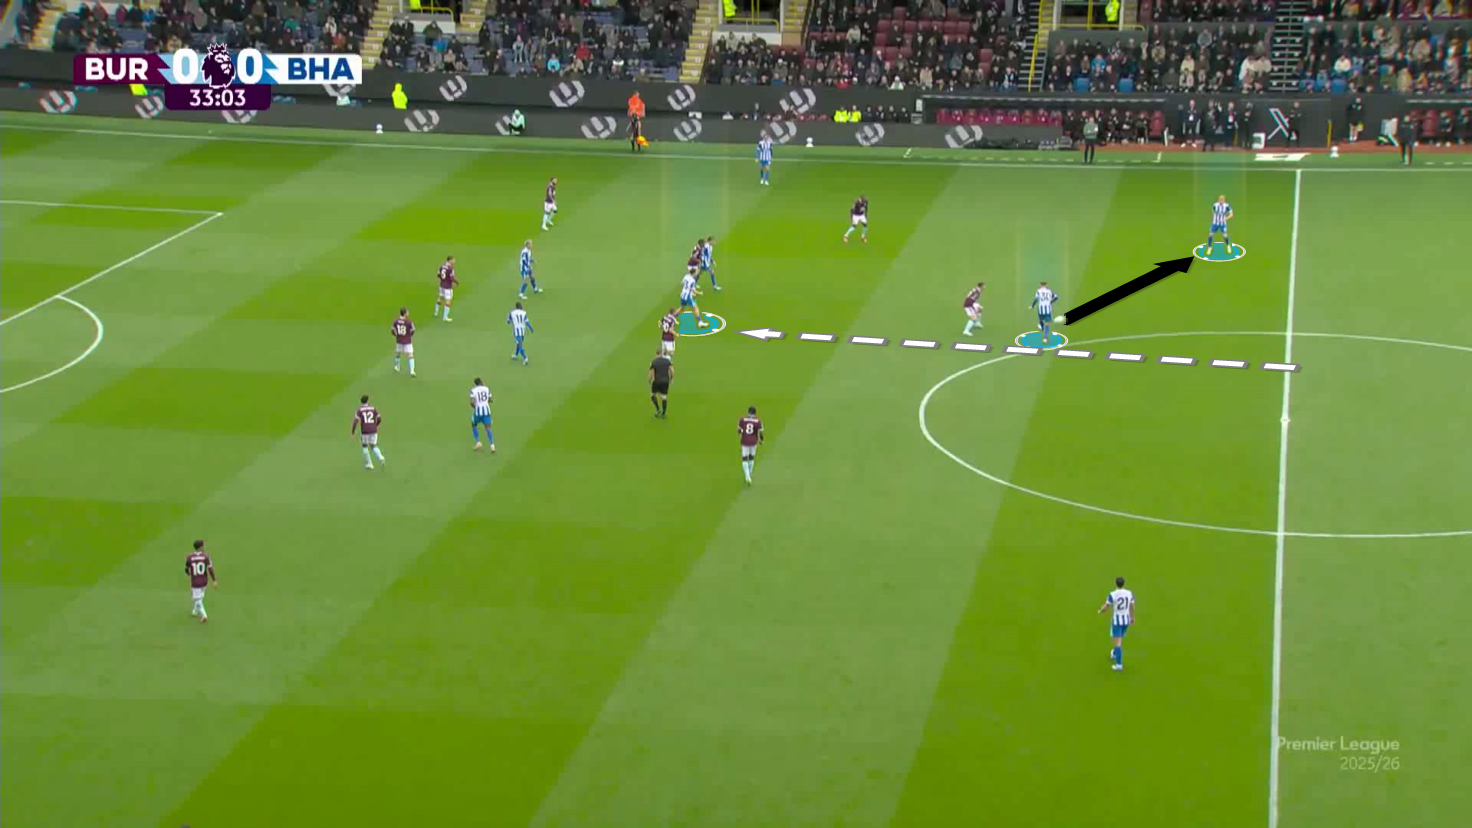
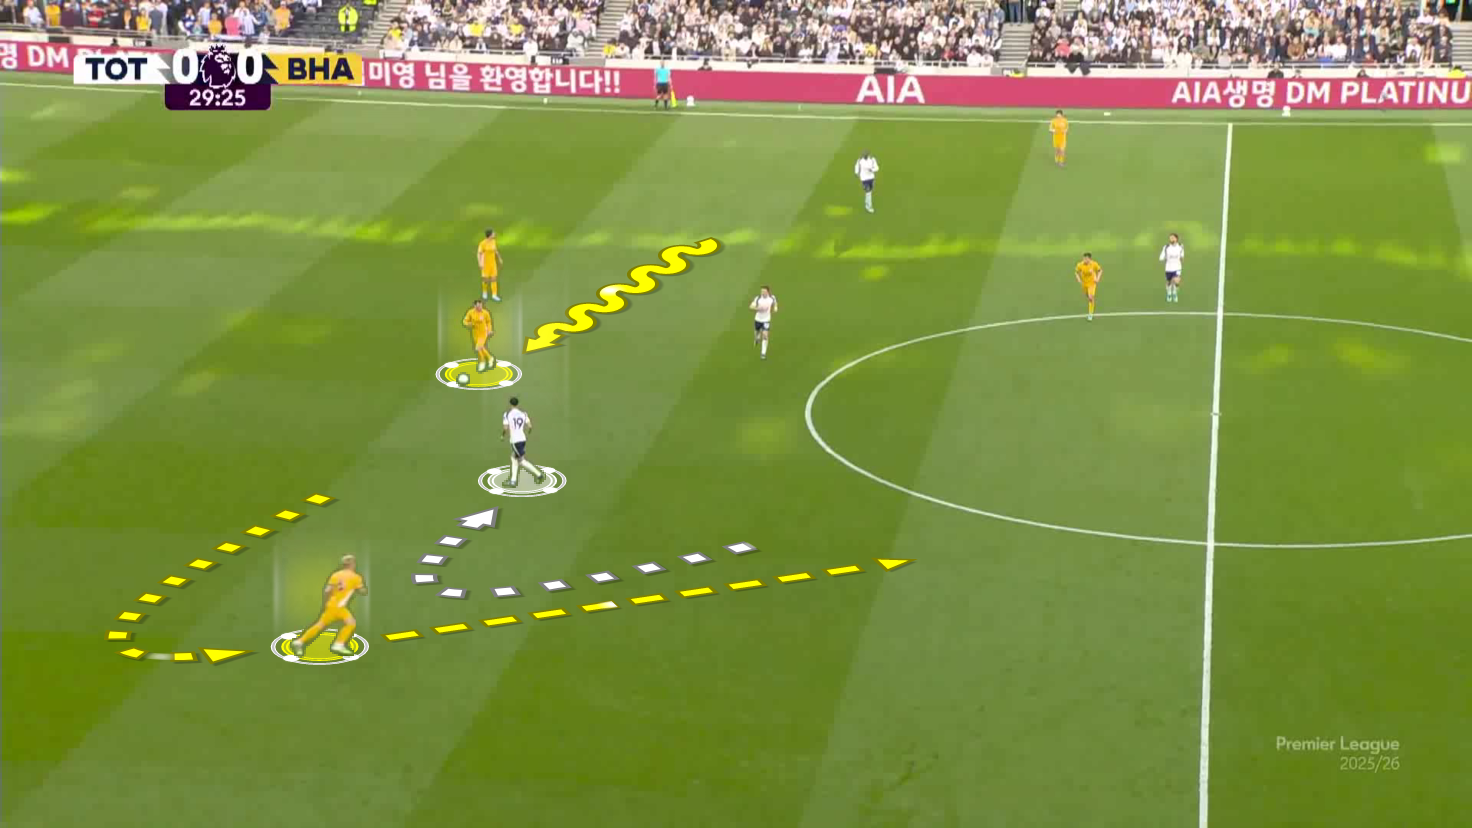
This example, from Brighton’s 2-0 victory away to Burnley, shows both central midfielders (highlighted) just inside the centre-circle, in line with both centre-backs.
Again, one centre-back pulled into the wide area, allowing his right-back to push on.
Both wingers have moved inside.
The right winger and centre-forward, Danny Welbeck, are positioned in the half-spaces between centre-backs and full-backs.
Left winger, Yankuba Minteh, is in the ‘10’ position to give numerical superiority in the central area.
Midfielder Pascal Groß, who had dropped into a left centre-back position, progresses the ball by dribbling directly at Burnley's highest player.
This action pins the forward in place, opening up more space for Brighton’s right centre-back.
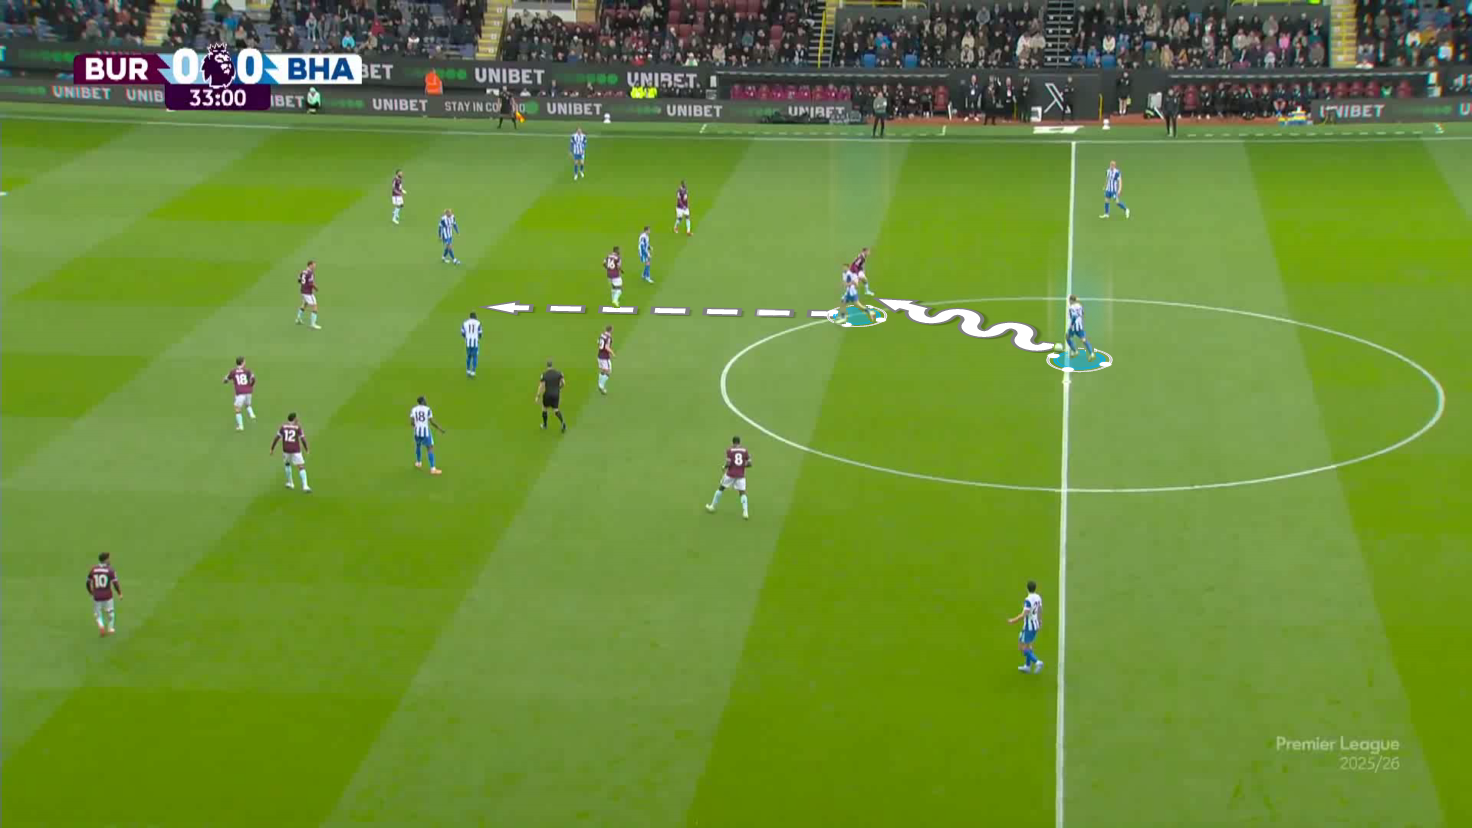
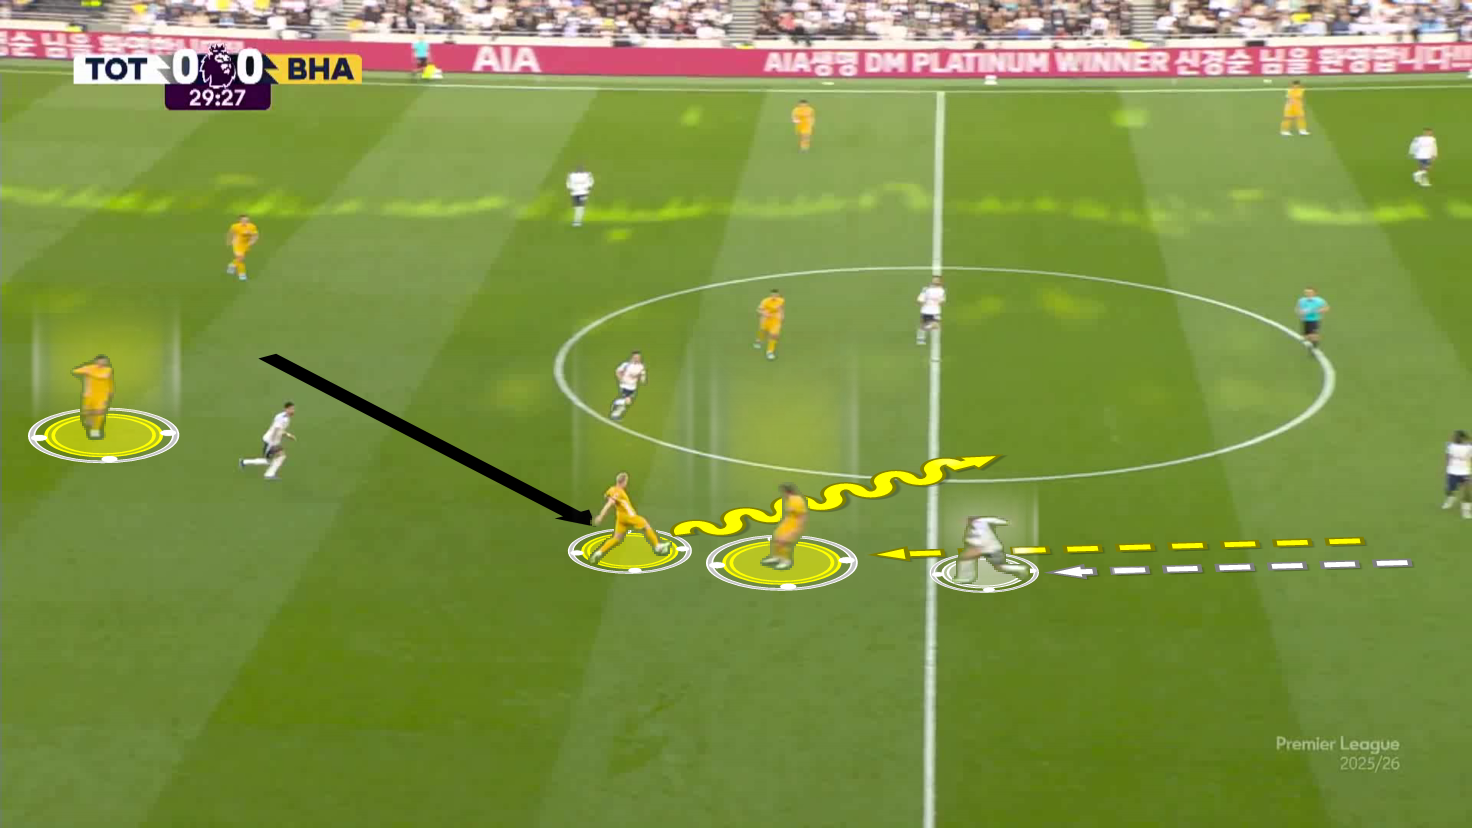
As Groß begins to dribble, Hinshelwood, who had been in the right centre-back position, somewhat bravely, begins to run forward, vacating the centre-back area completely.
When Groß gets close to the committed Burnley forward, he passes the ball to his right centre-back.
Hinshelwood pauses his forward run slightly, slowing down to remain between two Burnley midfielders until his teammate is ready to pick him out.
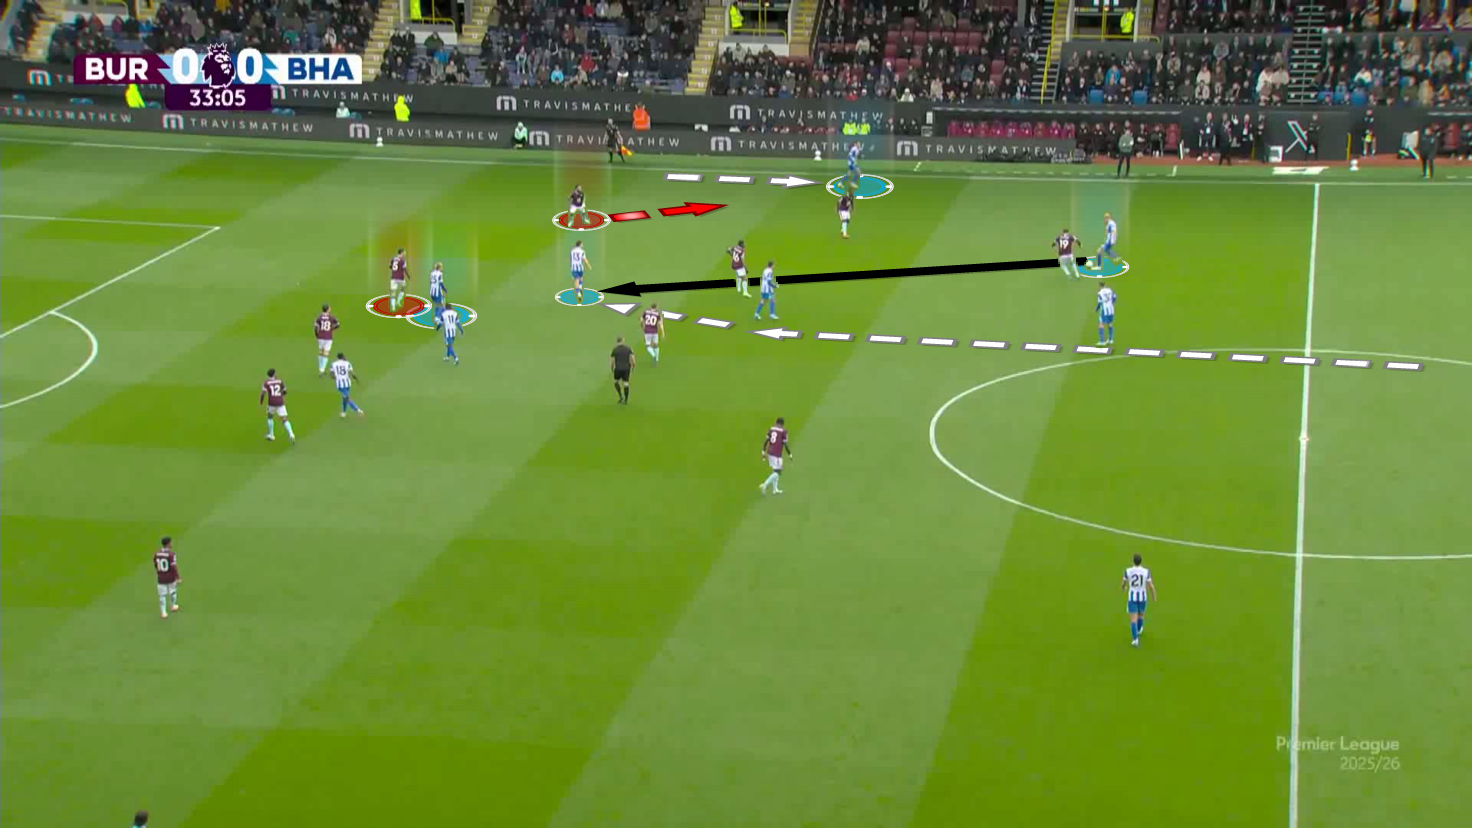
By arriving from such a deep position and timing his movements so well, Hinshelwood makes himself almost impossible to pick up.
Hinshelwood is aided by his inverted winger pinning the nearest centre back, preventing him from stepping in, and the Burnley left-back being distracted by Brighton’s right-back dropping towards the ball.
This allows the attacking midfielder to receive in a pocket of space and combine to create a penalty box entry.
How Brighton’s Centre-Backs Step Into Midfield
A major component of Brighton’s success when building up is the dynamism of their centre-backs.
Particularly impressive is their willingness to step into midfield and receive on the other side of the opposition's pressure.
This section is going to analyse the different scenarios in which Brighton’s centre-backs step in to either receive or drag pressing players away from the ball.
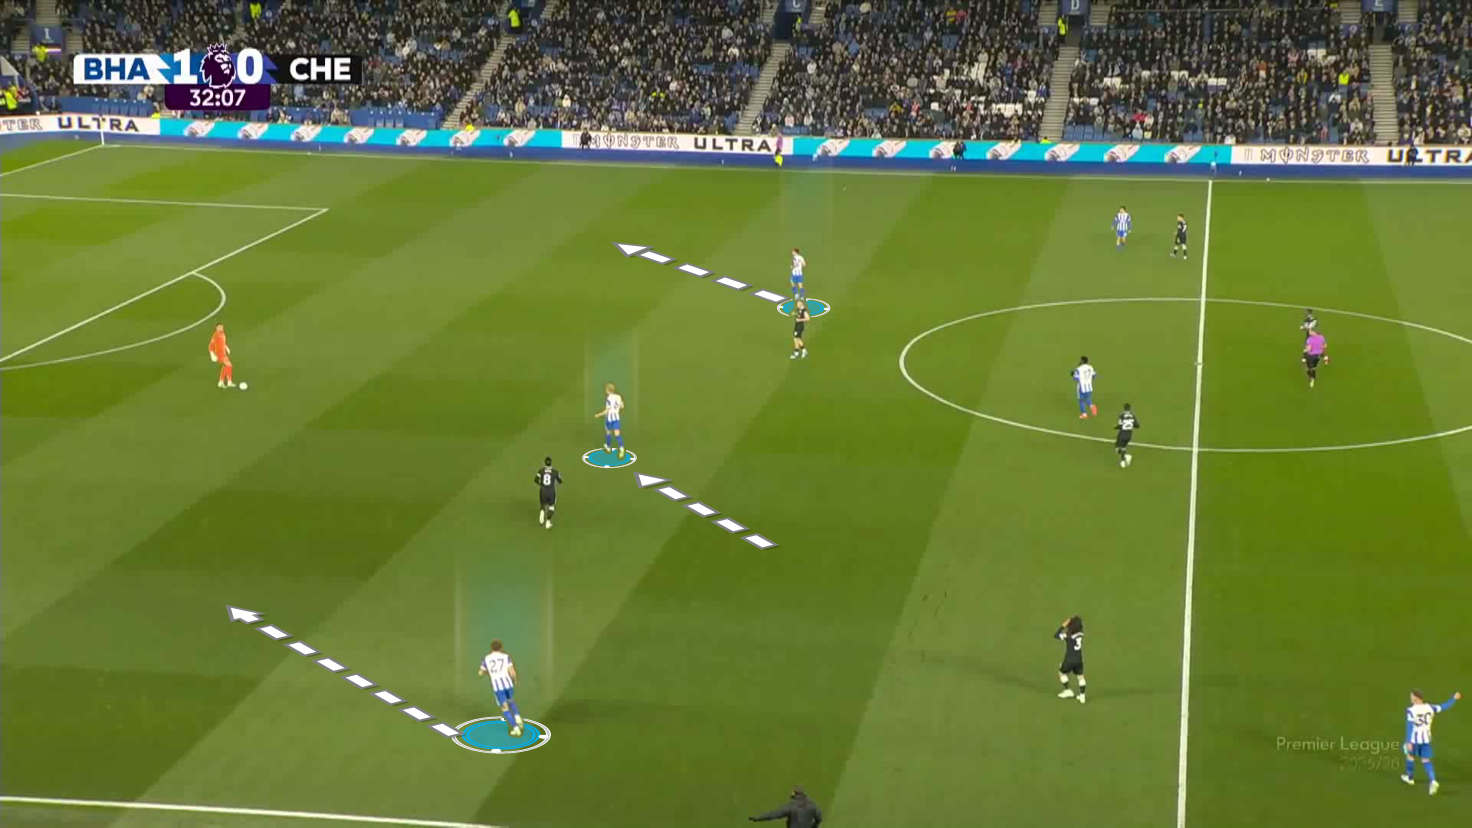
The above image shows centre-back Jan Paul van Hecke, waiving his right-back deeper towards the ball as the goalkeeper receives it at his feet.
van Hecke wants the right-back to drop into a centre-back position so the Dutch defender can remain in the middle.
The right-back's positioning means van Hecke can stay on the blindside of the pressing striker, as a ‘6’, and cause confusion amongst the Chelsea players on who they should be pressing.
Ultimately, Marc Cucurella, who is playing left wing-back for Chelsea, is signalled by his striker to press a player who is now in a centre-back position.
While van Hecke does not receive the ball in this instance, his positioning has dragged away the highest opposition player, allowing his goalkeeper to receive under little pressure.
Instead of being forced into playing a rushed clearance, with his head raised, Verbruggen has time to play a long ball into the area vacated by Cucurella.
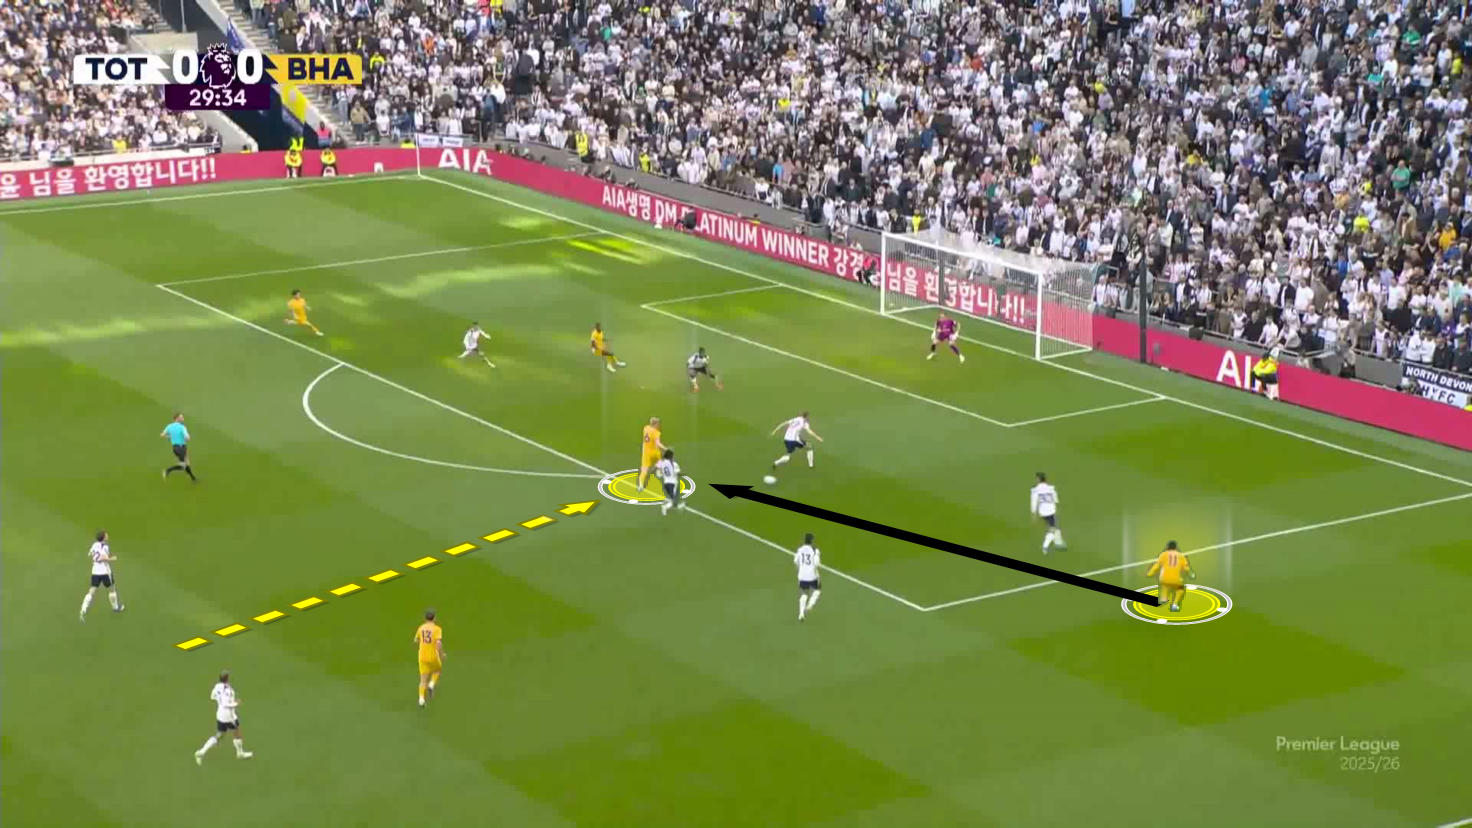
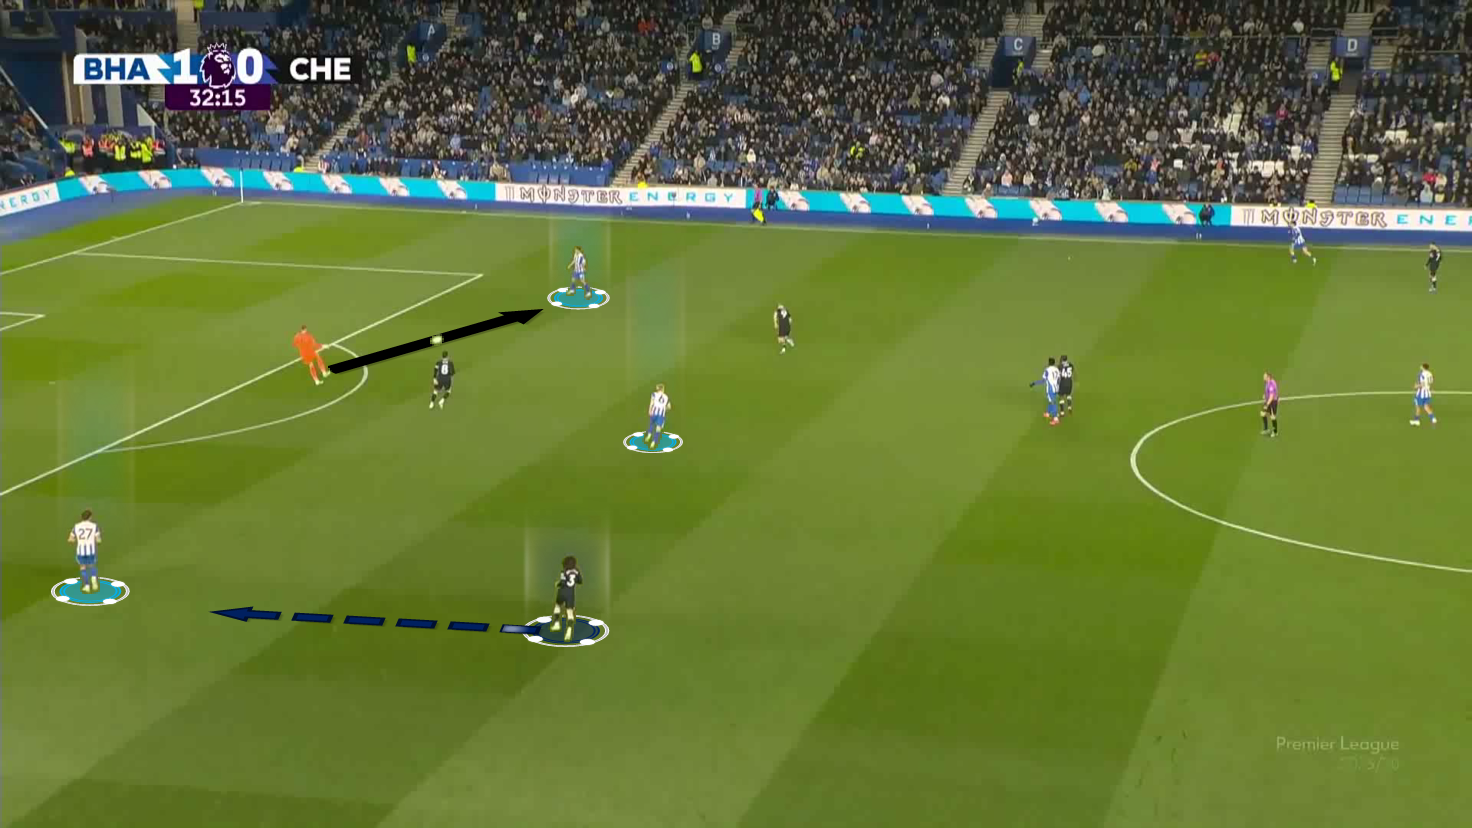
In this example from Brighton’s 2-2 draw with relegation-threatened Tottenham Hotspur, Van Hecke steps into midfield to receive from his midfielder, Groß.
Groß picked up the ball in the left wide area and dribbled across the first line of pressure.
This is another trait of Brighton that helps them disrupt pressing structures, forcing opposition forwards to engage and dragging players out of position.
Initially, Van Hecke shows for the ball in a predictable fashion by widening and dropping off slightly, as if asking to receive in front of the pressing Spurs player (highlighted).
As the Spurs forward loops his run in an attempt to cut off the centre-back, Van Hecke steps forward into the midfield area.
As Van Hecke receives the ball, his right-back, arriving from an advanced inverted position, runs directly at him, bringing a defending player towards the ball.
The right-back, Mats Wieffer, dropping into the same space, actually aids van Hecke.
It allows Van Hecke to use his momentum against the flow of the opposition midfielders' press to take the defending player out of the game.
Van Hecke’s aggressive first touch bypasses the entire opposition midfield in an action that, whilst being described, sounds risky, but was in fact relatively secure at every stage.
Not only did the midfielder who played the pass into Van Hecke fill in to cover for his advancing centre-back, but the ball did not appear in any danger of being lost.