
![Hull City Vs Middlesbrough [1–0] – EFL Championship Playoff Final 2025/2026 – Tactical Analysis](https://cdn.mymidnight.blog/77f959f119f4fb2321e9ce801e2f5163/size/w1000/2026/05/Championship-Playoff-Final-20252026.png)
Hull City Vs Middlesbrough [1–0] – EFL Championship Playoff Final 2025/2026 – Tactical Analysis

After a week of controversy following the spygate drama, which resulted in Southampton’s expulsion from the EFL Championship Playoff Final, Hull City defeated Middlesbrough at Wembley Stadium this past weekend to earn their way back to the Premier League for the 2026/2027 campaign.
Saturday’s contest was a slow-paced, cagey affair.
Middlesbrough dominated the possession, ending the contest with 64.18%, but failed to really do much with it, generating just 0.96 xG from their 11 shots, only one of which hit the target.
Meanwhile, the Tigers successfully imposed their low-block-counterattack game plan on the match.
They had fewer shots than Boro (nine), but they managed to hit the target three times and generated 1.43 xG, almost half of which came from the game-winning Oli McBurnie chance.
This tactical analysis details how Hull City tactics executed Sergej Jakirović’s strategy to perfection on Saturday to get back to England’s top flight for the first time in a decade.
We’ll also examine Boro’s missed opportunities and consider if they could’ve done more with their possession to come away victorious.
Hull City Vs Middlesbrough Lineups & Formations
Both sides played with a back five and one striker on Saturday's Championship Final.
As Boro dominated the ball, their shape is listed as a 3-4-3 below, but resembled more of a 5-4-1 out of possession.
Hull City’s shape usually looked like more of a 5-2-3 shape, with the wingers sitting alongside the centre-forward in the mid block before dropping back in alongside the central midfielders in the low block phase.
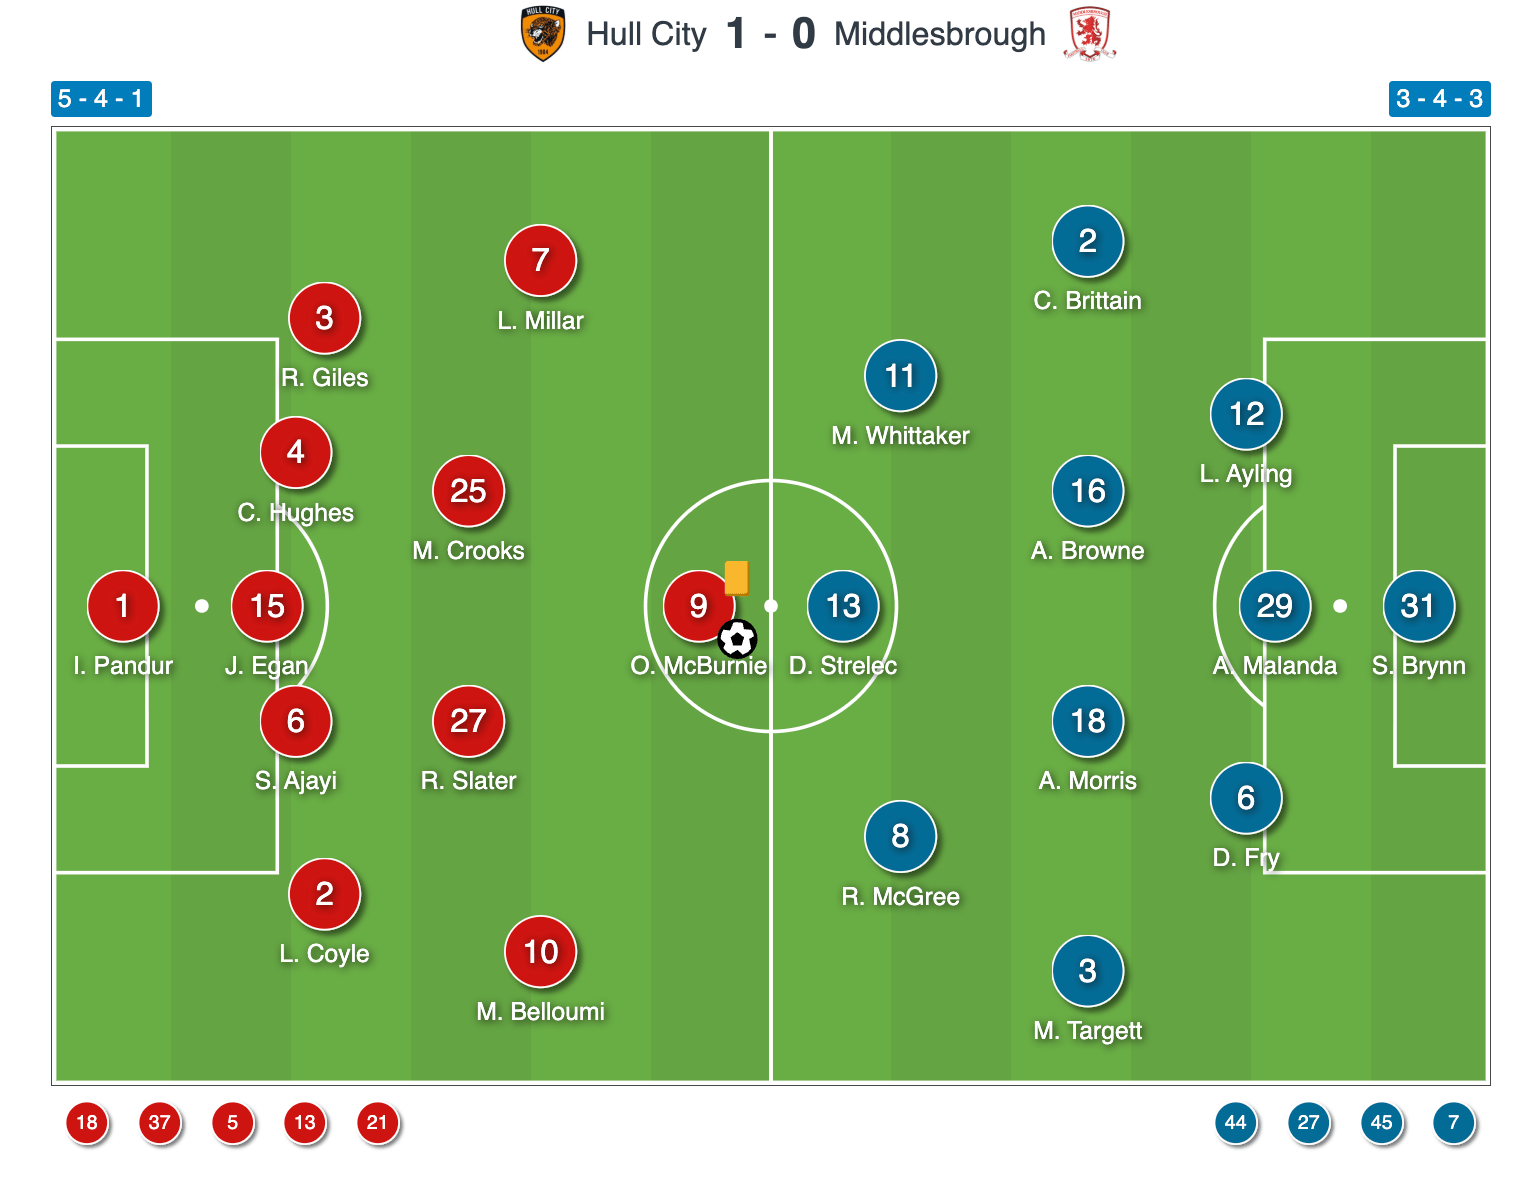
Hull City Lineup Vs Middlesbrough
Ivor Pandur started in goal for the Tigers behind Semi Ajayi, John Egan and Charlie Hughes from right to left centre-back.
Lewie Coyle and Ryan Giles lined up at right and left wing-back, respectively, with Regan Slater and Matt Crooks in central midfield.
Mohamed Belloumi and Liam Millar played key roles for Hull on the wings, outside Oli McBurnie at centre-forward.
Sergej Jakirović made five changes to his starting XI over the course of the match.
Three of those changes happened in regular time: Joe Gelhardt came on for Millar in the 63rd minute, before Cody Drameh and Yu Hirakawa replaced Belloumi and Giles in the 76th minute.
Hull made their final two changes in the seventh minute of added time, with John Lundstram and Paddy McNair replacing Regan Slater and Lewie Coyle.
Middlesbrough Lineup Vs Hull City
On the other side, Sol Brynn started in goal for Boro behind Luke Ayling, Dael Fry and Adilson Malanda as the centre-back trio.
Callum Britain and Matt Targett started at right and left wing-back, respectively, with Aidan Morris and Alan Browne in central midfield.
Morgan Whittaker and Riley McGree played on the wings, while David Strelec was Boro’s centre-forward.
Kim Hellberg made four substitutions during the match, two of which came in regular time.
Firstly, star midfielder Hayden Hackney was able to give his side 20 minutes off the bench, as he came on in the 70th minute for Strelec.
Six minutes after that, Sontje Hansen replaced McGree for the North-East club.
In the sixth minute of added time, Hellberg made his final two changes, bringing on Cruz Ibeh and Jeremy Sarmiento for Matt Targett and Alan Browne.
Hull City Out-Of-Possession Tactics
Figure 2 below shows an example of how Hull City appeared in the mid-block phase.
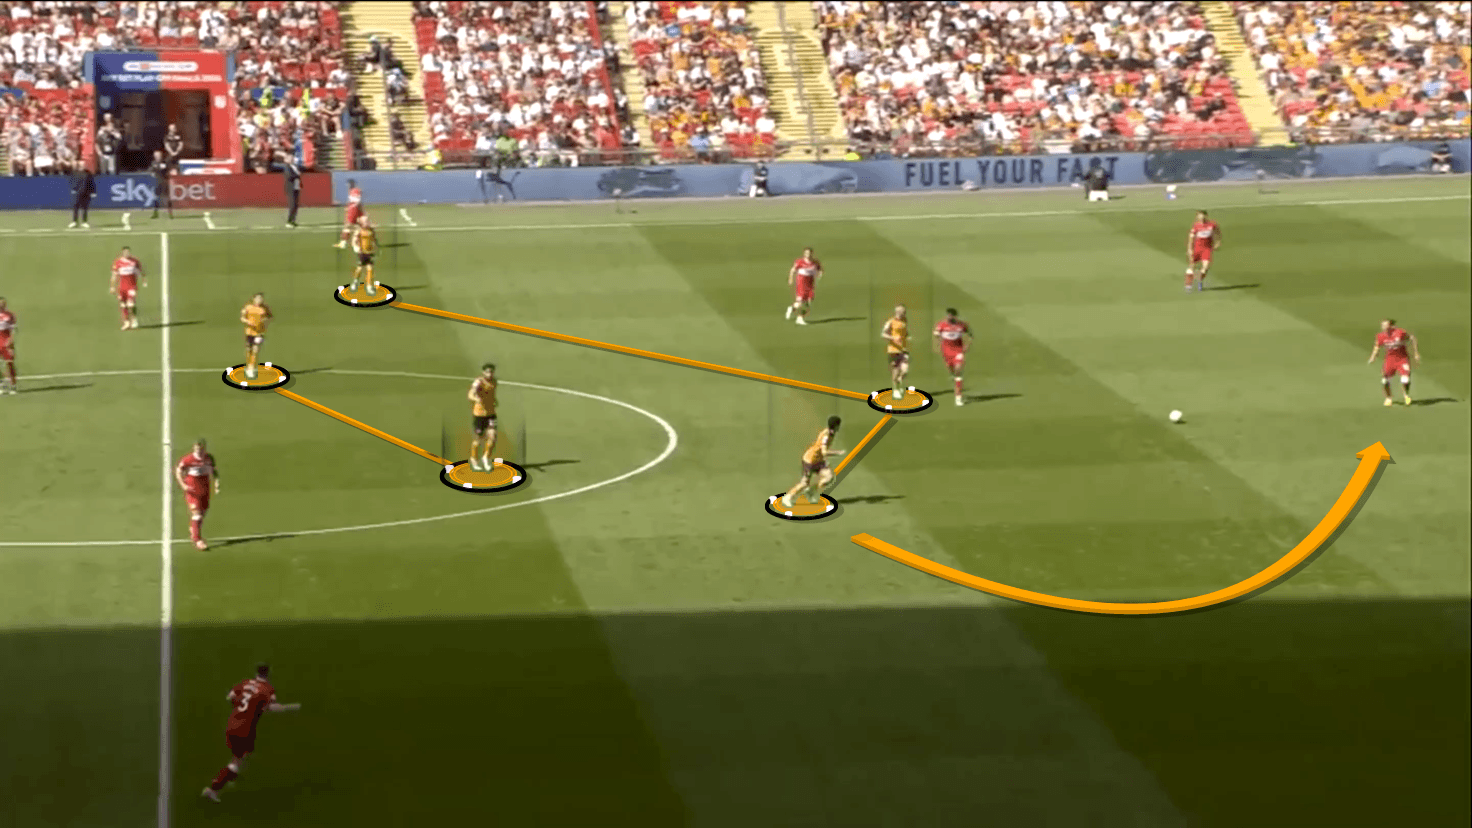
Hull were happy to allow Middlesbrough’s centre-backs to have the ball undisturbed, focusing on blocking or retaining access to the Boro midfielders in such situations.
If the ball moved to the wide centre-backs, the near Hull winger would close that player down with a bending run which kept the wing-back in his cover shadow, as we see Belloumi preparing to do in Figure 2.
In doing so, the centre-back on the ball feels pressure and has his easiest passing option removed or made more complicated.
The aim of bending the run to cut off that easy pass to the wing-back is to ultimately force the centre-back long or into the congested central areas.
Either of those situations could force a turnover and allow Hull to spring a counterattack.
Similarly, if the ball was played to the wing-back earlier, the winger would come out to close them down aggressively, with the rest of the Hull shape following.
This occurred just before Figure 2 on the opposite wing, and this is why we find Millar so wide on the left wing in the image.
Thanks to Millar’s pressure and the support from the rest of Hull’s defensive block, Boro were forced backwards.
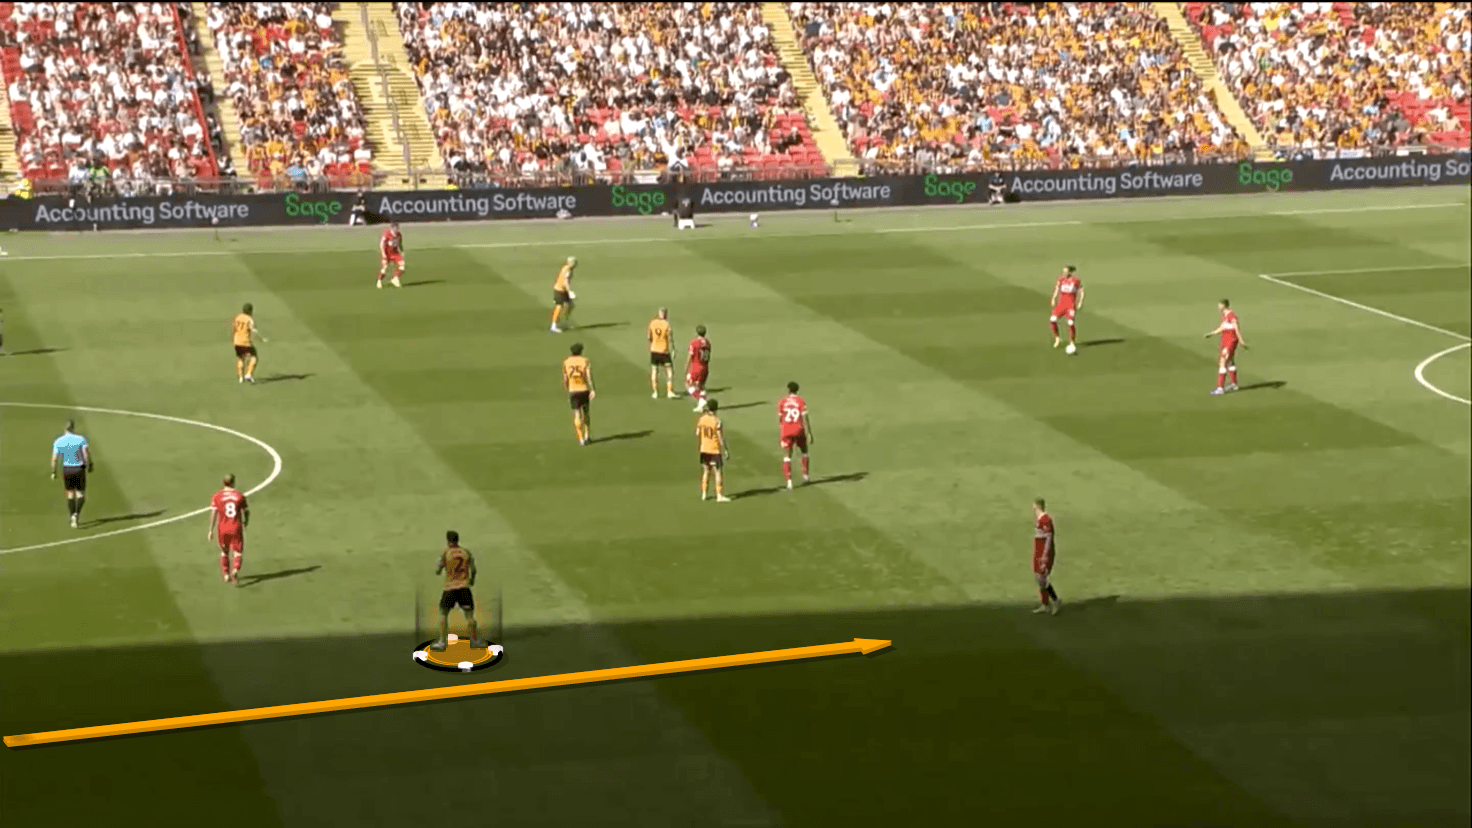
At times, Hull’s wing-back would also come forward aggressively to close down the Middlesbrough wing-back on their side to keep that easy passing option cut off.
Above, we see Belloumi occupied by Boro centre-back Malanda in central midfield, preventing the winger from jumping out to the wing-back if necessary.
Coyle supports the press by advancing to gain access to the wing-back himself, keeping that passing option unattractive for Luke Ayling in possession at right centre-back for Boro in Figure 3.
If they’d been able to progress easily through the wing-backs, Boro could’ve punished Hull’s 5-2-3 defensive shape because of how tight the central midfielders and the front three got to one another in the mid-block.
![Croatia Vs Spain [1-2] UEFA Nations League 2026/2027: How Slaven Bilić High Pressing Tactics Troubled Spain - Tactical Analysis](https://cdn.mymidnight.blog/77f959f119f4fb2321e9ce801e2f5163/size/w600/2026/10/Croatia-Vs-Spain--1-2--UEFA-Nations-League-20262027---Tactical-Analysis.png)

![Scotland Vs Switzerland [0-3] UEFA Nations League 2026/2027: How Aggressive Pressing Backfired & Murat Yakin Took Advantage - Tactical Analysis](https://cdn.mymidnight.blog/77f959f119f4fb2321e9ce801e2f5163/size/w600/2026/10/Scotland-Vs-Switzerland-20262027---Tactical-Analysis.png)
![Olympique De Marseille Vs PSG [1-2] Ligue 1 2026/2027: How Bruno Génésio Transitions Troubled PSG - Tactical Analysis](https://cdn.mymidnight.blog/77f959f119f4fb2321e9ce801e2f5163/size/w600/2026/09/Marseille-Vs-PSG-2026_2027---Tactical-Analysis.png)
![Fulham Vs Manchester United [1-1] Premier League 2026/2027: How Álvaro Arbeloa Tactics Exposed The Red Devils' Problems - Tactical Analysis](https://cdn.mymidnight.blog/77f959f119f4fb2321e9ce801e2f5163/size/w600/2026/09/Fulham-FC-Vs-Man-United-2026_2027---Tactical-Analysis.png)
![AS Roma Vs Inter Milan [2-2] Serie A 2026/2027: When Undefeated Giallorossi Attack Met Nerazzurri Comeback Resilience - Tactical Analysis](https://cdn.mymidnight.blog/77f959f119f4fb2321e9ce801e2f5163/size/w600/2026/09/AS-Roma-Vs-Inter-Milan-2026_2027---Tactical-Analysis.png)
![Real Sociedad Vs Bournemouth [1-2] Europa League 2026/2027: How Do Marco Rose Pressing Tactics Work? - Tactical Analysis](https://cdn.mymidnight.blog/77f959f119f4fb2321e9ce801e2f5163/size/w600/2026/09/Real-Sociedad-Vs-Bournemouth-20262027---Tactical-Analysis-1.png)
![AC Milan Vs Benfica [0-2] Europa League 2026/2027: How Marco Silva Tactics Exposed Rúben Amorim Defensive Problems - Tactical Analysis](https://cdn.mymidnight.blog/77f959f119f4fb2321e9ce801e2f5163/size/w600/2026/09/AC-Milan-Vs-Benfica-20262027---Tactical-Analysis.png)