![Brighton & Hove Albion Vs Aston Villa [4-0] Premier League 2026/2027: Fabian Hürzeler’s Asymmetric Attack – Tactical Analysis](https://cdn.mymidnight.blog/77f959f119f4fb2321e9ce801e2f5163/size/w1000/2026/08/Brighton-Vs-Aston-Villa-2026_2027---Tactical-Analysis.png)
Brighton & Hove Albion Vs Aston Villa [4-0] Premier League 2026/2027: Fabian Hürzeler’s Asymmetric Attack – Tactical Analysis
Brighton dismantled Aston Villa 4-0 at the Amex. This Tactical Analysis examines Hürzeler’s asymmetry, pressing structure and left-sided overloads, while explaining why Villa’s flat midfield and lack of final-third presence failed.

The opening weekend of the season is always a strange time.
Fitness is uneven, and the squad you finished last season with is not the squad with which you start this one.
Aston Villa arrived at the Amex, having lost a spine.
Morgan Rogers and Youri Tielemans? Gone.
Ezri Konsa and Lucas Digne? Gone.
Emiliano Martínez? Absent and angling for the exit.
Ollie Watkins? Omitted amid Saudi interest.
Unai Emery could point to the arrivals of João Gomes and Johan Manzambi as intelligent reinvestment, though Manzambi was already unavailable and Gomes was about to have the worst ninety minutes of his career.
Brighton were hardly untouched themselves.
Jan Paul van Hecke had gone, and Carlos Baleba had just been sold to Manchester United, while attackers Evan Ferguson and Yankuba Minteh were unavailable, with Luka Vušković and others arriving to fill the gaps.
That symmetry matters because it is the thing that turns "Villa were dreadful" into "Brighton were excellent".
Both sides were depleted and had sold a key midfielder.
One produced 3.4 open-play xG, the highest figure Brighton have recorded in a Premier League match since 2021/2022, and 21 shots.
The other produced 0.31 xG, no shots on target, and five touches in the opposition box across the entire game, only two of them before the red card.
Bart Verbruggen was not required to make a single save.
This Brighton versus Aston Villa tactical analysis breaks down how the match was won, the formations both sides chose, the patterns that emerged from them, and the performances of two players in particular: Jack Hinshelwood and Emiliano Buendía.
Brighton Vs Aston Villa Lineups & Formations
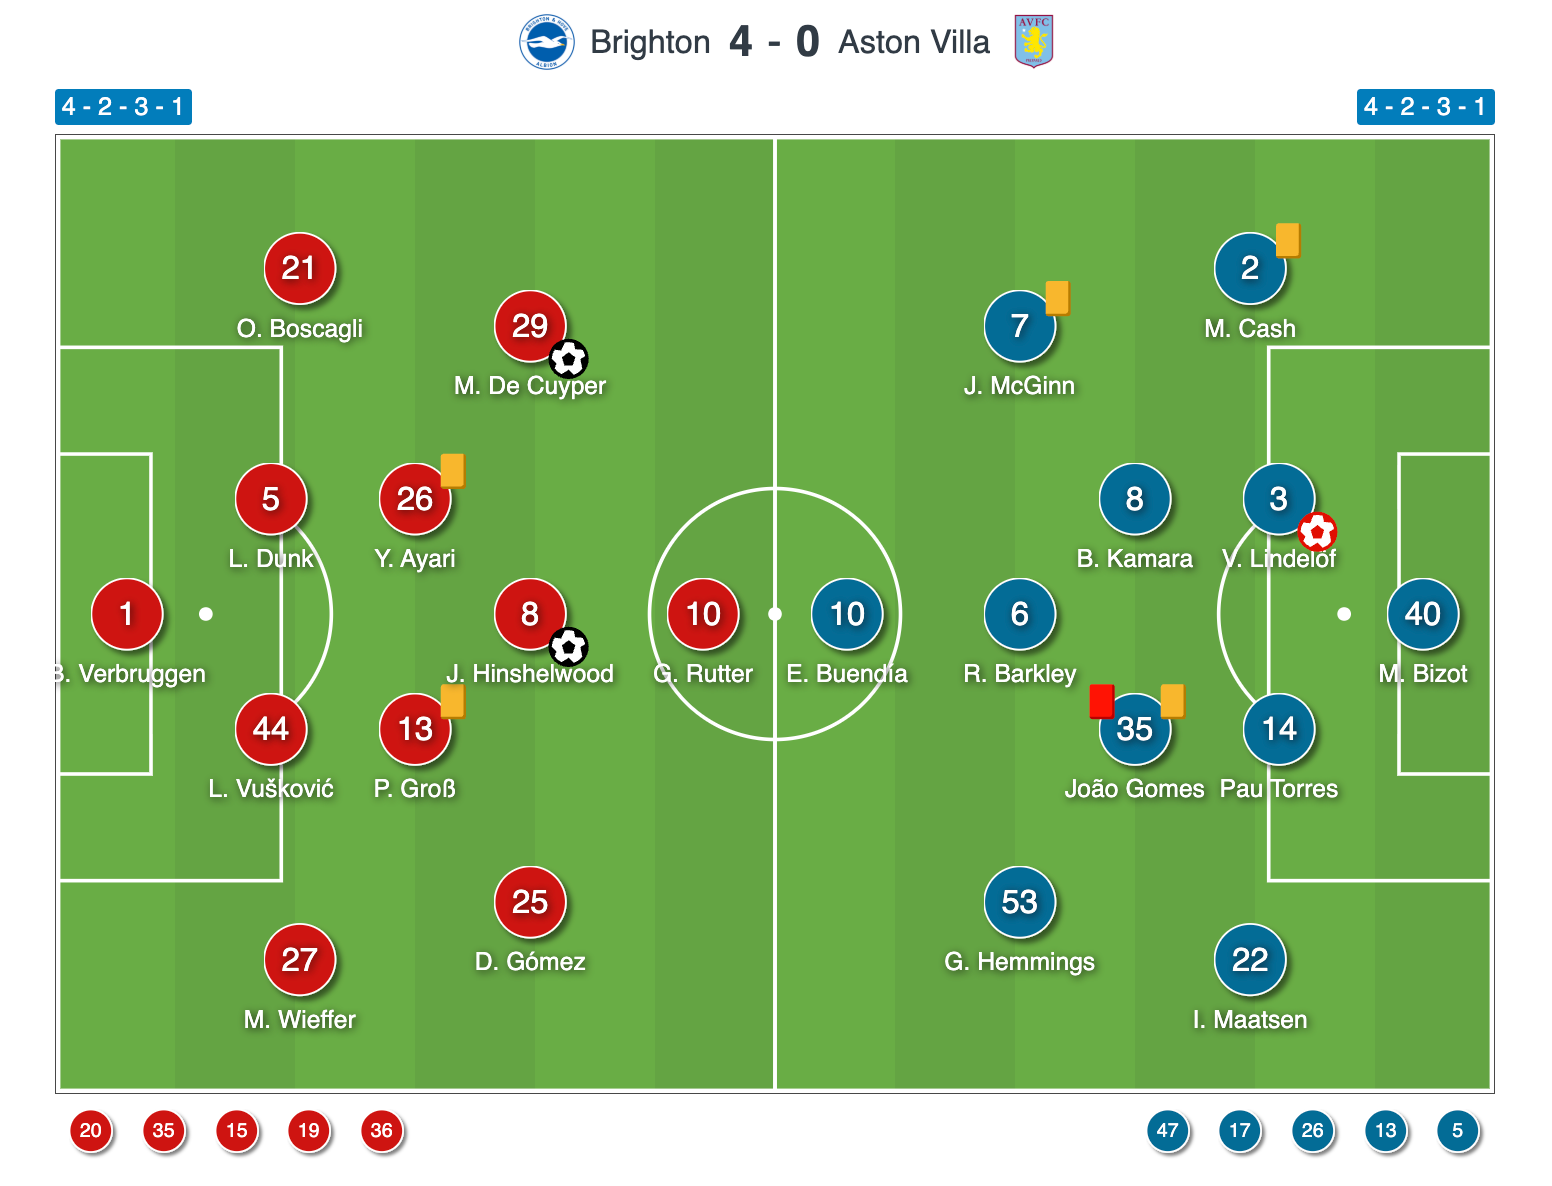
Brighton Lineup Vs Aston Villa
Brighton lined up in a 4-2-3-1 shape with Bart Verbruggen in goal behind a back four consisting of Mats Wieffer, Luka Vušković, Lewis Dunk and Olivier Boscagli from right to left.
Pascal Groß and Yasin Ayari played in central midfield, behind the trio of Diego Gómez, Jack Hinshelwood and Maxim De Cuyper, with Georginio Rutter up front.
Aston Villa Lineup Vs Brighton
Villa, meanwhile, lined up in what was, functionally, a 4-3-3 with no centre-forward.
Marco Bizot started in goal with Matty Cash, Victor Lindelöf, Pau Torres and Ian Maatsen making up the back four from right to left.
Boubacar Kamara, Ross Barkley and João Gomes played in midfield, with John McGinn and George Hemmings on the wings, with Buendía leading the line as a makeshift nine.
The two team sheets contain the same idea inverted.
Brighton took a full-back and pushed him forward into more space, while Villa took a No. 10 and pushed him forward into less.
Brighton Asymmetry Vs Aston Villa Flat Three
Brighton's shape was lopsided on purpose.
The left was the attacking side, and Maxim De Cuyper, a natural left-back, played as the left forward.
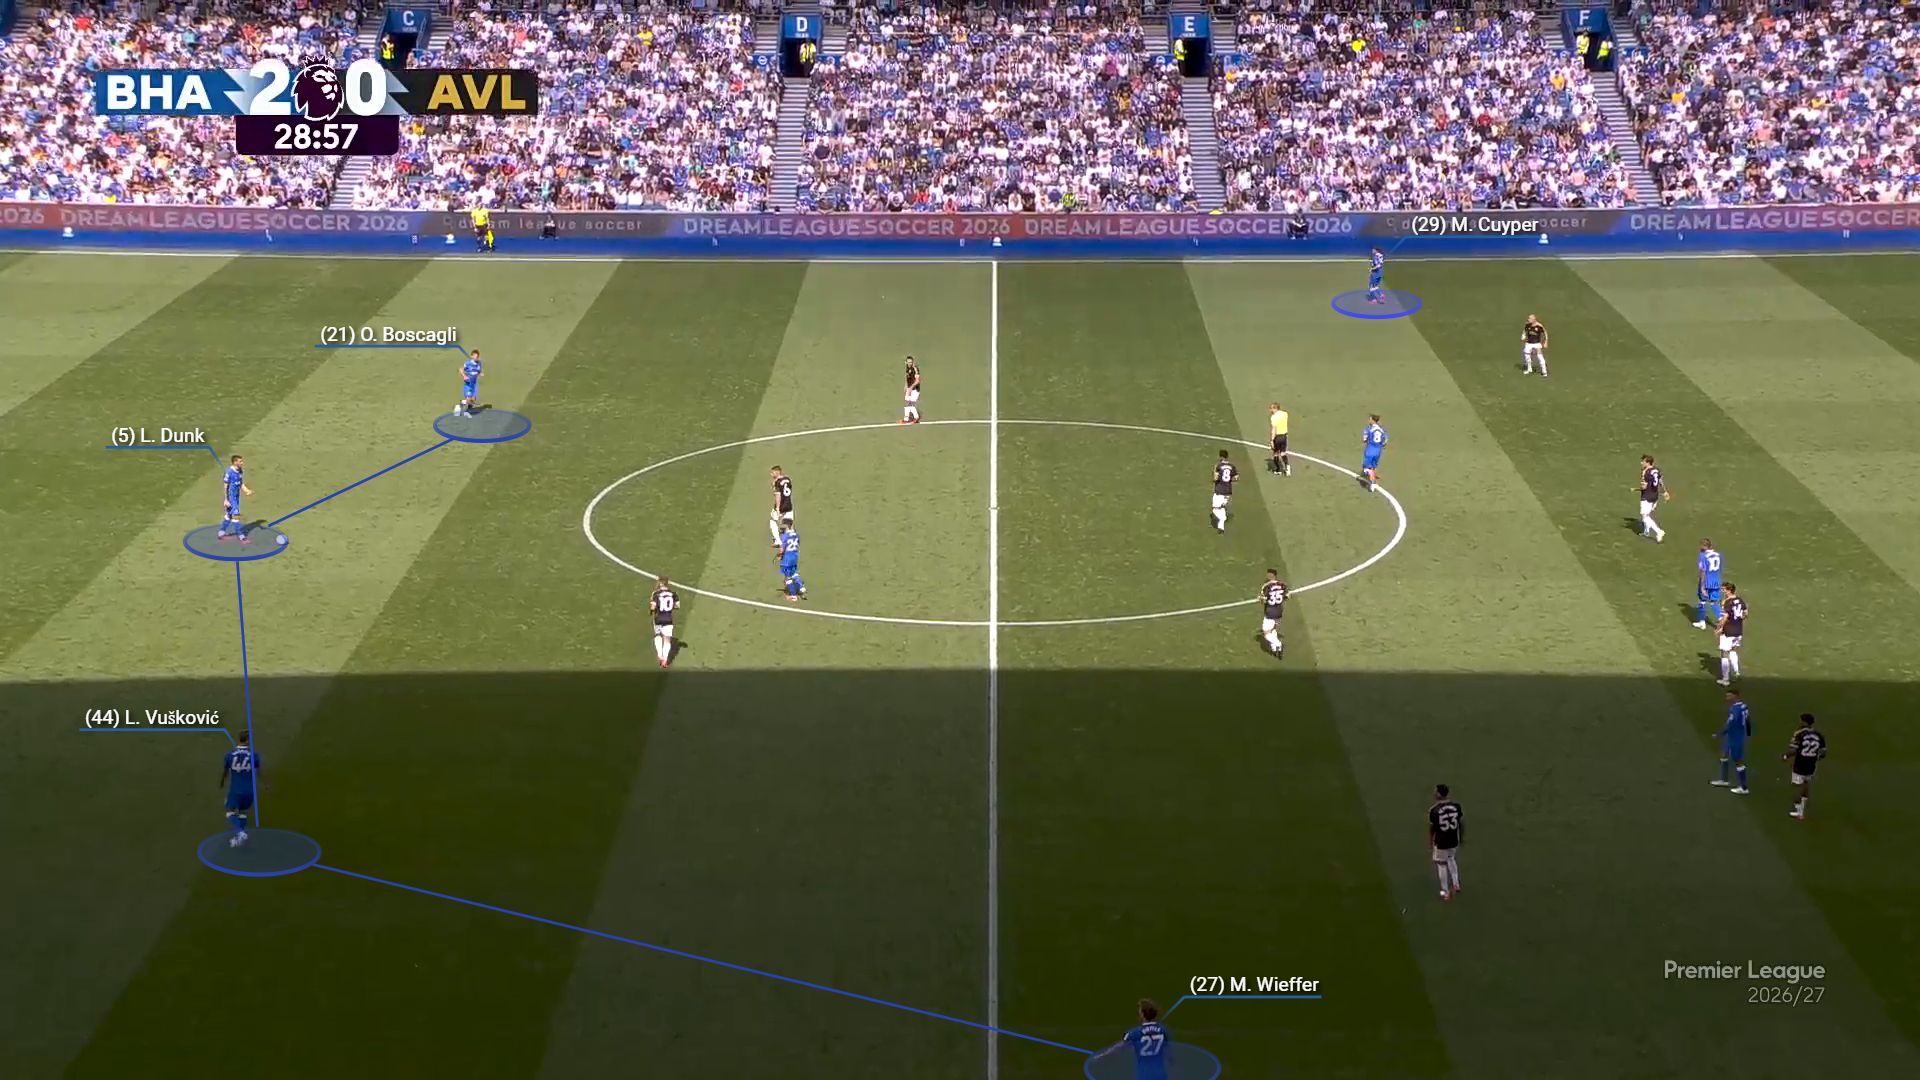
Behind him, Olivier Boscagli, a natural centre-back, played at left-back.
Boscagli was solid defensively, and that allowed De Cuyper to fully concentrate on attacking duties.
The right was more about control.
Mats Wieffer played right-back, with Diego Gómez ahead of him in the half-space, and this was a similar position to the one Jack Hinshelwood took up on the left side.
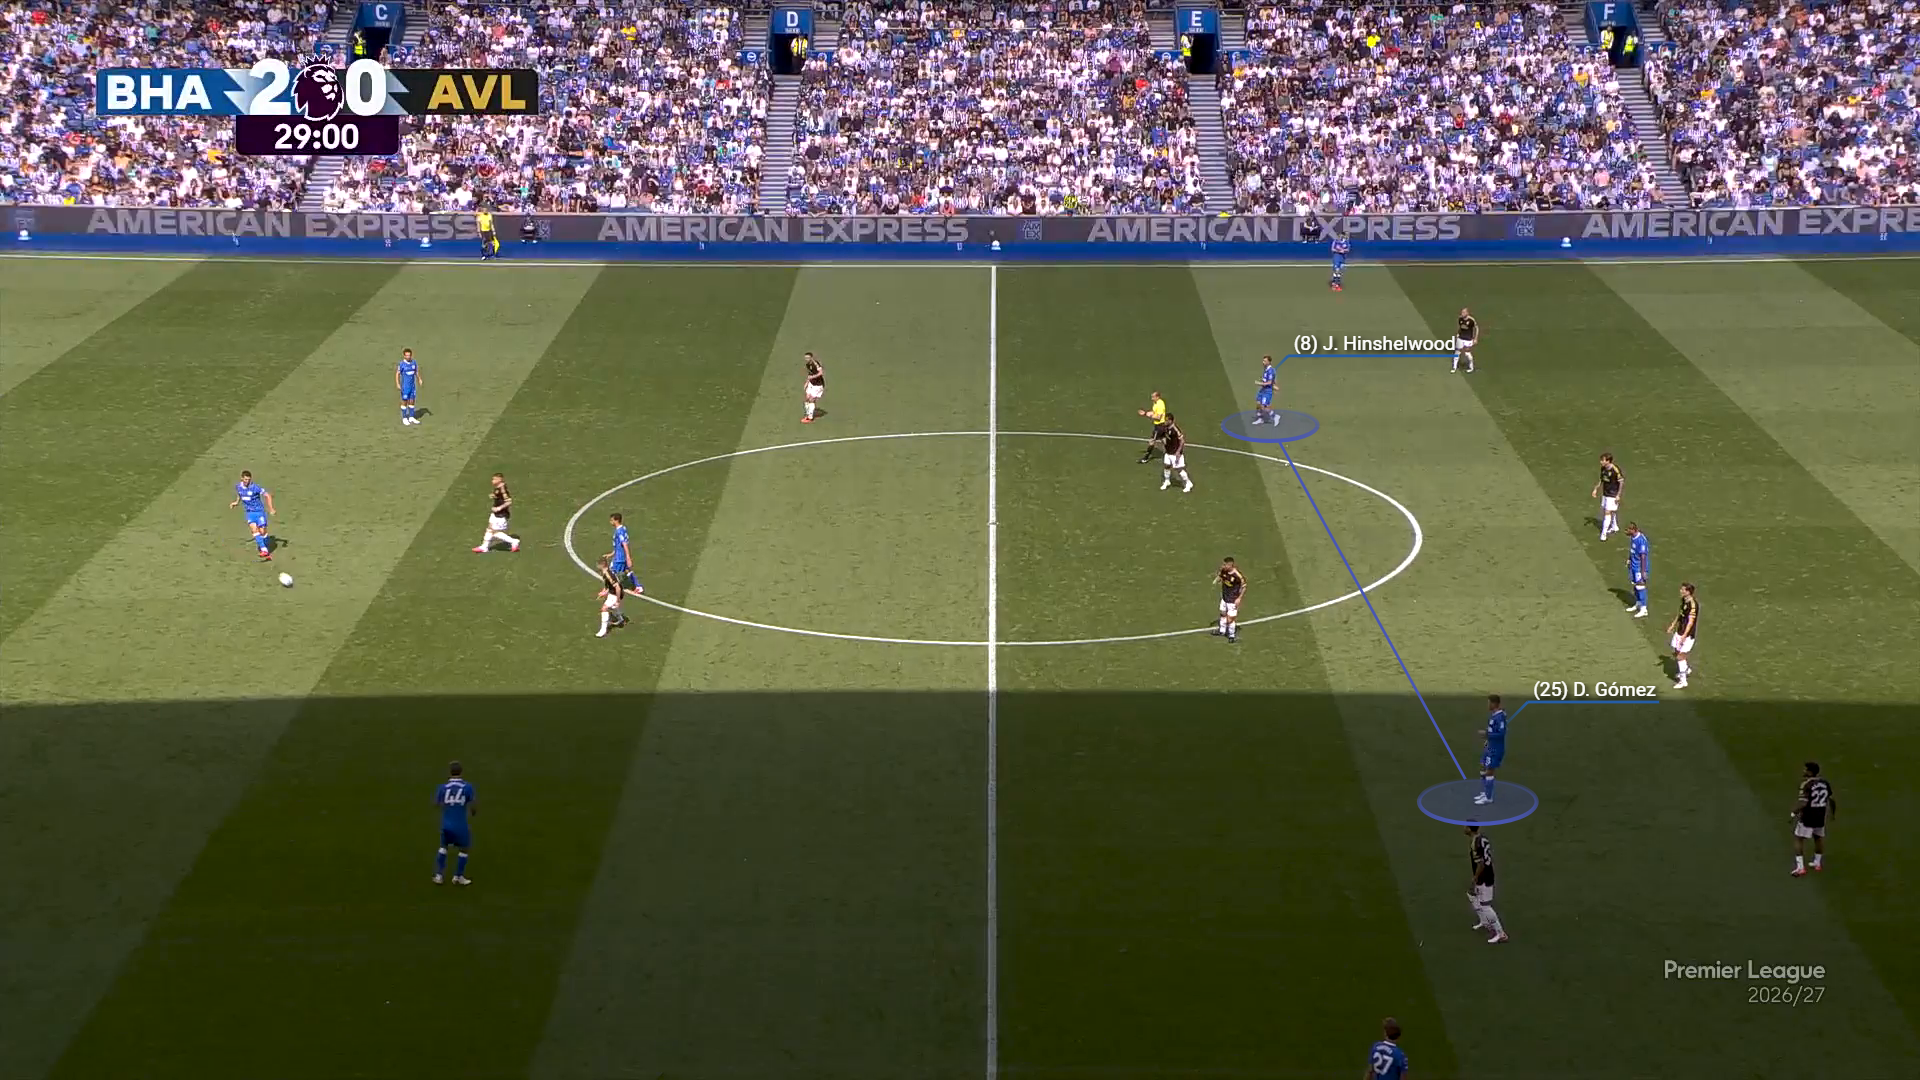
Brighton are working the ball on the far left while Gómez (25) and Hinshelwood (8) hold positions on the opposite side, already beyond the halfway line and on the blind side of a Villa block that has shifted ball-side.
Gómez stays high and wide to pin the full-back and stretch the back line to full width, making himself an isolated 1v1 target for a switch of play, while Hinshelwood occupies the half-space seam between Villa's midfield and defence as the line-breaking receiver who can turn that switch into penetration.
Because they sit in two different channels at two different depths, one defender can't cover both, so Villa are dragged into a horizontally over-stretched shape.
Their back four becomes a back three plus an isolated full-back; a midfielder must either drop and pull his line back or leave the pass into Hinshelwood on, and the gap between full-back and centre-back opens up.
It also disarms the press in the sense that Villa can't commit numbers to the ball carrier on the left, knowing the switch punishes them instantly.
So Brighton gain time and space in build-up through positioning, with the only trade-off being their own rest-defence if the ball is turned over.
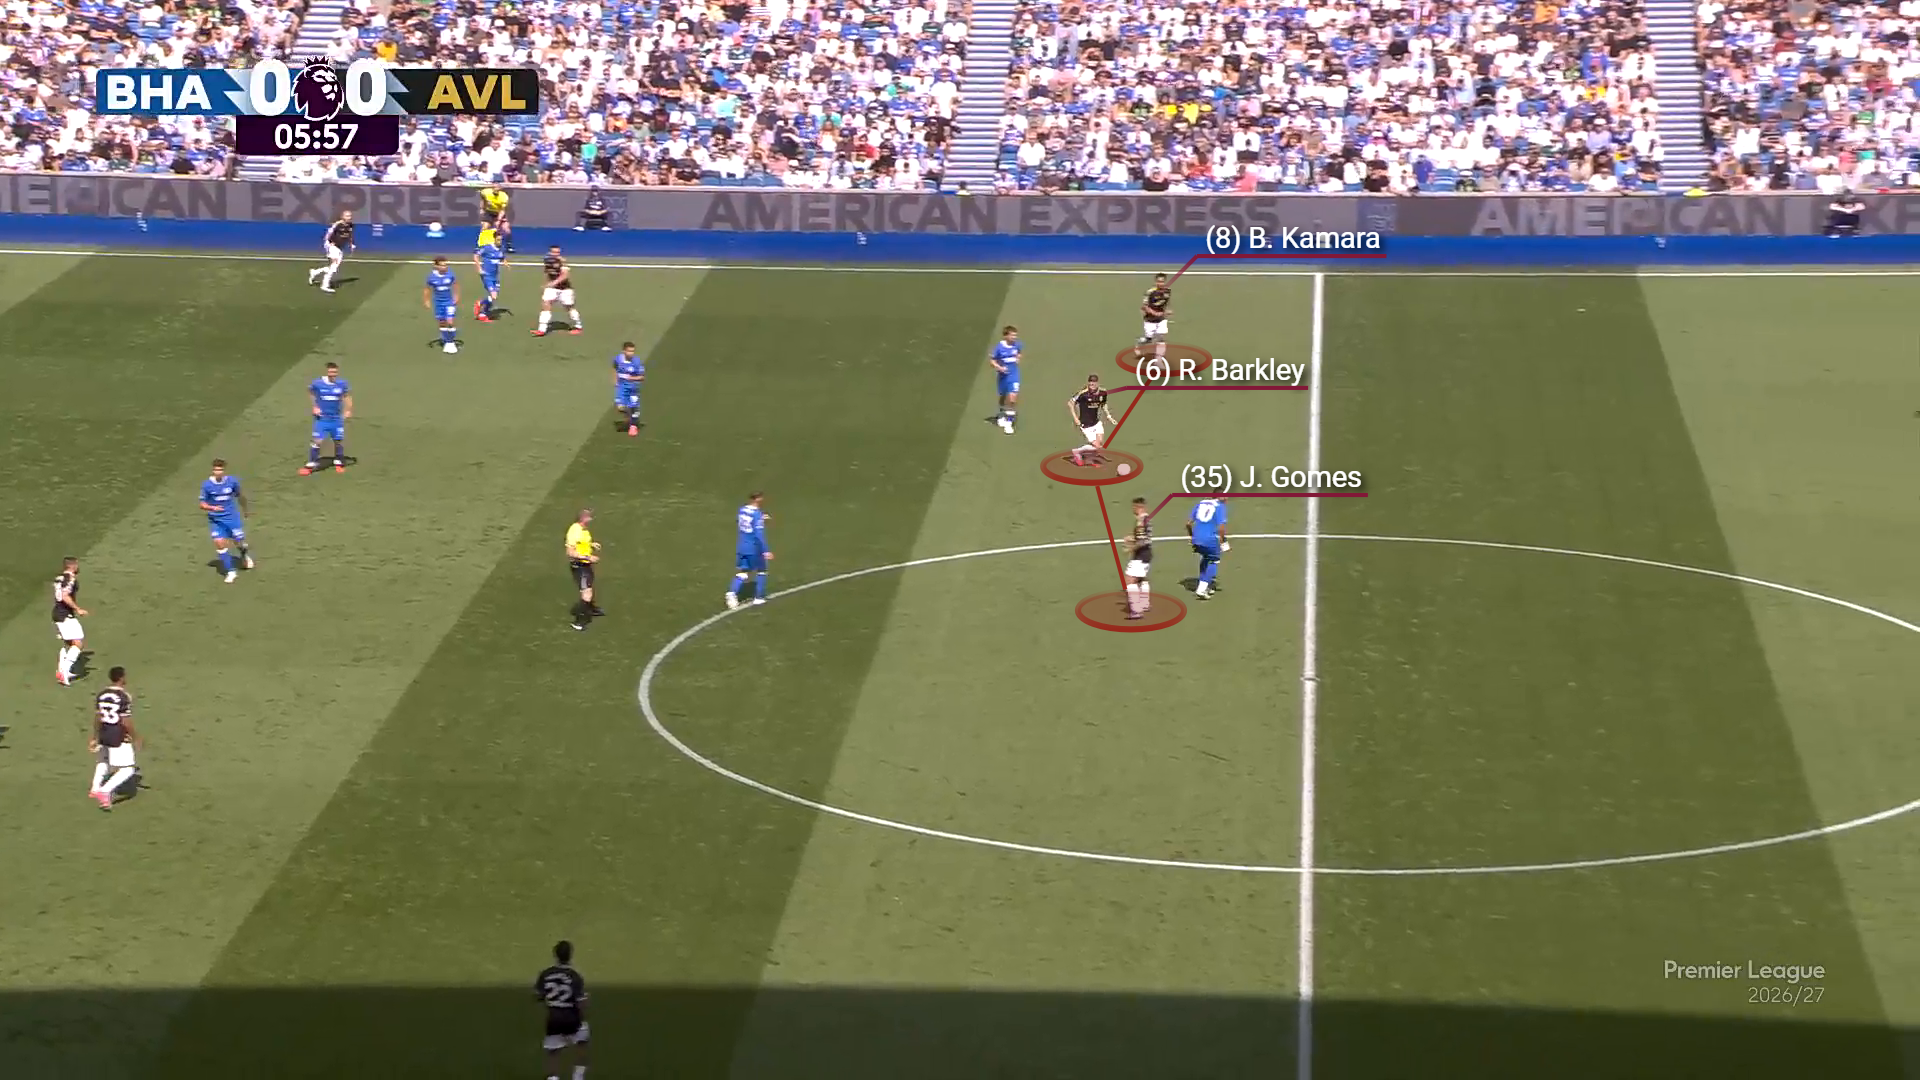
Villa, meanwhile, fielded three central midfielders against Pascal Groß and Yasin Ayari, which reads as a 3v2 overload, yet produced nothing.
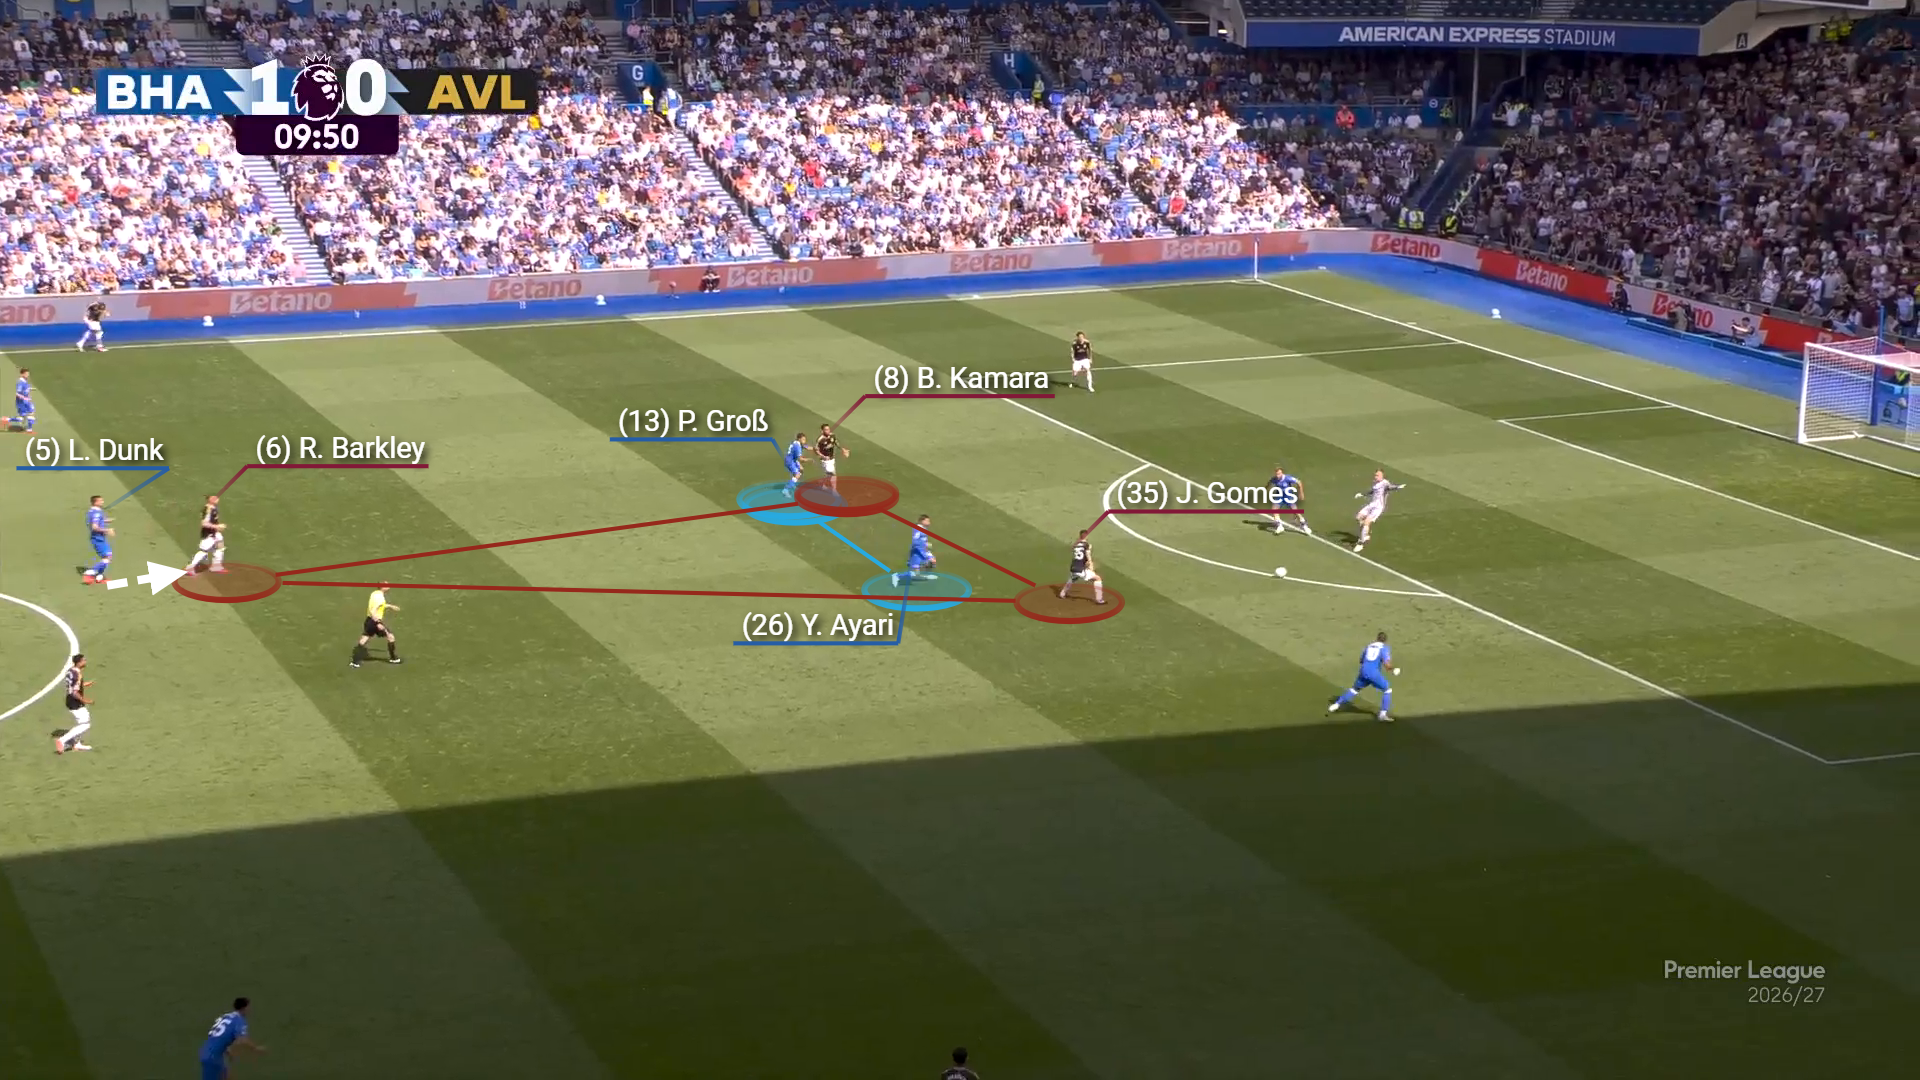
In this moment, Groß and Ayari are a two-man midfield screen trying to control Villa’s three central options, and Barkley being higher is what creates the stress.
With Gomes and Kamara deeper, they can circulate and draw one of Groß or Ayari toward the ball, while Barkley stays between the lines as the free receiver on the half turn, so Brighton’s midfield cannot both protect the pivot access and also block the forward pass into Barkley.
If Barkley receives, he can immediately play the next action into the channel or combine for a third-man run.
This forces Lewis Dunk into a difficult choice: step out to engage Barkley and risk opening the space behind him for runs in the inside channel, or hold the line and allow Barkley time to turn.
The implication is that Barkley’s advanced starting position pins Brighton’s midfield deeper and increases the likelihood that Dunk is pulled out of the backline or Brighton concede controlled progression into the zone in front of their centre-backs.
Brighton covered it structurally, with Georginio Rutter pressing the ball-side centre-back on a curved approach, alongside Hinshelwood, who would do this while shadowing the deepest Villa pivot as a free man from the eight slot.
Gómez and De Cuyper would be responsible for pinching in to seal the half-spaces, turning a nominal two into a functional three or four in the pressing phase.
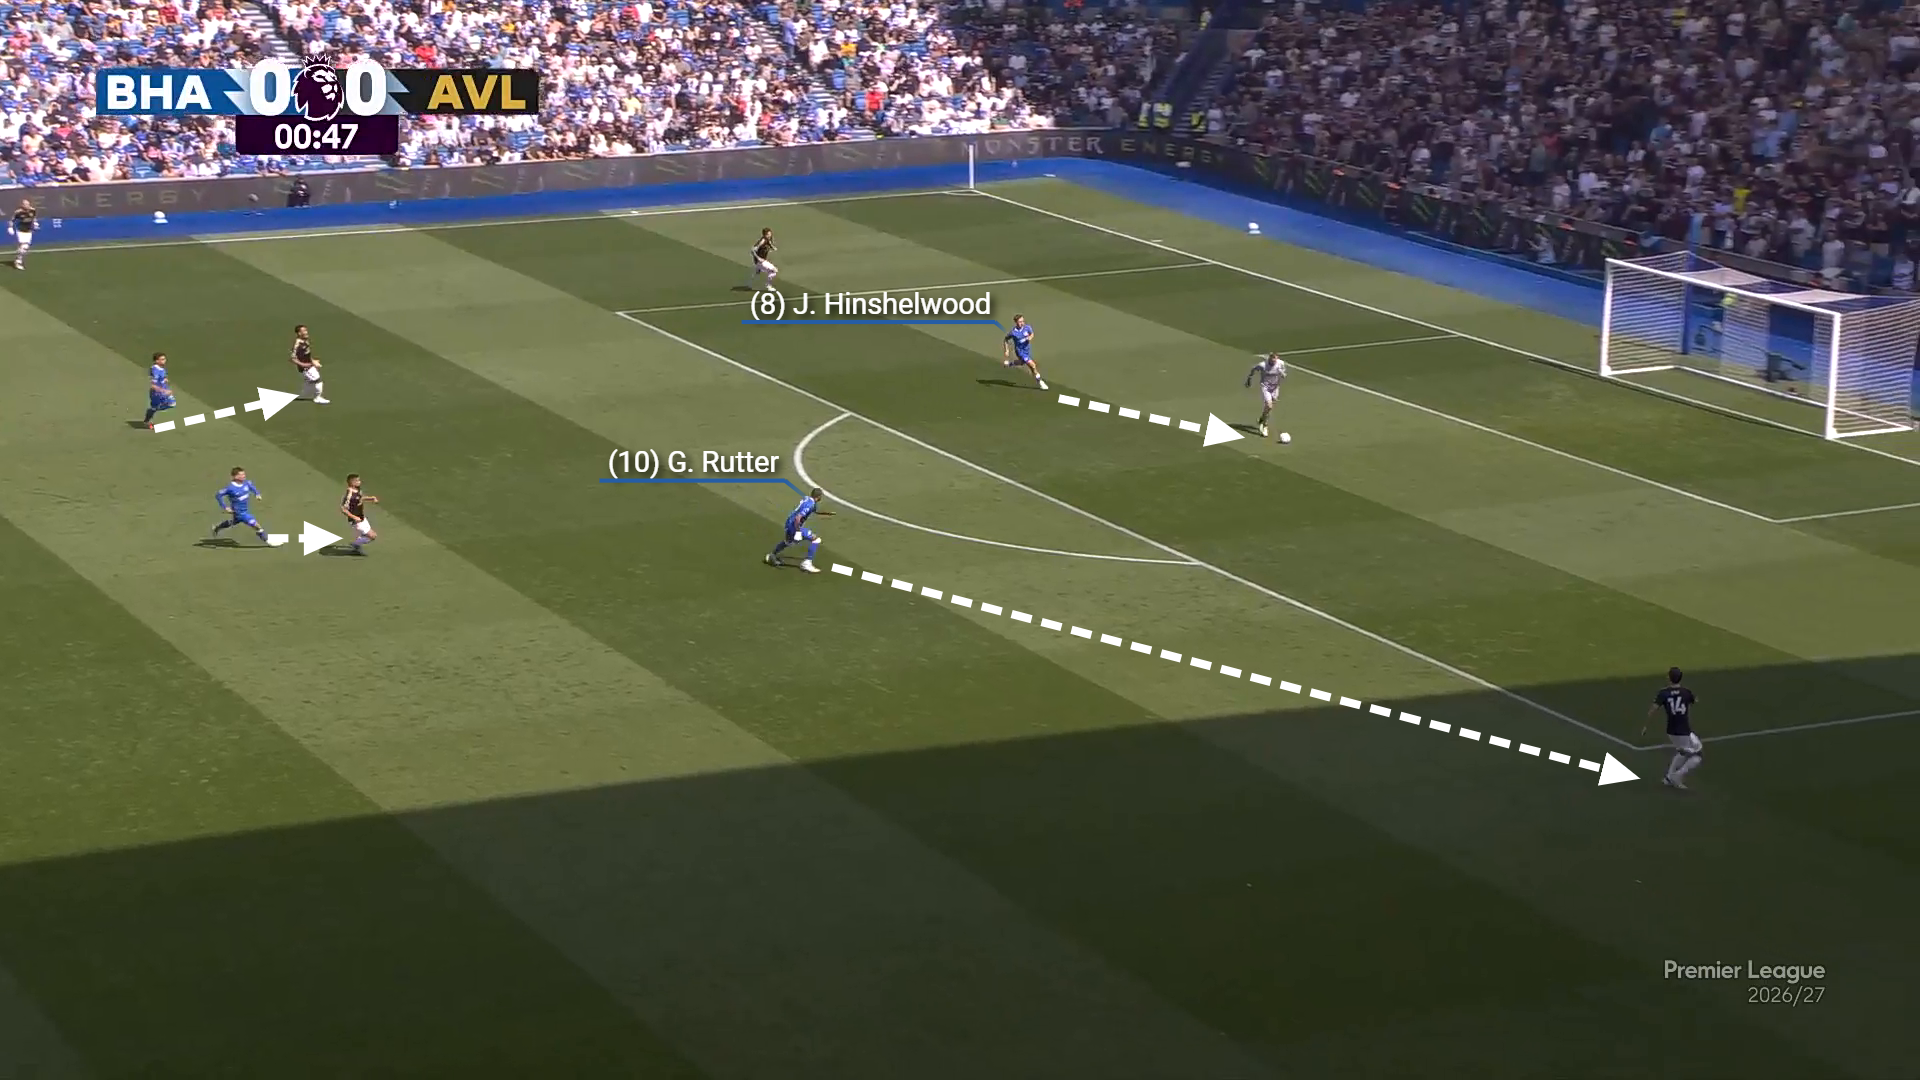
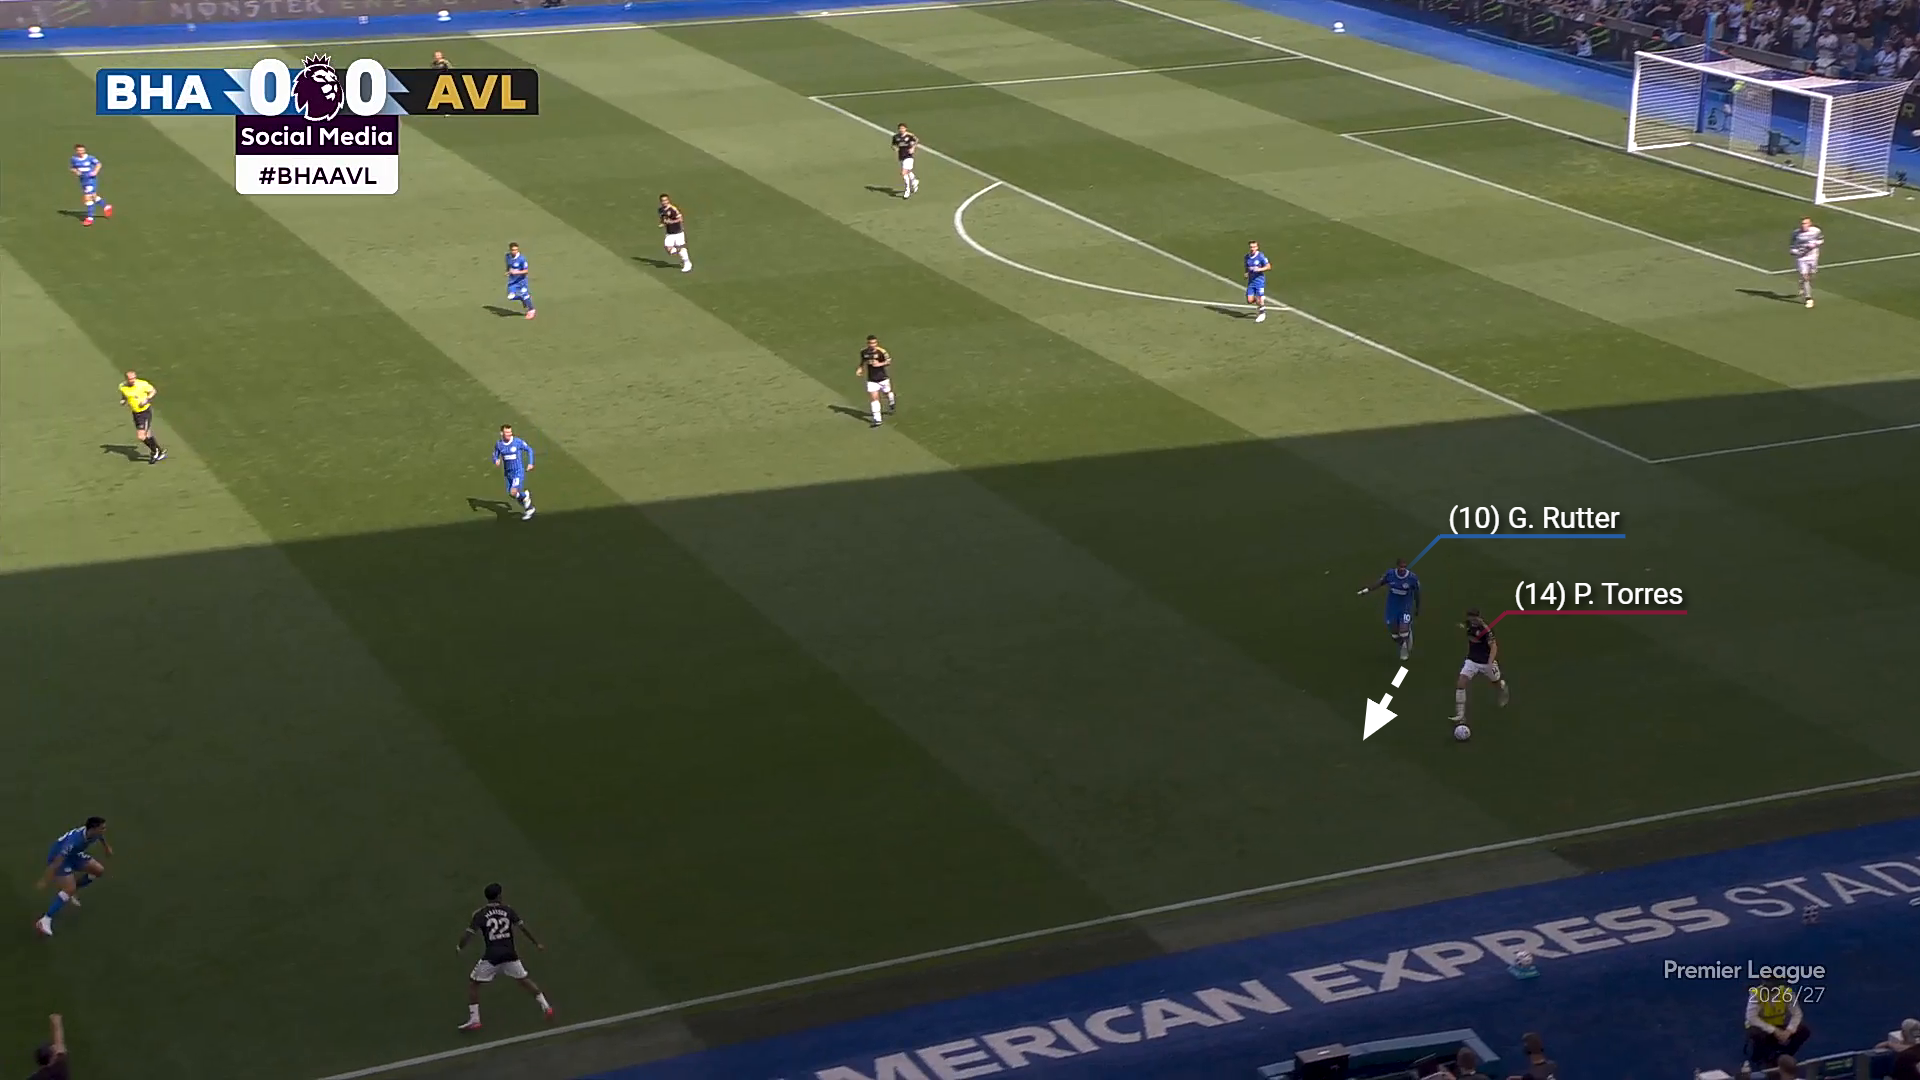
In this phase, Brighton’s press is coordinated through Rutter and Hinshelwood to force Villa into predictable, low-value exits.
Rutter’s approach is to press with a curved run and cover shadow to screen the central passing lane into midfield, which discourages progression through the middle and funnels possession toward the touchline or back to the goalkeeper/centre-back.
Hinshelwood then steps up as the second wave to compress the space behind Rutter, locking the nearby half-space and removing the easy bounce pass that would let Villa reset and play out.
Together, they increase pressure on the ball while protecting central zones, making Villa more likely to go long or play into a pressured wide area where Brighton can contest second balls and regain higher up the pitch.
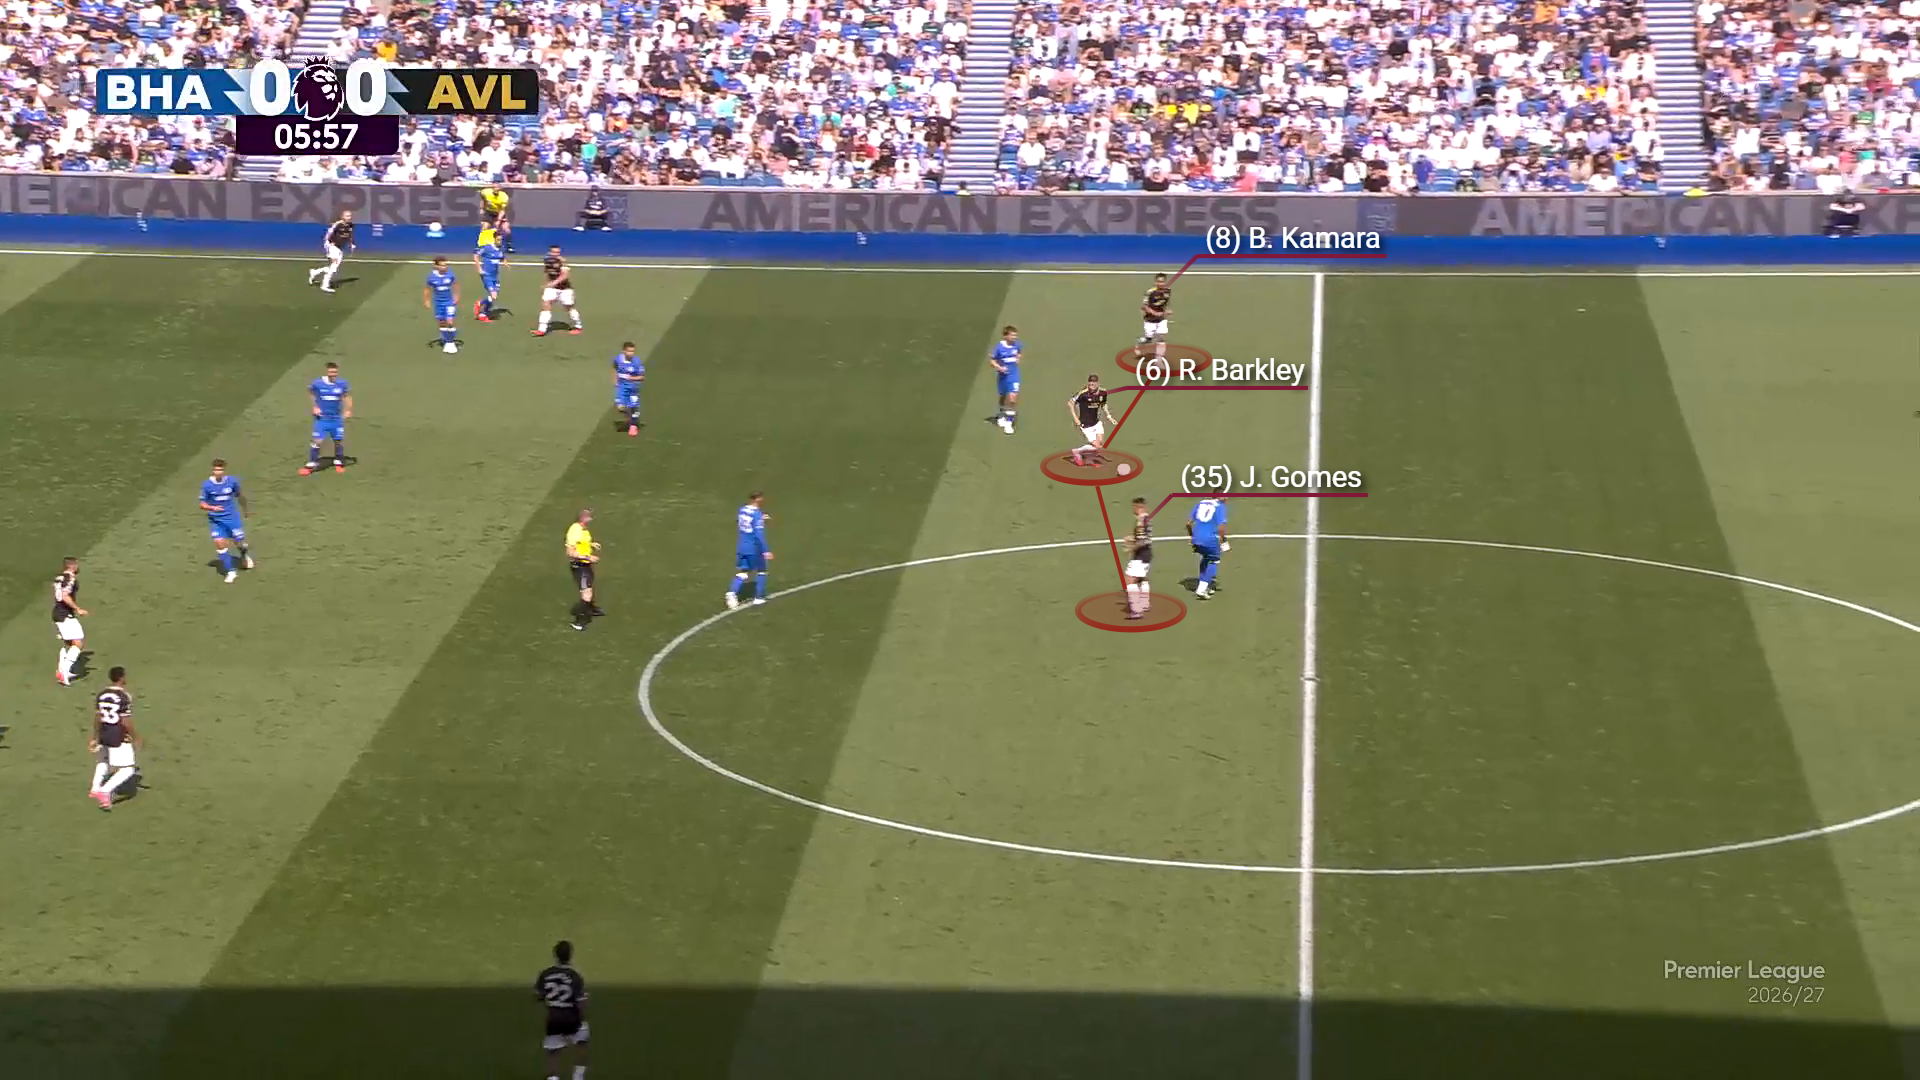
More fundamentally, Villa's extra man was behind the ball.
Numerical superiority in your own half is only worth something if it converts into progression, and progression requires a presence further forward.
Boubacar Kamara, Ross Barkley and Gomes are all ball-oriented, and none stretch the zone they intended to play into.
![Borussia Dortmund Vs Werder Bremen [2-2] Bundesliga 2026/2027: How Daniel Thioune Tactics Earned A Late Comeback With 29% Possession - Tactical Analysis](https://cdn.mymidnight.blog/77f959f119f4fb2321e9ce801e2f5163/size/w600/2026/10/Borussia-Dortmund-vs-Werder-Bremen---Tactical-Analysis.png)


![Scotland Vs Switzerland [0-3] UEFA Nations League 2026/2027: How Aggressive Pressing Backfired & Murat Yakin Took Advantage - Tactical Analysis](https://cdn.mymidnight.blog/77f959f119f4fb2321e9ce801e2f5163/size/w600/2026/10/Scotland-Vs-Switzerland-20262027---Tactical-Analysis.png)