
How To Coach Man-Marking And Zonal Marking Like Diego Simeone - Tactical Theory
What is the difference between man-marking and zonal marking? This tactical theory explains the main defensive systems, their strengths and weaknesses, and how modern teams combine both approaches through flexible and mixed marking structures.

With football tactics constantly evolving and defensive systems becoming increasingly structured and organised, any football fan needs to understand the basics of football defending.
Defending is applying pressure, both as a player and as a whole team, on the opponent to prevent him from progressing forward to your own goal.
A team can mark and press every player, but there will be no room for error: when the marker is passed, the team is immediately outnumbered.
Then you can defend zonally, but you can't let the opposition have all the time they want on the ball either.
So, depending on the current circumstances, any team can apply many defensive tactics for any particular match.
Football teams in the modern era defend as a unit, and every player has a particular defensive task in every game.
It is the coach's job to convey his message to the players about how to defend as a team and as individuals.
Generally speaking, there are two types of marking opposition players in football: man-marking and zonal marking.
In this tactical theory piece, I will compare them to some of the most well-known variations used by teams in the past and modern football.
Moreover, I will look into some mixed systems that can use both man and zonal-marking when defending.
What Is Man-Marking?
Strict man-marking is the most basic form of defence, in which each player has a marker assigned to control and track their movements during the game.
This method of defending was widely popular from the beginning of association football until the second half of the twentieth century.
It can still be applied to corners and generally to set-pieces, and in certain situations when a player or a group of players are man-marking the opposition, not a team.
Defending by strictly man-marking every player has its advantages.
For example, it is very easy for a coach to communicate this idea to his players, and it is a simple task for players to execute compared to other defensive systems, where you have to control a handful of other variables.
However, this system reveals its flaws when the opposing team exploits it with simple positional rotations.
It wreaks havoc on the entire defensive system because the player whose marker has left his position faces the dilemma of whether to follow his marker.
If he does, he will leave a gap in the defensive line where he is playing.
The opposition team gets one free man to pass to and intensifies their attack if he doesn't.
The basic examples include the number 9 dropping into the midfield and wingers cutting inside to drag the opposition full-backs with them, thus allowing their full-backs to exploit the space.
Flexible man-marking can be used to stop the opposition from taking advantage of this rigid structure.
The point is that when the opposition player tries to enter the new zone, the player tracking him doesn't always follow him.
When the opponent leaves that player's zone, he is handed over to the defender whose zone he has entered.
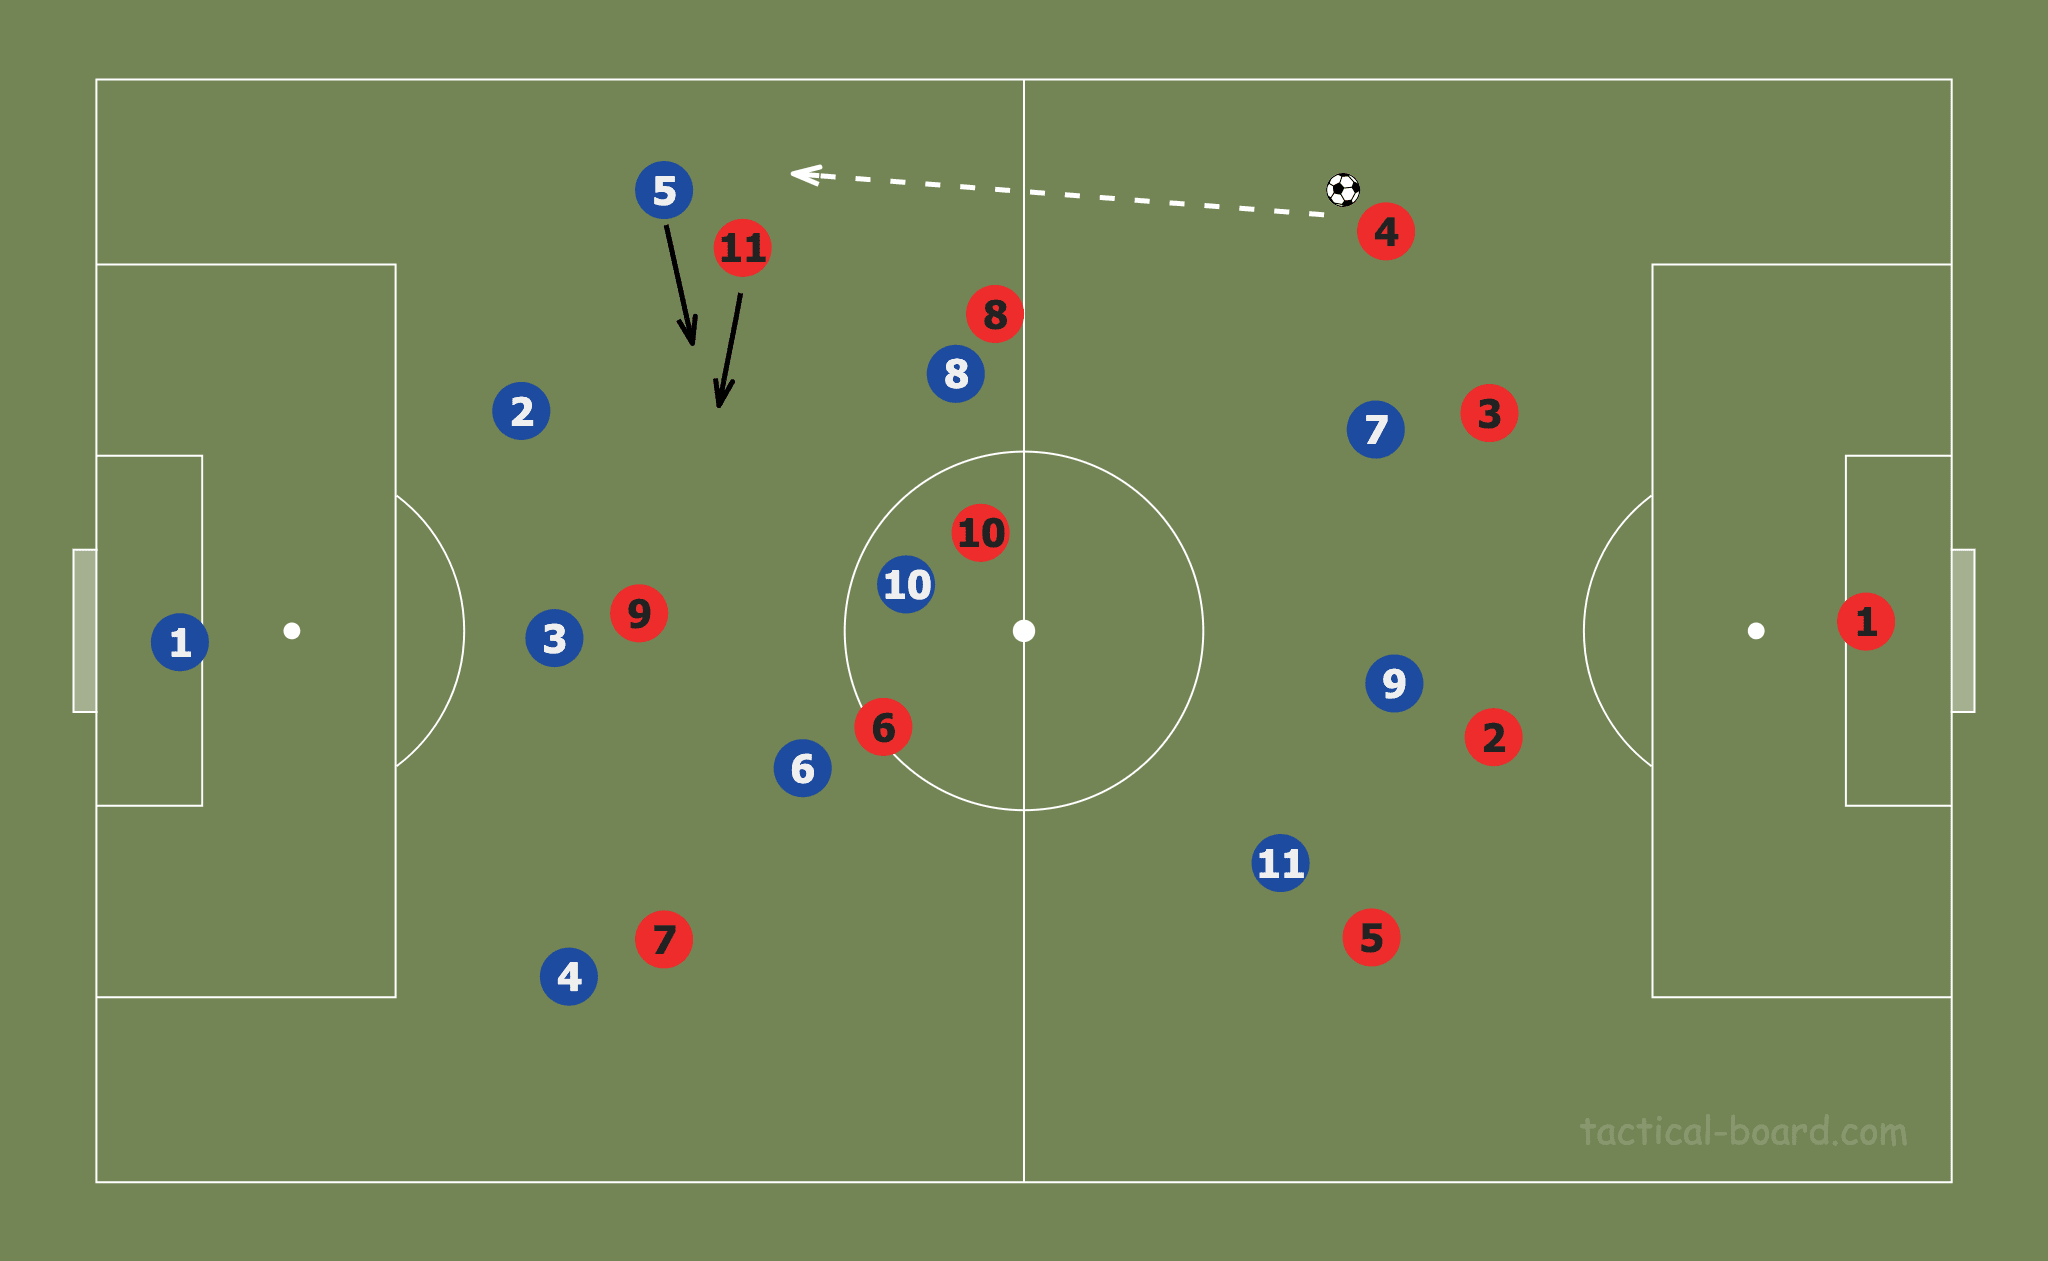
In the example above, you can see that blue #5 followed the red winger #11, thus leaving space for #4 to run into.
With flexible man-marking, blue #5 will follow his marker only until a certain point, when the blue centre-back #2 will step in and mark #11.
This prevents the opposition from capitalising on players leaving their positions.
This is a more complex system than strict man-marking, and there, you can see the first notable signs of cooperation between the players.
Another good example is the role of a libero, or the so-called "free man".
The player with this role usually played as a defender (like Franz Beckenbauer in the 1960s and 1970s for Bayern Munich), positioned behind the rest of the defenders to be the last guard on the way to their own goal.
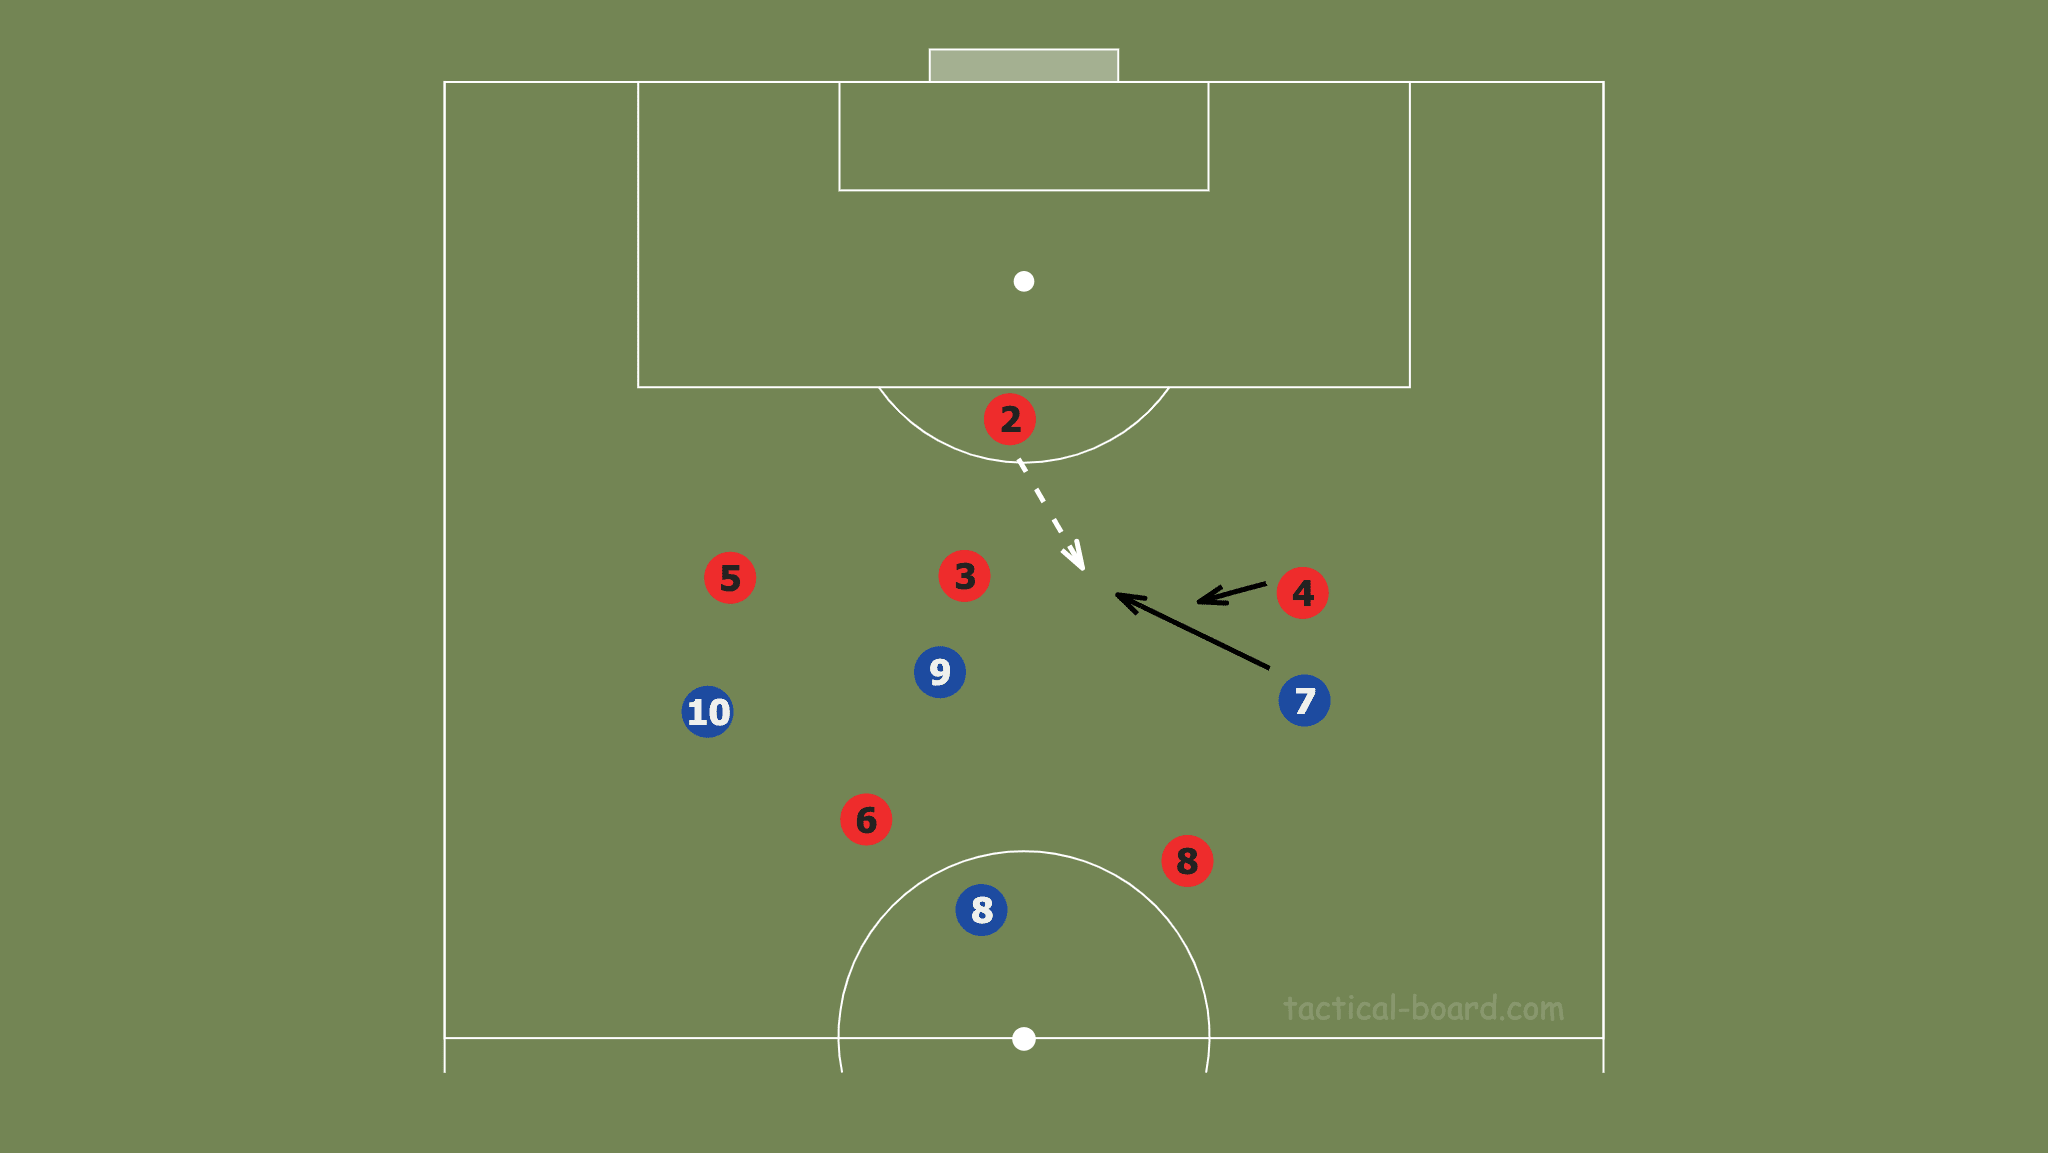
Once a player with the ball leaves the other defender's zone and enters his zone, the libero man-marks that player and tracks him down.
You can see one example in the image below: red libero #2 is behind other defenders and comes into play only when the opponent enters his zone, previously getting away from other defenders.
Although the aforementioned systems are easy to understand and execute, they are not used in modern football in their pure form.
They were playable and mostly used in the last century, especially flexible man-marking in the 1950s, 60s, and 70s.
That is no longer the case because of the increased awareness of the attackers, advanced tactical concepts, and a better understanding of space in football.
The more advanced version of flexible man-marking is space-oriented man-marking, where a team moves as a unit, controlling space and distance from each other, both horizontally and vertically (initially, they are positioned according to position-oriented zonal marking, which I will cover in the next section of this analysis).
However, when a player enters a specific zone of the pitch, he is man-marked in that zone.
In the image below, you can see an example of space-oriented man-marking.
Two blue defensive midfielders in a 4-2-3-1 formation hold their position and control the space.
When the red #10 with the ball enters their zone, one of the midfielders (depending on the situation) marks him and tracks him.
If the red #10 leaves the zone without the ball, then both blue midfielders #6 and #10 return to their initial positions.
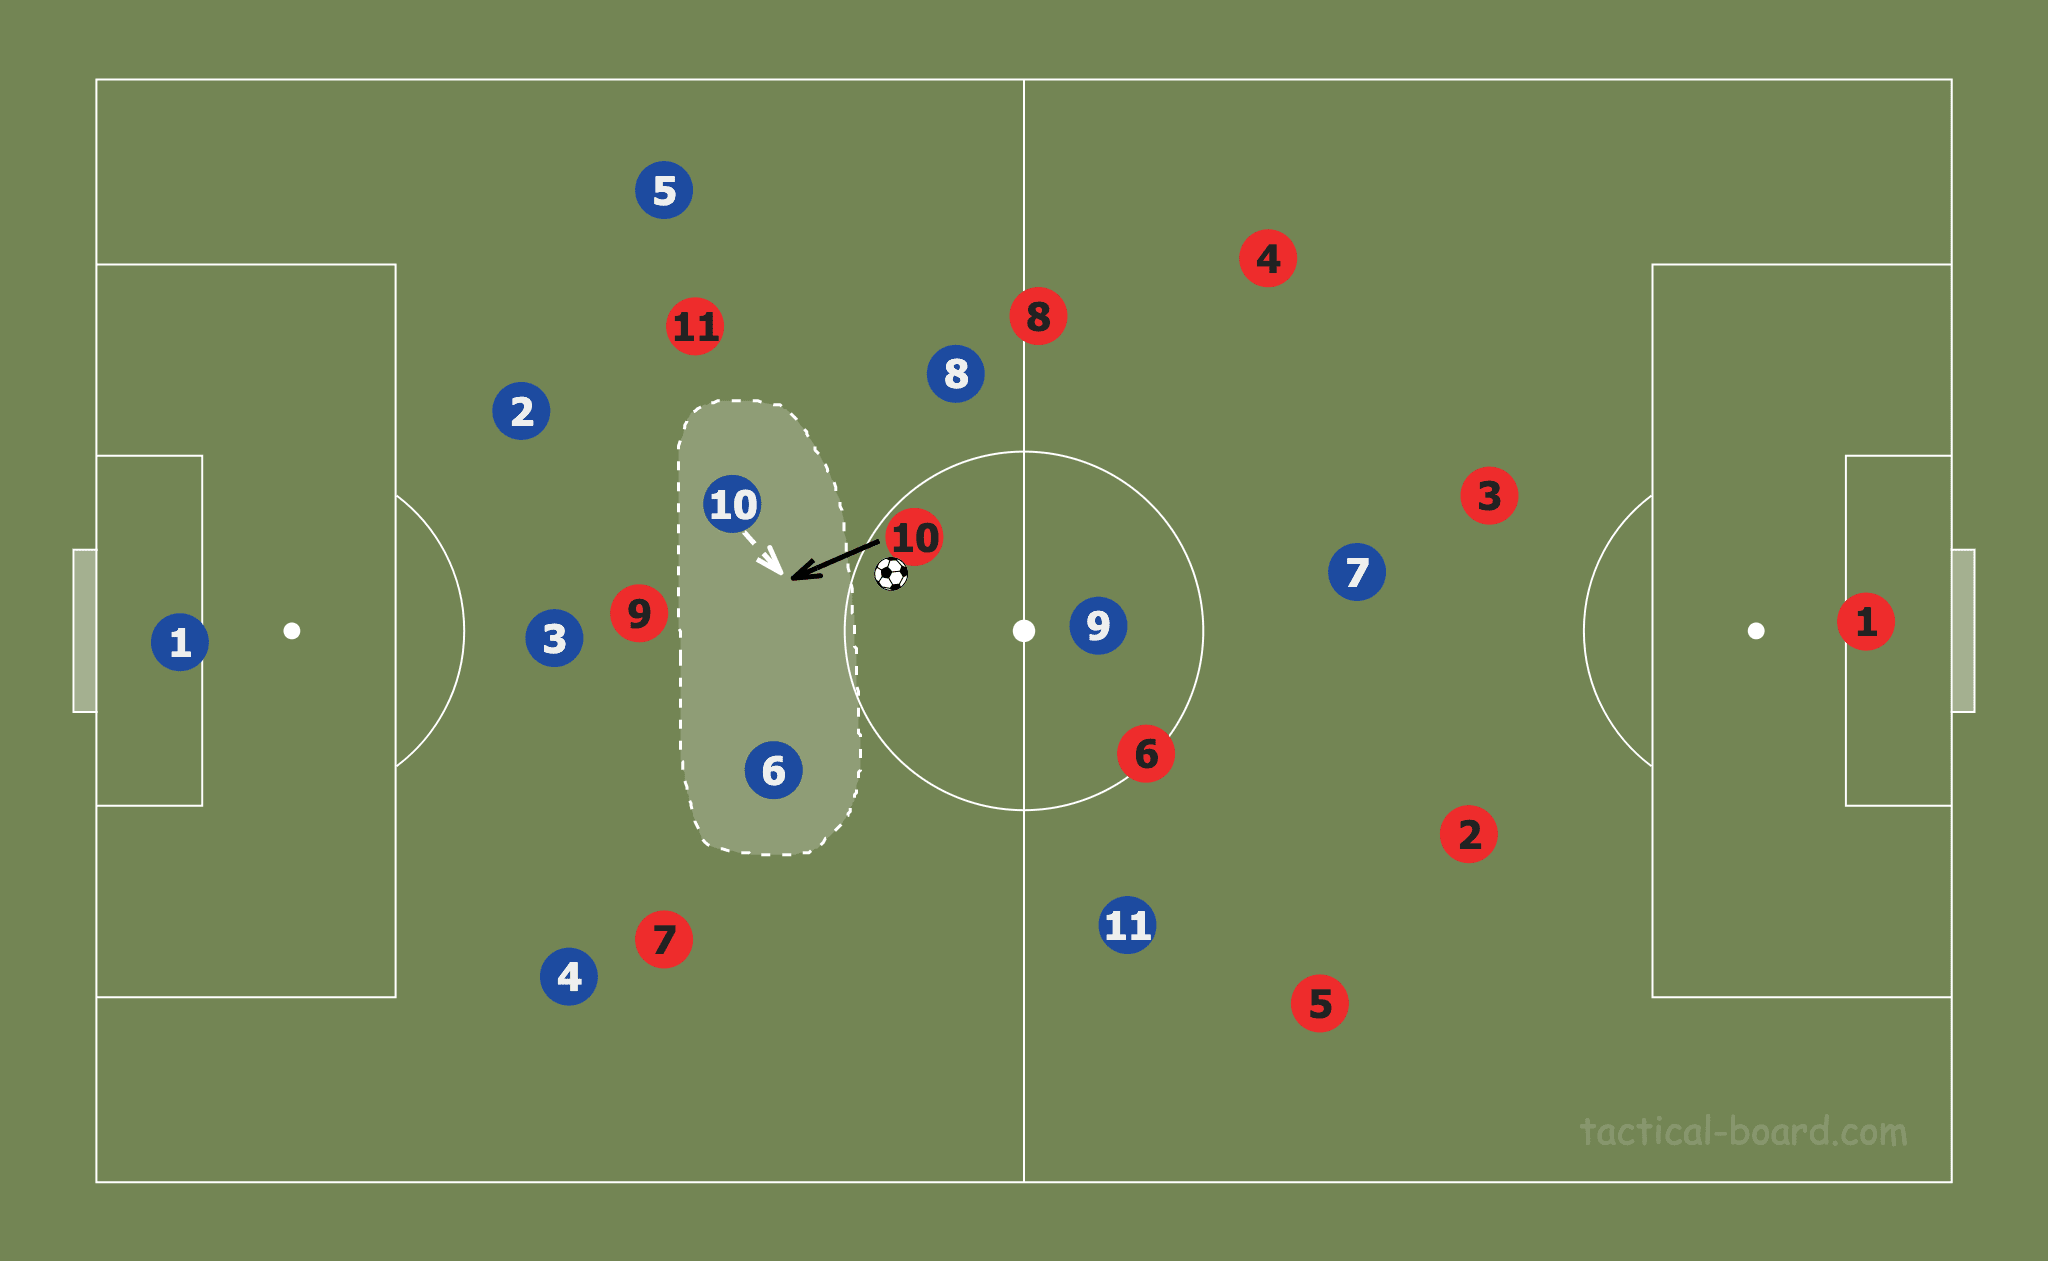
If the red #10 does not enter the zone and, for example, plays a pass to the flanks, the blue midfielders hold their position.
When one of the players leaves their respective zone, the rest of the defensive line should suffocate the space left by that player, not to leave any open gaps between the lines.
For example, if one of the centre-backs steps out of the line to mark the forward who drops deep, the rest of the defenders should close the gap.
The last variant of man-marking that can be used is man-marking certain players.
It is quite common for any team to try to prevent the other team's most creative player/players from spending too much time on the ball.
For example, it is very common to mark the opposition's attacking midfielder with their own midfielder, while other players can defend differently.
Sometimes teams are forced to resort to man-marking when the coach thinks this is the best way for his team to perform against the opponent.
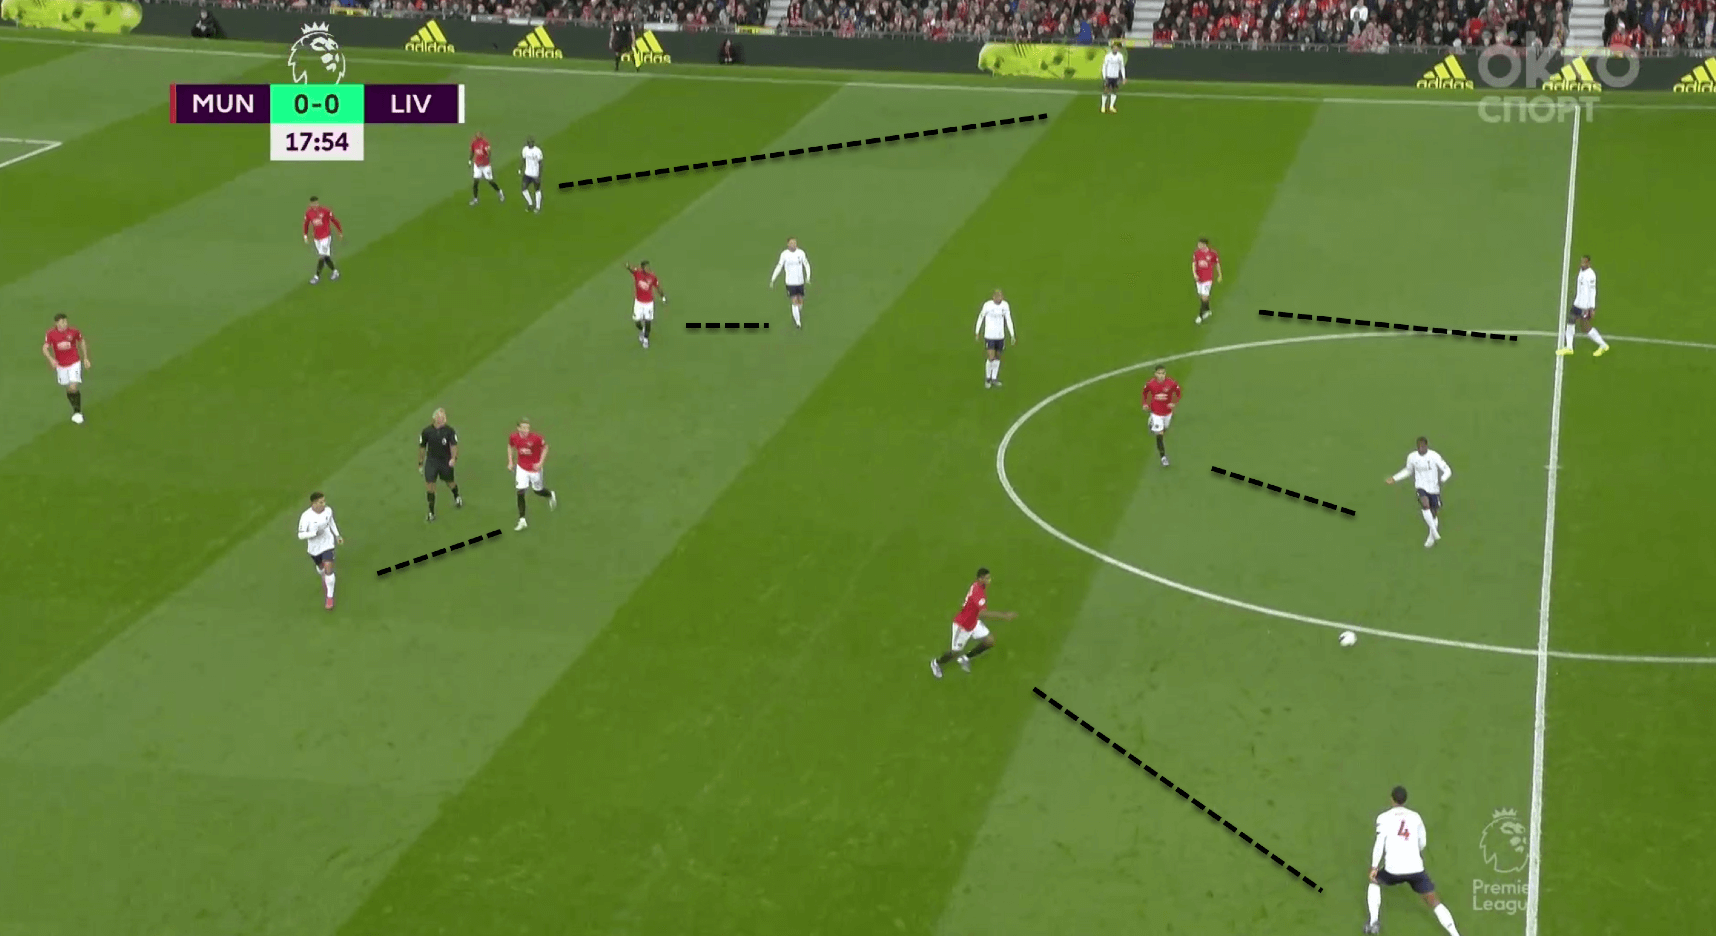
For example, in a game between Manchester United and Liverpool, Man United used a mirror 5-3-2 formation against Liverpool's attacking 2-3-5 structure.
However, the rigid man-marking structure cannot be used because modern football involves frequent rotations and role changes.
So, for instance, when one of Liverpool's midfielders was dropping into the defensive line, one of the United midfielders applied pressing only in certain moments (heavy touch, no open passing lanes, etc.).
What Is Zonal Marking?
As football tactical theory continued to evolve and players started to understand football more and more in terms of positioning themselves according to the space around them and the positioning of other players, the zonal marking system gradually replaced man-marking in open play.
It started in the 1950s and was revolutionised by Arrigo Sacchi and his four principles of defensive positioning.
He stated that for a defender to determine his position, he needs to look at four reference points: his teammates, the position of the ball, the open space, and the positioning of the opposing players.
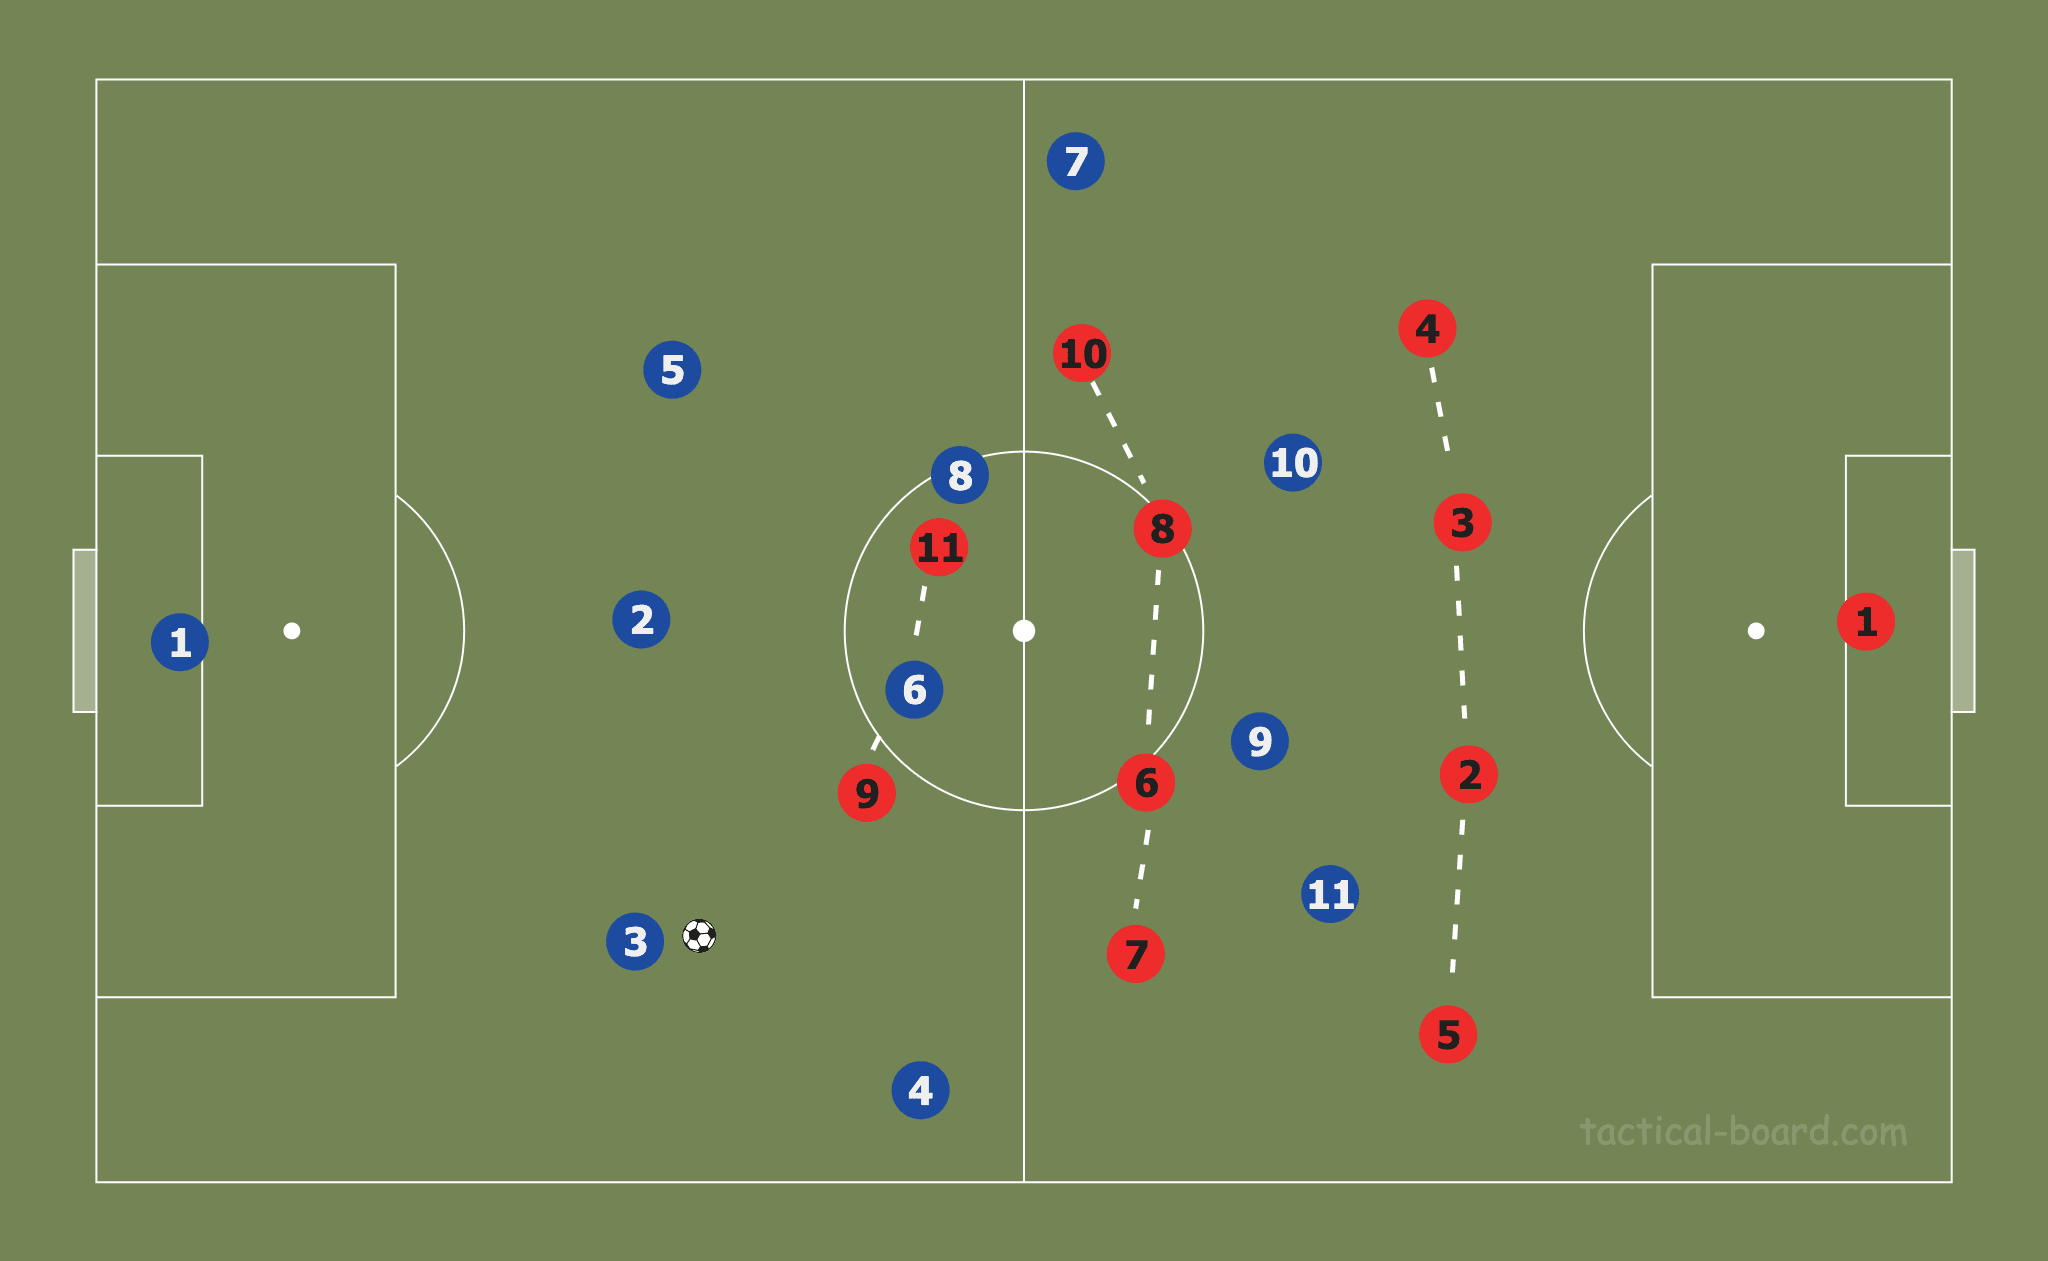
The first option of zonal marking is position-oriented zonal marking, in which the team moves as a unit depending on the ball's position.
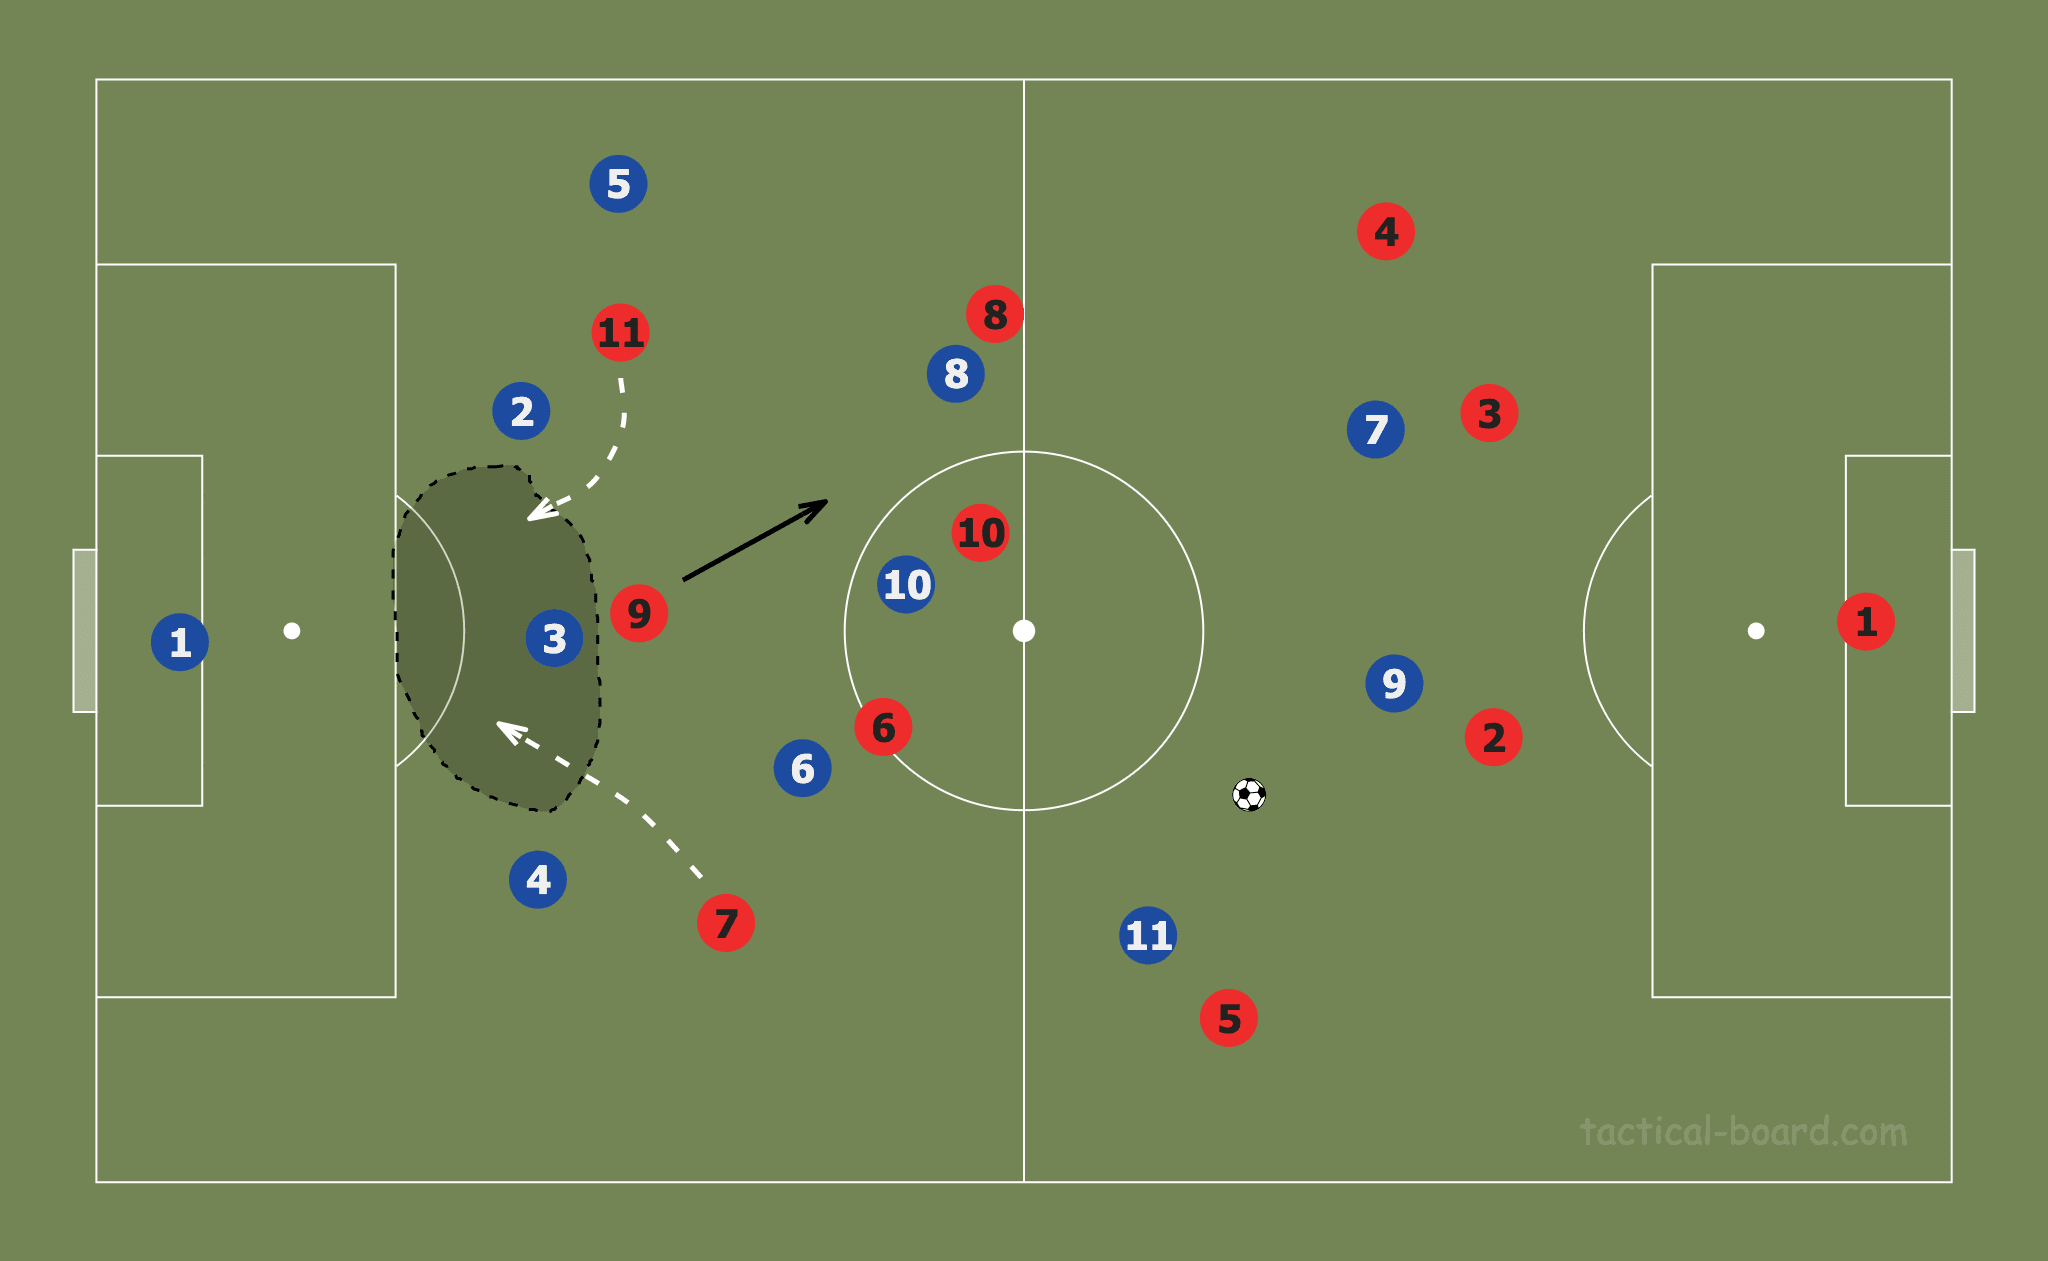
The best example of this system is Diego Simeone's Atletico Madrid, whose 4-4-2 low to medium block is one of the best defensive systems in world football.
The concept lies in the correct distances between the players.
Compactness is the key component of this system, which closes down space in the centre and intentionally leaves space on the flanks.
I will analyse this concept using the example of Atletico with their famous flank traps.
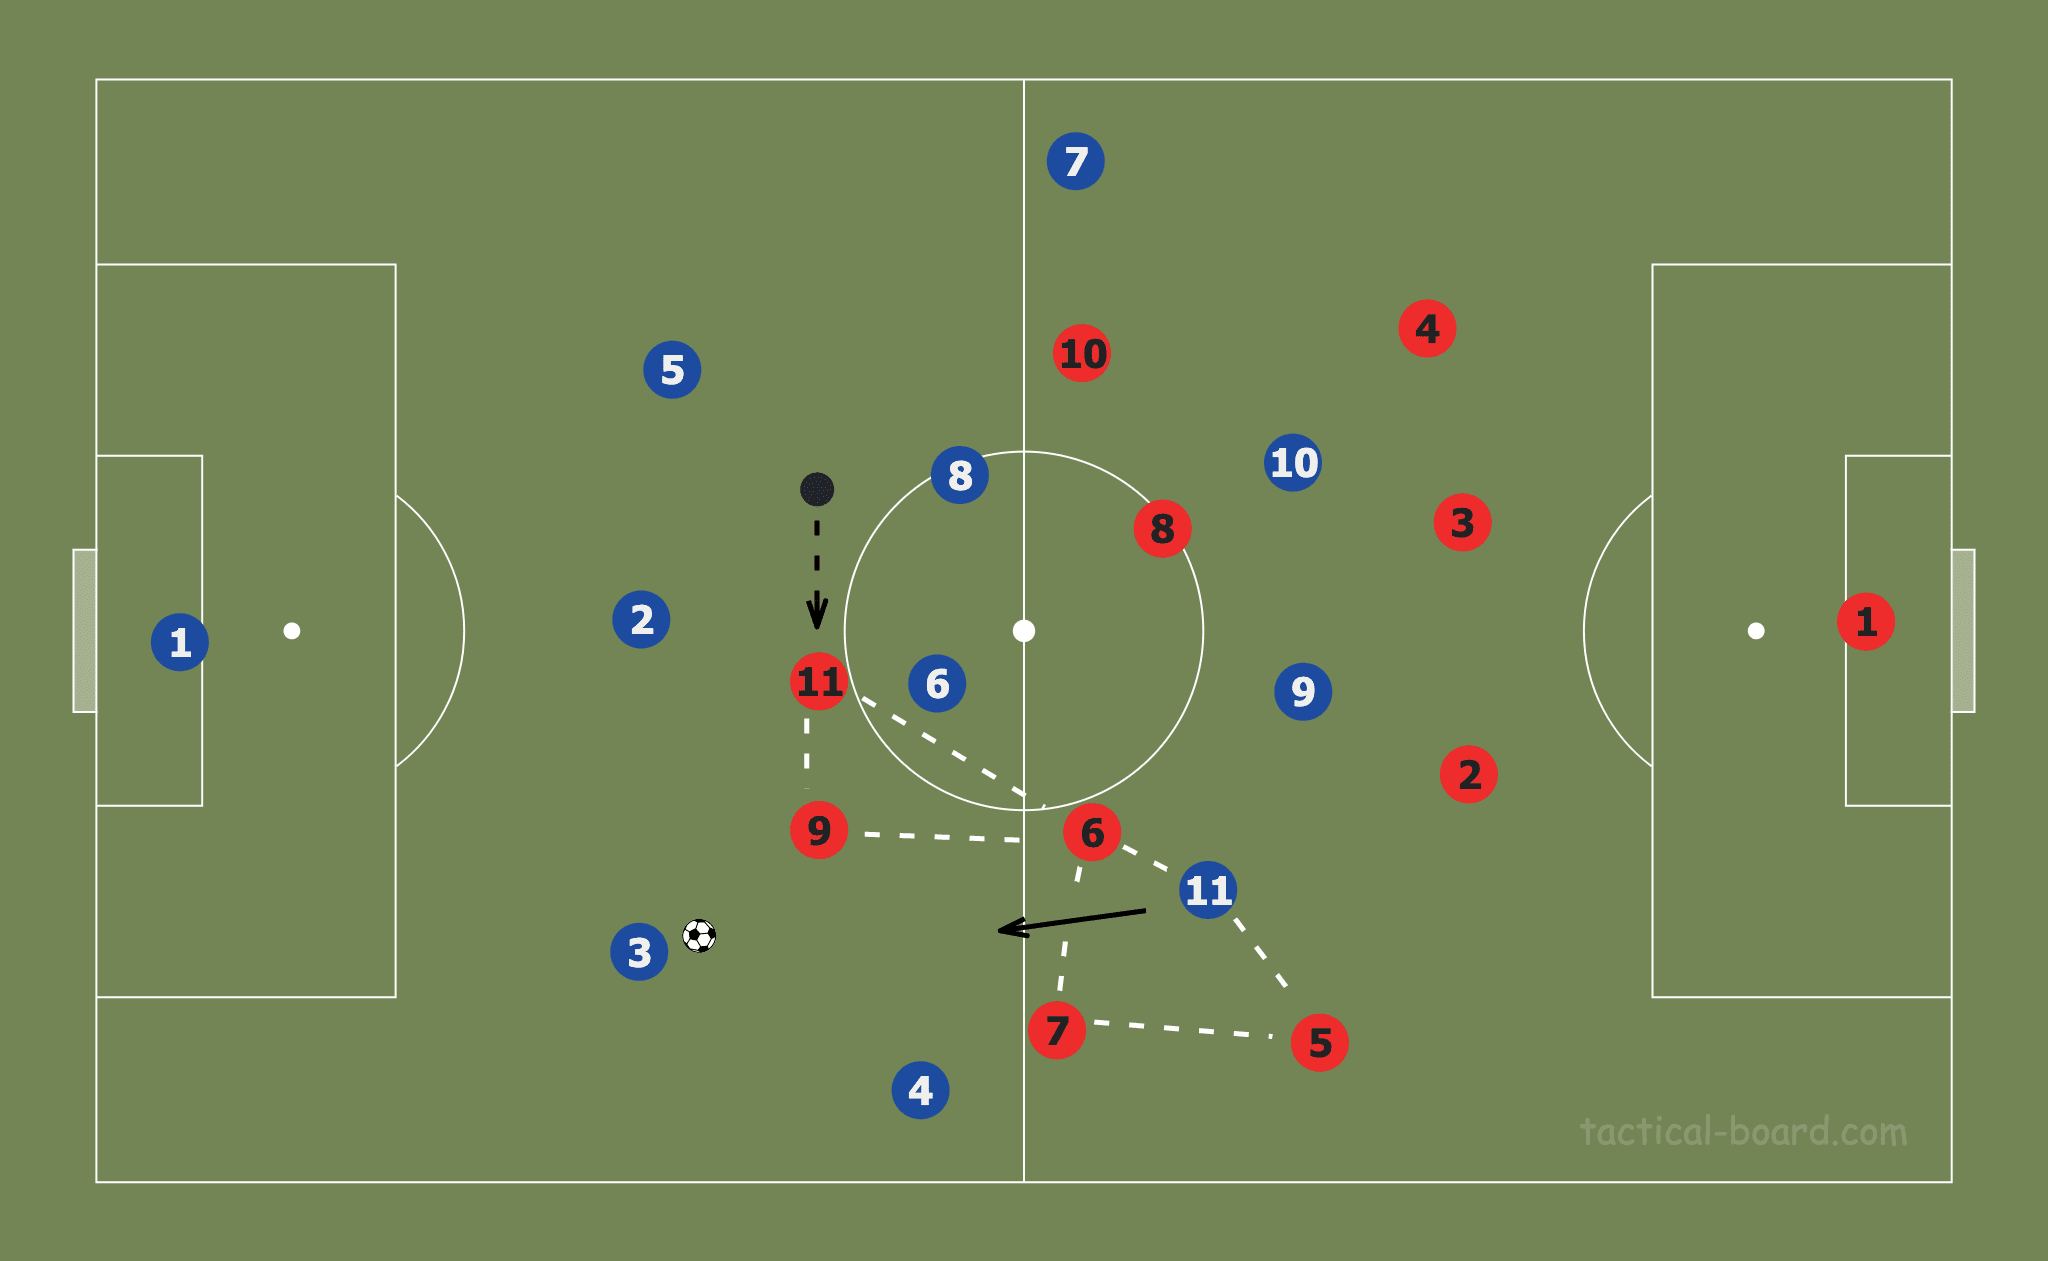
When the ball reaches the opposition player on the flank, the opportunity arises to shut down all the possible passing options.
Both forwards (red #11 and #9) shift towards the player with the ball, creating superiority with numbers.
Together with the midfielder (red #6) and two flanking players (red #7 and #5), they try to close every possible passing option for the blue #3 on the ball.
Due to the movement of red players, all the promising passing lanes (for blue players #4, #6, and #11) are shut down with numbers.
Thus, when the blue #3 decides to pass it to one of those players, it won't be an issue for one of the red players to tackle or intercept the ball.
With the right execution and chemistry between the players, such a system becomes very hard to break down (the first leg between Atletico and Liverpool in the Champions League a few years ago can be used as an example).
The next variant of zonal marking is man-oriented zonal marking.
It is very similar to the previous concept of position-oriented zonal marking.
However, in this concept, a certain opposition player (often the player with the ball or the most creative player) becomes the reference point for the whole team, and it adjusts the position accordingly to the movements of that particular player.
With this system, a defender marks his zone, and his main objective is to keep a certain distance from the player he marks (the reference point).
The distance between the marker and the player tracking him should allow the defender to apply pressure when the opponent enters the zone, while also not breaking his defensive line.
The reference point can be a player closest to the zone or the most creative player of the opposite team.
Using Mixed Systems For Marking
In modern football, teams rarely strictly use one way of marking the opposition team.
There are many variables to consider: the class of the opposition, the class of certain players, the formation, the current state of injuries and players available, and so on.
Coaches can often be very flexible when it comes to choosing how to mark before and during games.
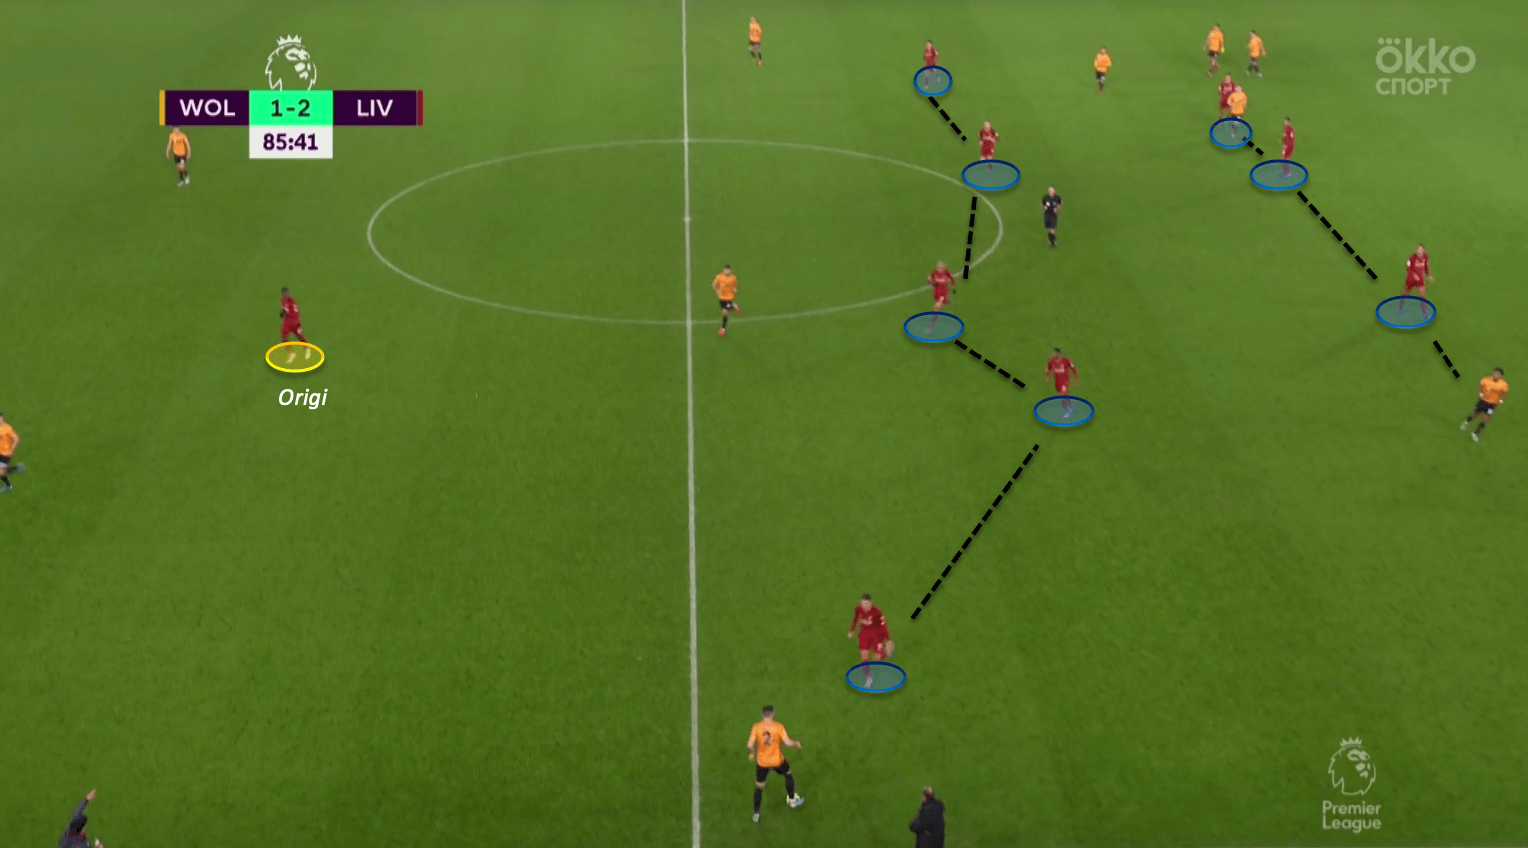
For example, Liverpool often deployed the same system when getting or having the lead in the closing stages of games.
They would line up in a 4-4-1-1 or 4-5-1 formation (plus some other variations) and defend zonally while the lone striker applied space-oriented man-marking.
You can see this in the image below, with Liverpool using a 4-5-1 formation with one striker up top.
While the rest of the team defends as a block, the striker only applies pressure on the defensive line if they push up with the ball.
In other cases, he moves according to the ball's position.
It is very similar to situational pressing, and the striker's defensive role is minimised, so the Reds have an option for occasional counter-attacks.
Many examples of different forms of man-marking and zonal marking are applied to the whole team and certain players.