
![Iran Vs New Zealand [2–2] – FIFA World Cup 2026: Direct Play & Transitions From Start To Finish – Tactical Analysis](https://cdn.mymidnight.blog/77f959f119f4fb2321e9ce801e2f5163/size/w1000/2026/06/Iran-Vs-New-Zealand-World-Cup-2026.png)
Iran Vs New Zealand [2–2] – FIFA World Cup 2026: Direct Play & Transitions From Start To Finish – Tactical Analysis

What initially appeared to be one of the less glamorous fixtures of the 2026 FIFA World Cup became one of the most compelling and tactically interesting games of the tournament so far.
New Zealand entered the match searching for their first-ever World Cup win, while Iran were aiming to progress from the group stage for the first time in their history.
That context gave the Group G meeting clear competitive tension, but the tactical dynamics made it even more compelling.
This tactical analysis examines how New Zealand’s direct attacking, Iran’s transition threat, and both teams’ willingness to commit numbers forward created an unusually open contest.
New Zealand relied heavily on Chris Wood as an outlet, while Iran repeatedly threatened when New Zealand’s build-up broke down.
Iran Vs New Zealand Lineups & Formations
Iran Lineup Vs New Zealand
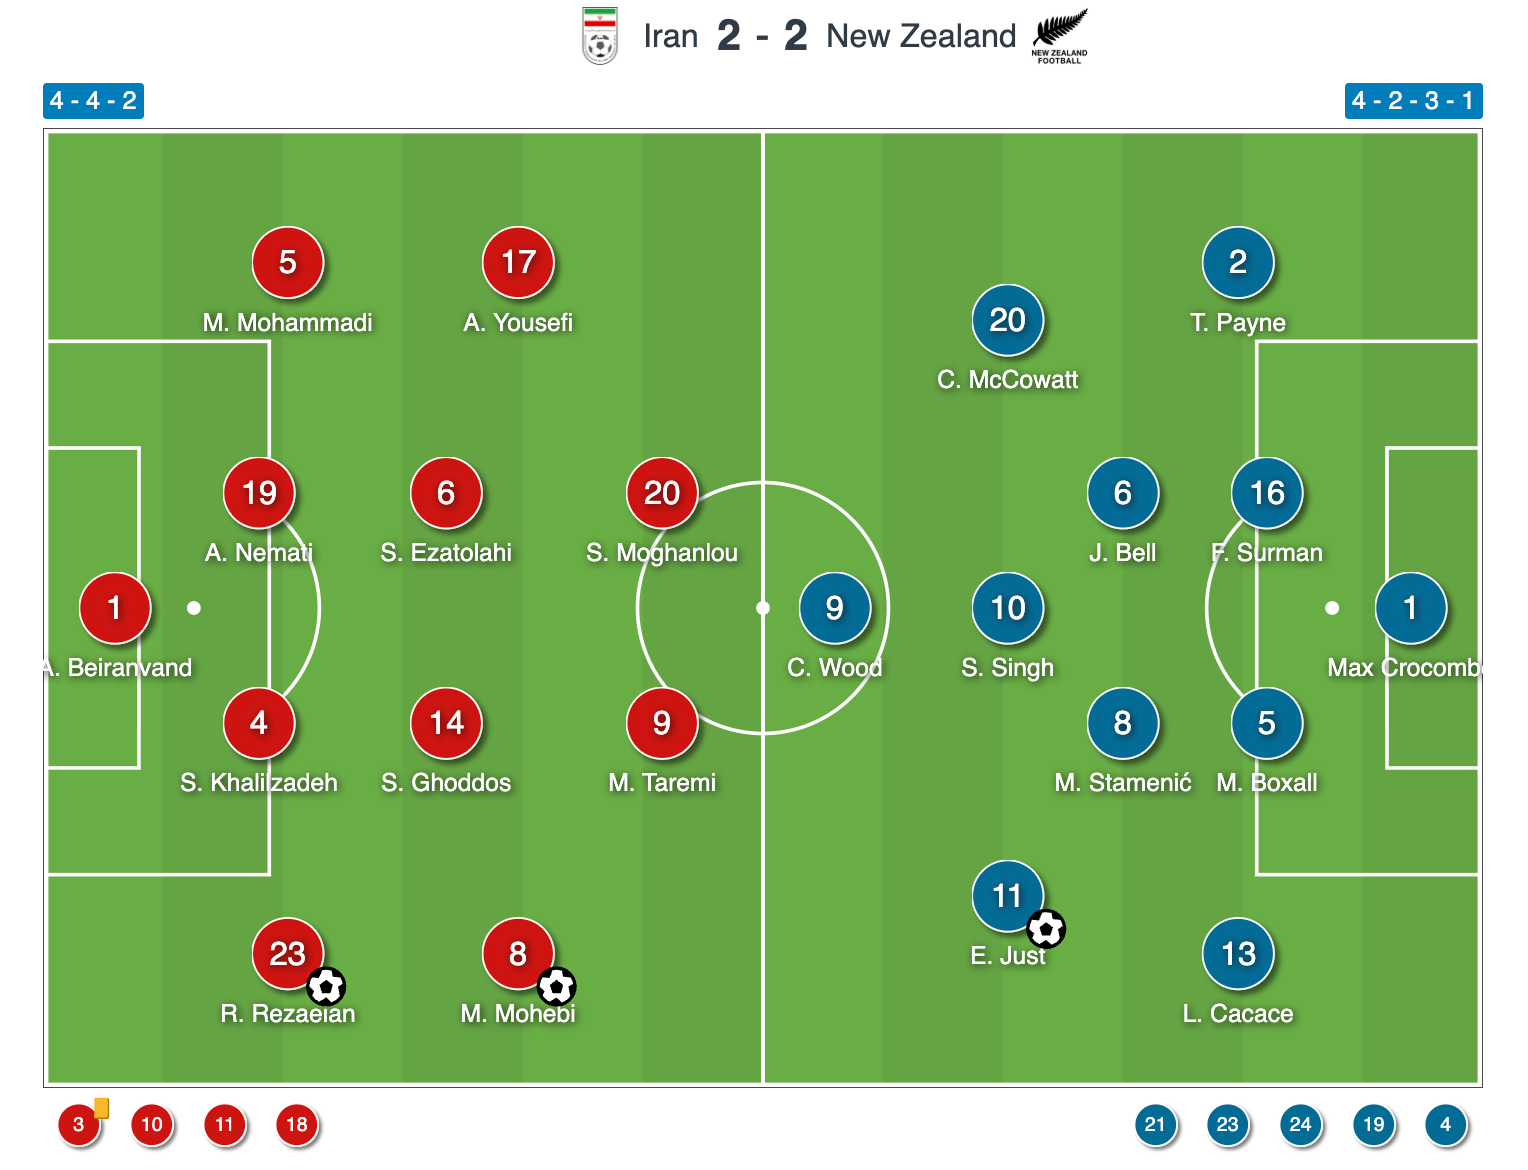
Amir Ghalenoei set his Iran side up in a 4-4-2 shape with Alireza Beiranvand in goal behind a back four of Ramin Rezaeian, Shojae Khalilzadeh, Ali Nemati, and Milad Mohammadi, from right to left.
Mohammad Mohebi and Arya Yousefi started on the right and left wing, respectively, with Saman Ghoddos and Saeid Ezatolahi in central midfield.
Shahriyar Moghanlou and Mehdi Taremi led the line for Ghalenoei's side up top.
Iran made four substitutions during the game, the first of which came at half-time as Arya Yousefi made way for Mehdi Ghayedi.
Shortly after that, Ali Alipour was introduced for Shahriyar Moghanlou.
In the 65th minute, Ehsan Hajsafi came on for Saman Ghoddos, and Iran's final change saw Amirhossein Hosseinzadeh replace Mehdi Taremi in the 80th minute.
New Zealand Lineup Vs Iran
As for New Zealand, Darren Bazeley set his side up in a 4-2-3-1 shape with Max Crocombe in goal, Tim Payne at right-back, Finn Surman at right centre-back, Michael Boxall at left centre-back, and Liberato Cacace stationed at left-back.
Joe Bell and Marko Stamenić played in central midfield, with Elijah Just on the right wing, Callum McCowatt at left wing, and Sarpreet Singh in a central attacking midfield role behind Chris Wood up top.
Bazeley made five substitutions during the match; the first two came in the 65th minute as Ryan Thomas and Ben Old were sent on for Callum McCowatt and Liberato Cacace.
In the 78th minute, Callan Elliot replaced Tim Payne, before Jesse Randall and Tyler Bindon replaced Sarpreet Singh and Marko Stamenić just inside stoppage time.
New Zealand Tactics In Possession
New Zealand were not scared of playing direct, and that style of play was necessary.
Their build-up phase was often unreliable, partly because their players lacked the same technical security and press resistance as the elite teams in the competition.
When they attempted to progress through the thirds, Iran could profit from loose touches, under-hit passes, or the spaces New Zealand left behind the ball after committing players forward.
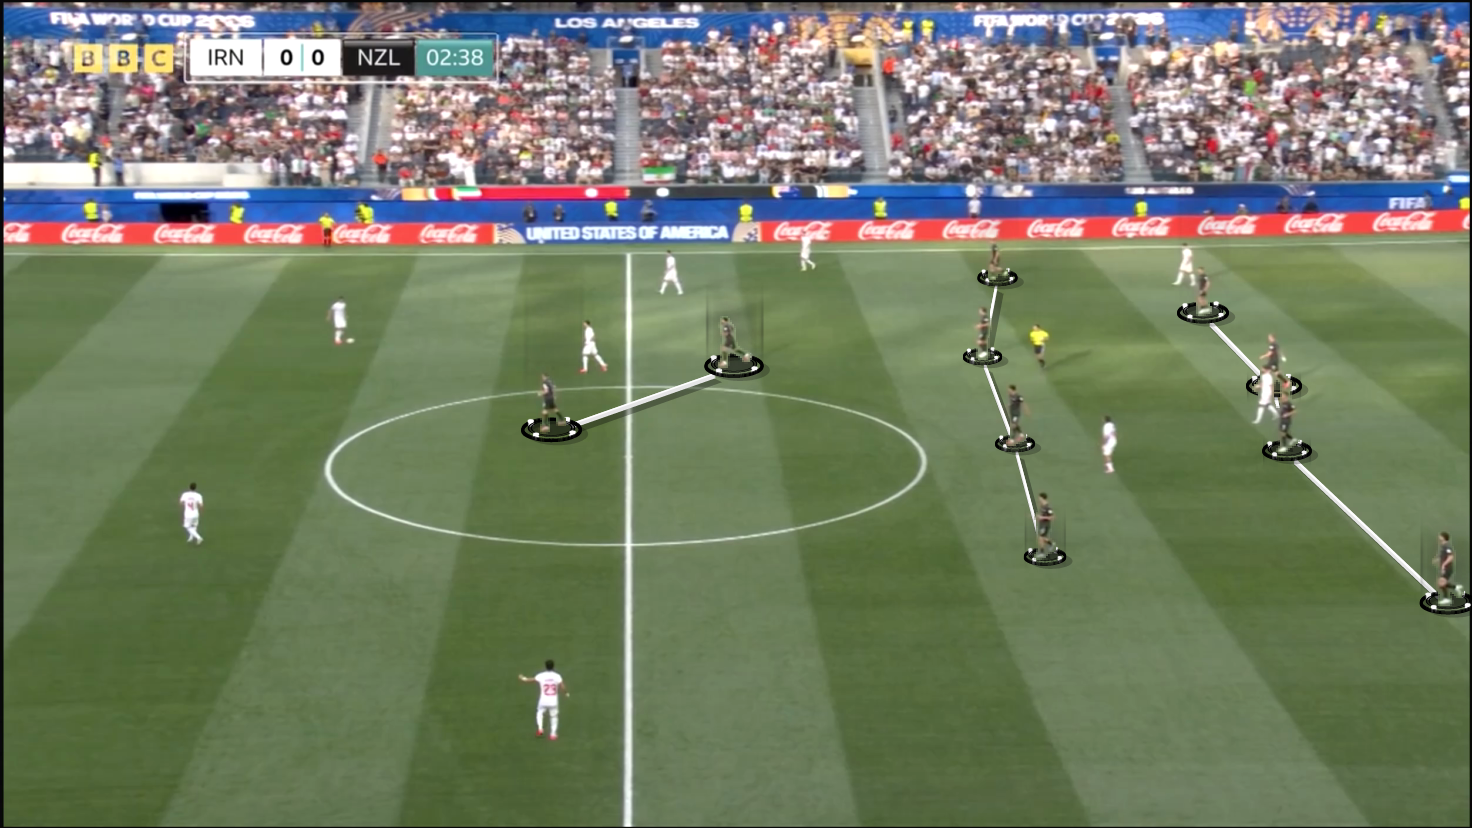
As shown in Figure 1, Iran were able to attack in transition in a 4v4 situation, which became one of their biggest threats throughout the game.
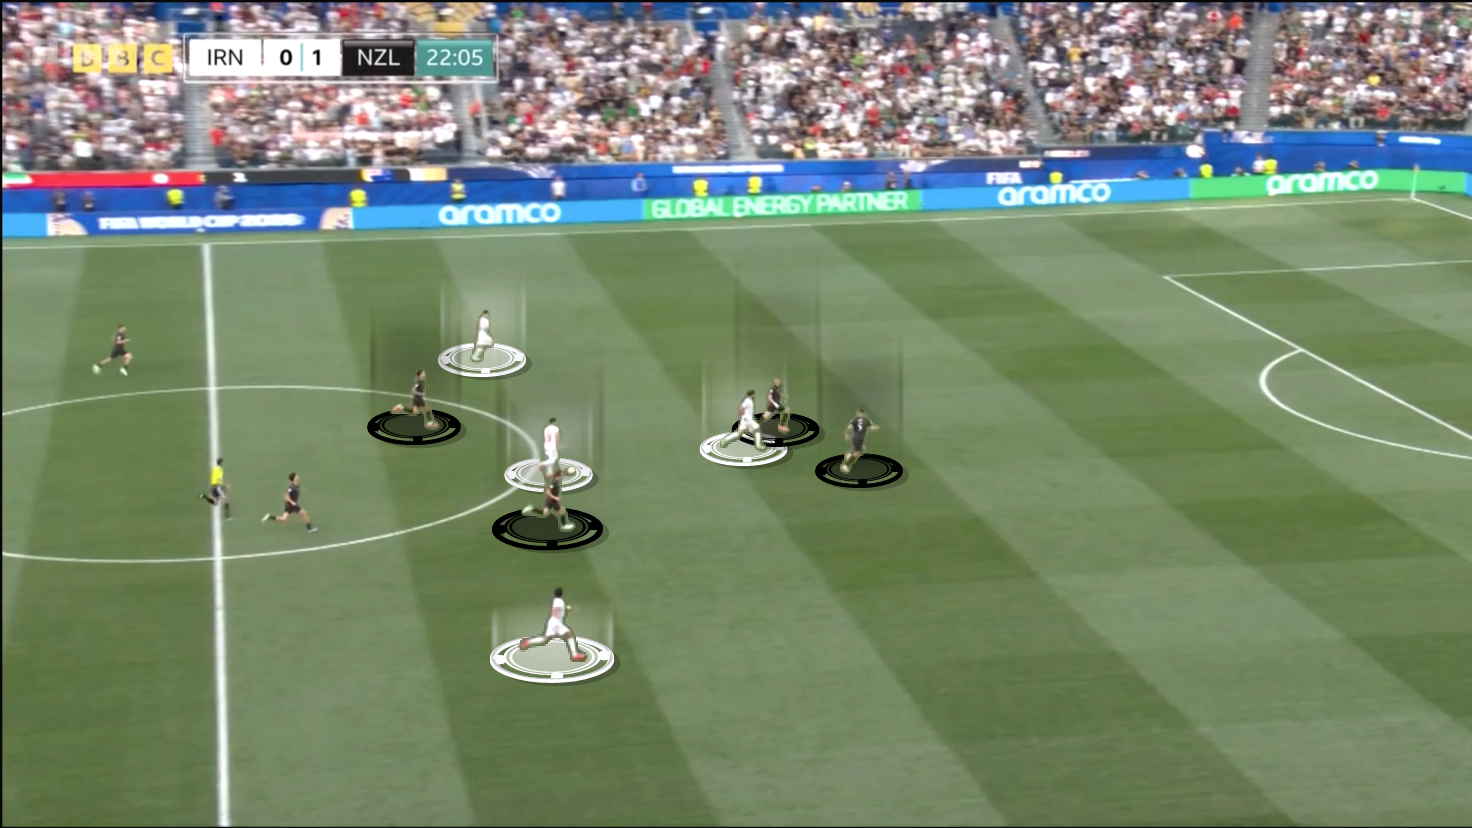
This was not only caused by individual errors.
New Zealand’s attacking structure also contributed.
They often committed a large number of players high, which helped them create forward-running options and overload the last line, but reduced their security behind the ball.
At times, only three players were left in the deeper build-up line, with one or two players in the next line depending on the phase of play.
This allowed New Zealand to pack the final line, but weakened their rest defence.
When they lost possession in the build-up or middle third, Iran could attack in transition and create high-quality chances.
There may have been a deliberate logic behind this.
New Zealand do not possess the same individual attacking quality as the best teams in the tournament.
By committing players forward and encouraging dynamic movement in advanced areas, they could compensate collectively for that lack of elite one-v-one threat.
However, the trade-off was clear: the more players they placed ahead of the ball, the more vulnerable they became after turnovers.
Despite those risks, New Zealand did many things well in possession.
They won duels effectively and produced aggressive forward runs, dribbles, short combinations, and dynamic rotations once they had the ball higher up the pitch.
Their attacking play was more convincing in these moments than in the earlier build-up phase.
When they bypassed the first line of pressure and played closer to Iran’s defensive block, they looked capable of disrupting the opposition’s man-oriented defensive structure.
Figure 2 highlights New Zealand’s 4-2-3-1 build-up, although the shape could also resemble a 4-2-4 when the attacking midfielders pushed higher.
In this structure, New Zealand initially had numerical superiority against Iran’s first line of pressure.
Their full-backs also pushed high and wide throughout the game, which allowed New Zealand to shift into a 2-2-6 structure.
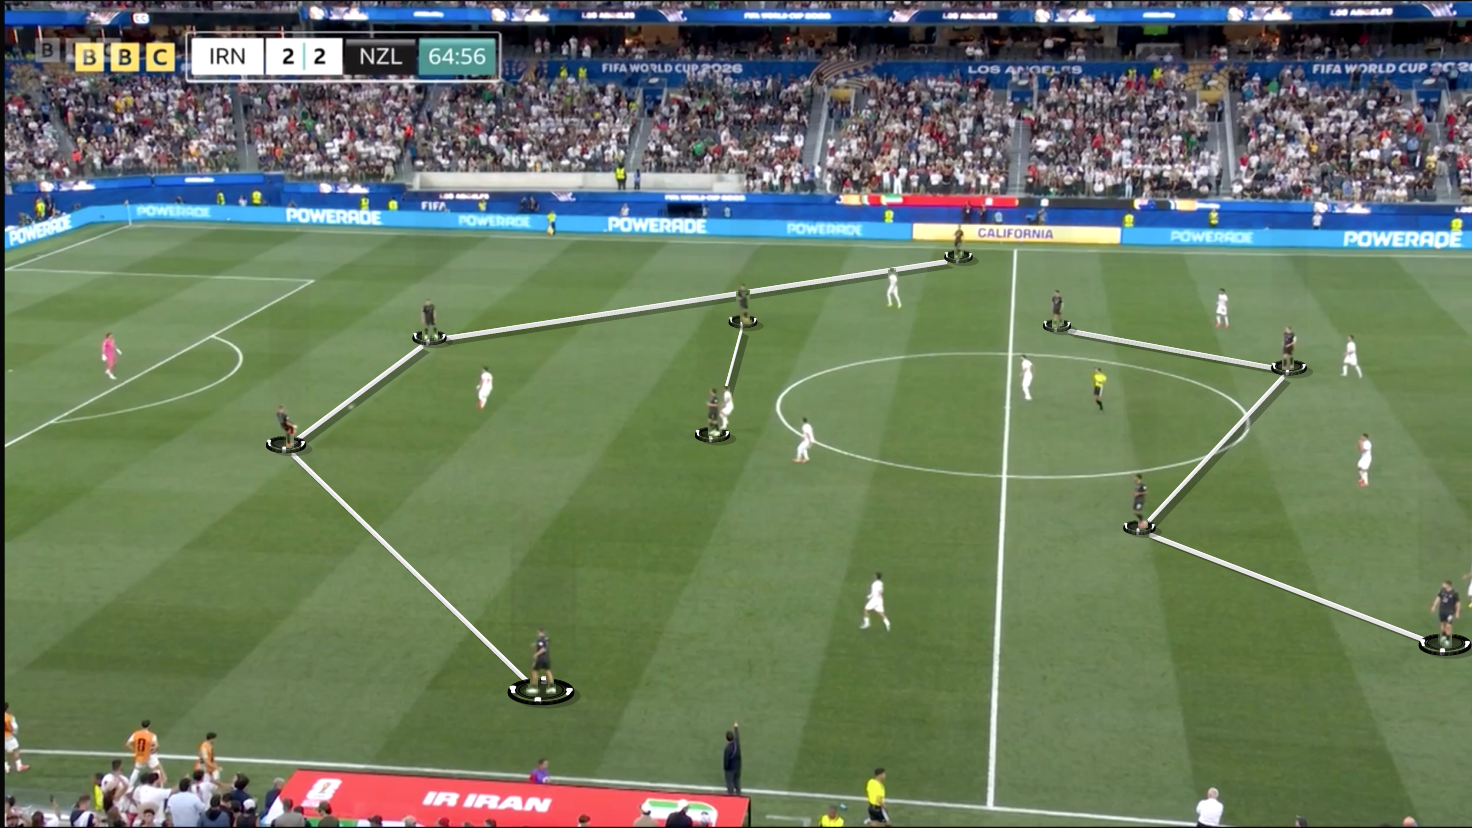
At other moments, a central midfielder dropped into the last line, creating a 3-1 structure in the first phase, as Figure 3 demonstrates.
Alternatively, one full-back could tuck into the back three while the opposite full-back advanced, with the midfielders maintaining their position.
In principle, this created a fluid build-up.
New Zealand were not fixed to one structure and could adjust the height of their full-backs, the positioning of their midfielders, and the number of players in the first line.
However, that same fluidity created risk.
If the full-backs were positioned high, they were no longer available to defend immediately after a turnover.
As a result, New Zealand’s defensive line could be exposed before the team had time to counter-press or recover.
In sustained possession, New Zealand also moved towards a 3-1-6 attacking structure, with the full-backs high, the number six and number eight deeper across the first two lines, and five or six players occupying the last line.
This helped New Zealand threaten the Iranian backline and create options for direct passes, crosses, and second balls, but again weakened their ability to defend transitions.
Chris Wood was an exceptional outlet and allowed New Zealand to bypass Iran’s press when their shorter build-up became unreliable.
This was crucial because New Zealand did not always look secure when circulating the ball across their defensive and midfield lines.
By finding Wood directly, they could move up the pitch with one pass, contest second balls, and bring their attacking midfielders or wide players into the game.
The connection between Elijah Just and Wood was especially important.
Just linked well with Wood in close proximity, with short passes, layoffs, and combinations providing key attacking value.
Their relationship was central to both of New Zealand’s goals.
Wood’s ability to receive under pressure, secure possession, and connect with nearby runners gave New Zealand a simpler and more reliable attacking option than extended periods of deep build-up and central progression.
New Zealand Tactics Out Of Possession
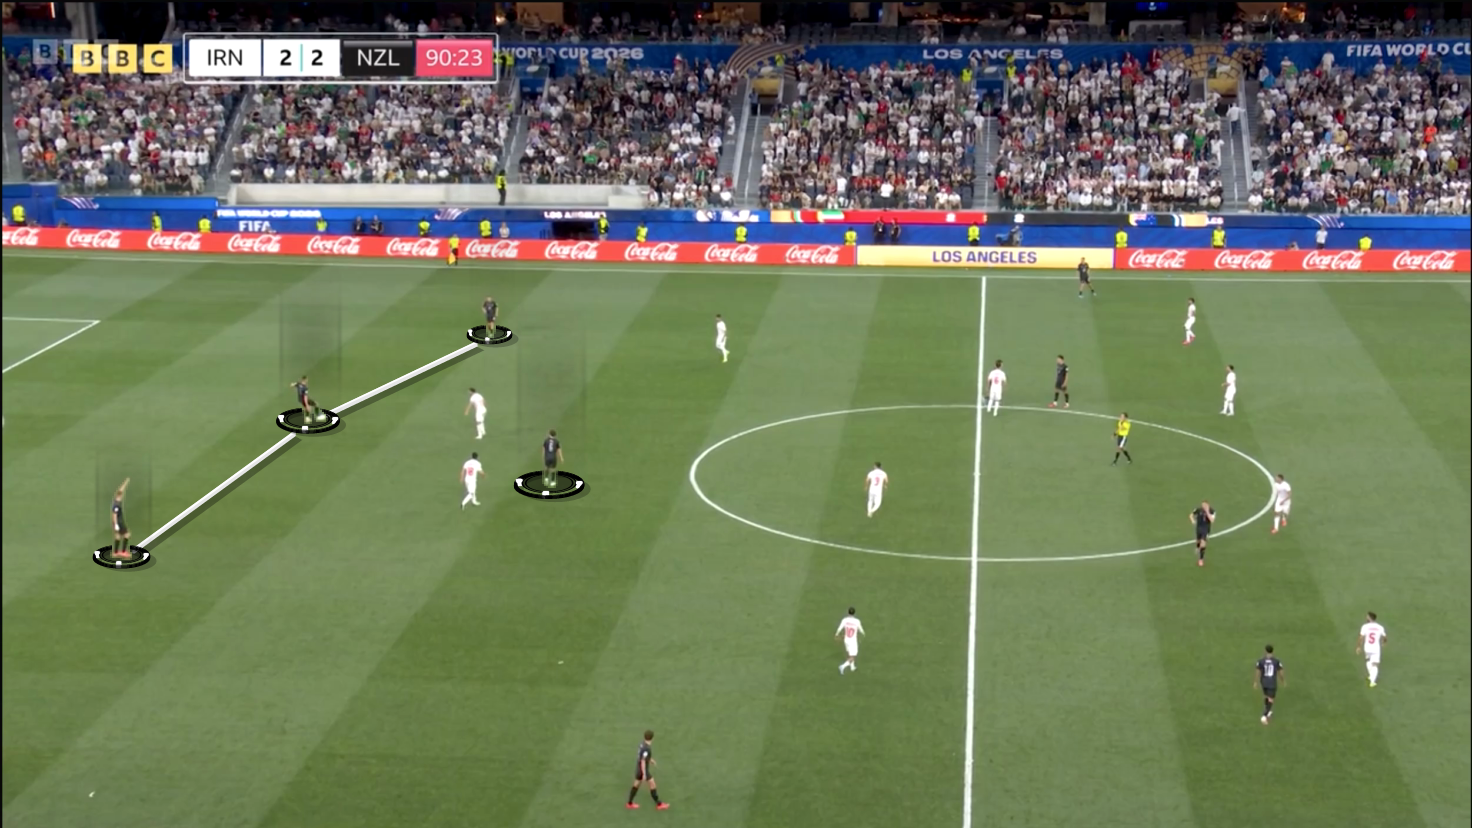
Out of possession, New Zealand defended in a zonal 4-4-2, as illustrated in Figure 4.
Their block was compact and generally disciplined, especially in central areas.
Iran rarely bypassed them cleanly through the middle, reflecting the strength of New Zealand’s spacing between the lines.
The front two helped screen central access, while the midfield four stayed narrow enough to protect the most dangerous zones.
![England Vs Croatia [4–2] – FIFA World Cup 2026: Thomas Tuchel Tactics Overwhelm Luka Modrić & Co. – Tactical Analysis](https://cdn.mymidnight.blog/77f959f119f4fb2321e9ce801e2f5163/size/w600/2026/06/England--Vs-Croatia--World-Cup-2026.png)
![France Vs Senegal [3–1] – FIFA World Cup 2026: Didier Deschamps' Second-Half Solution – Tactical Analysis](https://cdn.mymidnight.blog/77f959f119f4fb2321e9ce801e2f5163/size/w600/2026/06/France-Vs-Senegal-World-Cup-2026.png)
![Spain Vs Cape Verde [0–0] – World Cup 2026: How The Blue Sharks Frustrated The European Champions – Tactical Analysis](https://cdn.mymidnight.blog/77f959f119f4fb2321e9ce801e2f5163/size/w600/2026/06/Spain-Vs-Cabo-Verde-World-Cup-2026-1.png)
![Netherlands Vs Japan [2–2] – FIFA World Cup 2026: When Structure Gave Way To Chaos – Tactical Analysis](https://cdn.mymidnight.blog/77f959f119f4fb2321e9ce801e2f5163/size/w600/2026/06/Netherlands--Vs-Japan--World-Cup-2026.png)
![Brazil Vs Morocco [1–1] – FIFA World Cup 2026: Another Statement From The Atlas Lions – Tactical Analysis](https://cdn.mymidnight.blog/77f959f119f4fb2321e9ce801e2f5163/size/w600/2026/06/Brazil-Vs-Morocco-World-Cup-2026--1-.png)
![Canada Vs Bosnia & Herzegovina [1–1] – FIFA World Cup 2026: Strong Foundations, Limited End Product – Tactical Analysis](https://cdn.mymidnight.blog/77f959f119f4fb2321e9ce801e2f5163/size/w600/2026/06/Canada-Vs-BIH-World-Cup-2026.png)
![Mexico Vs South Africa [2–0] – FIFA World Cup 2026: Javier Aguirre's Out-Of-Possession Plan Delivers – Tactical Analysis](https://cdn.mymidnight.blog/77f959f119f4fb2321e9ce801e2f5163/size/w600/2026/06/Mexico-Vs-South-Africa-World-Cup-2026.png)