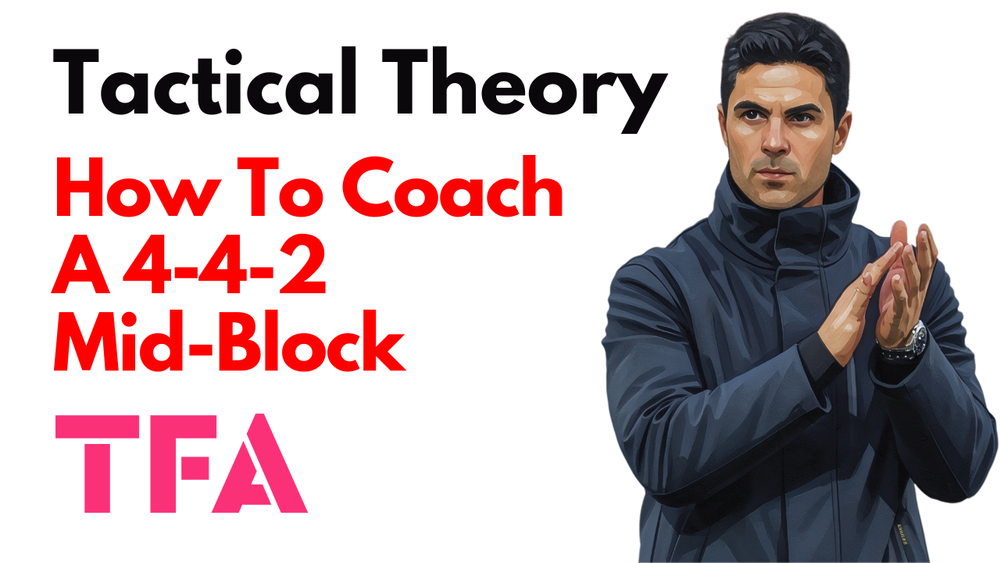
How To Coach 4-4-2 Mid-Block With Practical Rondo Examples - Tactical Theory

What Is A 4-4-2 Mid-Block?
The 4-4-2 mid-block is an out-of-possession strategy that features a flat back four, a midfield four, and two central forwards.
The set-up has three clear defensive lines occupying the middle third of the pitch.
The primary aim is to condense central areas and prevent teams from being able to play through the structure.
With a relatively low line of confrontation, teams will use the mid-block tactic to invite the opposition out of their defensive third.
This can provide opportunities to isolate the man on the ball and regain possession.
When possession is won, counterattacks can be launched into the vast space the opposition has left behind their defensive line.
This tactical analysis will examine the key principles and tactics involved in a 4-4-2 mid-block formation and how coaches can effectively implement this tactical theory.
Principles Of A 4-4-2 Mid-Block
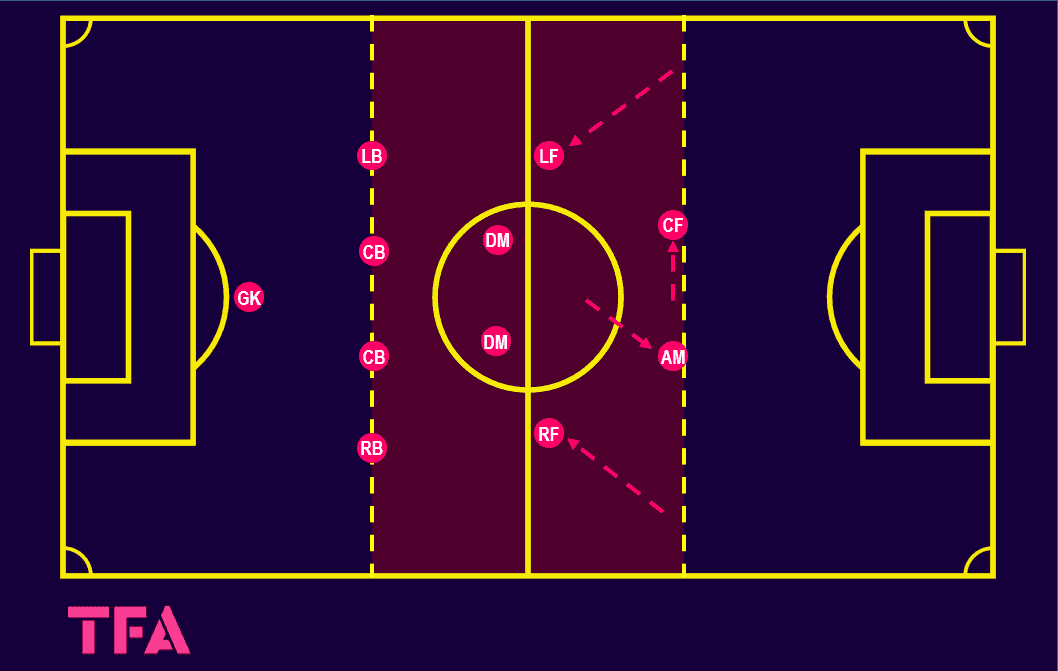
The 4-4-2 is a common out-of-possession formation in modern football, but it is less utilised in possession.
As shown in the tactical diagram above, this often means that teams must modify their attacking formation once they lose possession of the ball.
For example, when transitioning from a 4-2-3-1 formation with the ball in possession, the attacking midfielder typically joins the striker to create a front two during the defensive phase.
The wide-forwards drop back and narrow off into the half-spaces to create a midfield four.
This is a quick and efficient way for teams to adapt their formation when entering the defensive phase.
Setting up a defensive block is much like the short blanket analogy; decisions must be made about prioritising covering the head or the feet.
Mid-blocks can offer a happy medium.
By setting the backline on the edge of the defensive third, if they read well when the ball is going to be played long and in behind, the goalkeeper and back-four can cover this area efficiently.
Should a long ball be played up to a central forward, the central midfielders' positioning means they are well-placed to pick up the second ball.
The line of confrontation, set on the edge of the attacking third, allows the opposition to build out unopposed.
However, this can become an advantage when the ball is turned over.
Space is created behind them by allowing (usually) the centre-backs to progress the ball up the pitch.
When the ball is won back, the now-attacking team is not as far from the goal as it would be with a low block.
This gives the opposition far less time to react to the transition and regroup before the space behind them is attacked.
Teams often deploy a 4-4-2 mid-block due to its compactness in the middle of the pitch.
The distance between the first and last lines is typically set no more than 40 yards apart.
This can be shorter depending on the level of the teams and the opposition's style of play.
For example, when South Korea implemented a 4-4-2 mid-block in their goalless draw against Uruguay at the 2022 FIFA World Cup, the team's vertical length was just 26 yards (24 meters).
This makes receiving between the lines extremely difficult, even for the most technically gifted teams.
The central areas are well protected, making it difficult and risky for teams to pass into.
Often, this forces teams to play down the sides where they are less of a threat at goal and where pressing traps can be set.
4-4-2 Pressing Traps
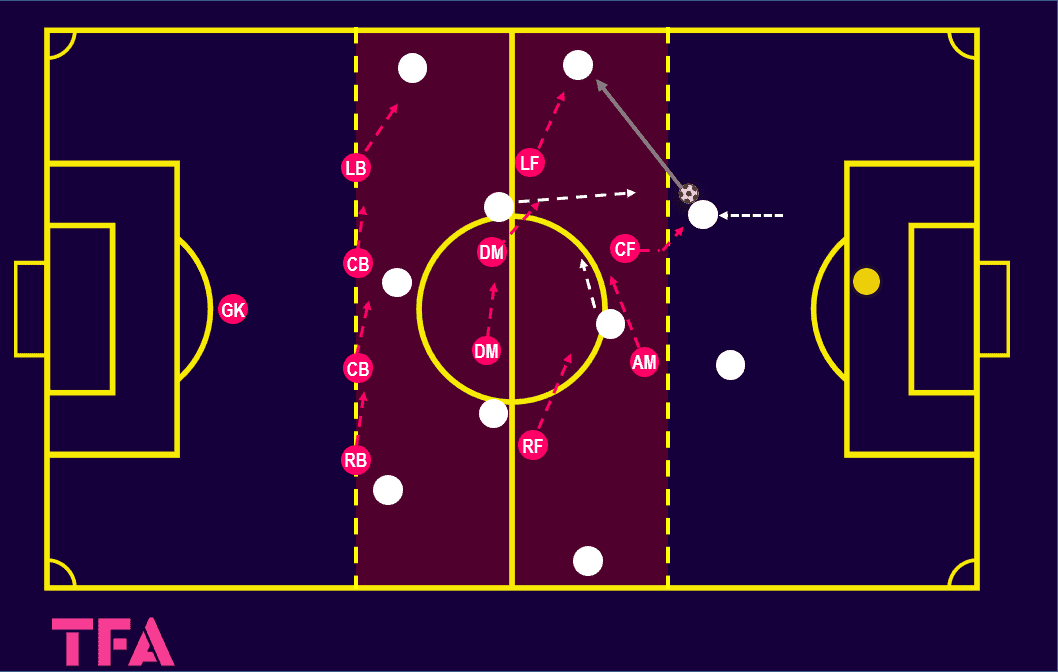
The above image shows a typical 4-4-2 pressing trap from a 4-4-2 mid-block where the opposition have been encouraged to play into the wide area.
When the ball enters the wide areas, the defending team can shift in their block and trap their opponents.
In this example, the defending teams’ forwards waited just inside the line of confrontation (set at the edge of their middle third) for the centre-back to carry the ball forward.
The forwards must be close enough to one another to prevent the ball from passing between them.
This prevents a centrally positioned 6/DMC from receiving the ball without a midfielder tracking him.
As the centre-back approaches, the ball-near forward initiates the press with a slightly angled run towards the defender's inside foot.
The forward's run aims to prevent both a straight pass into midfield and a pass to the opposite centre-back.
This forces the ball carrier down one side and makes his likely next action a pass into his full-back.
When the ball-near forward initiates the press, the ball-far forward drops diagonally behind him.
This allows the ball to be far forward, making it difficult for the 6/DMC to receive the ball, while not leaving the team too exposed on a switch of play.
The wide midfielder's starting position prioritises protecting the half-space whilst encouraging the pass into the full-back.
If the wide midfielder gets drawn out too wide too early, a passing lane opens up, allowing an opposition forward to receive the ball at his feet.
From his narrow starting position, the wide player should point his hips at the full-back rather than having a flat, forward-facing body shape.
This allows him to sprint to the wide area more efficiently.
When the wide-midfielder reads the pass, he must be able to apply pressure from beneath to the full-back’s first touch.
This immediate pressure underneath the full-back takes away his option to play forward.
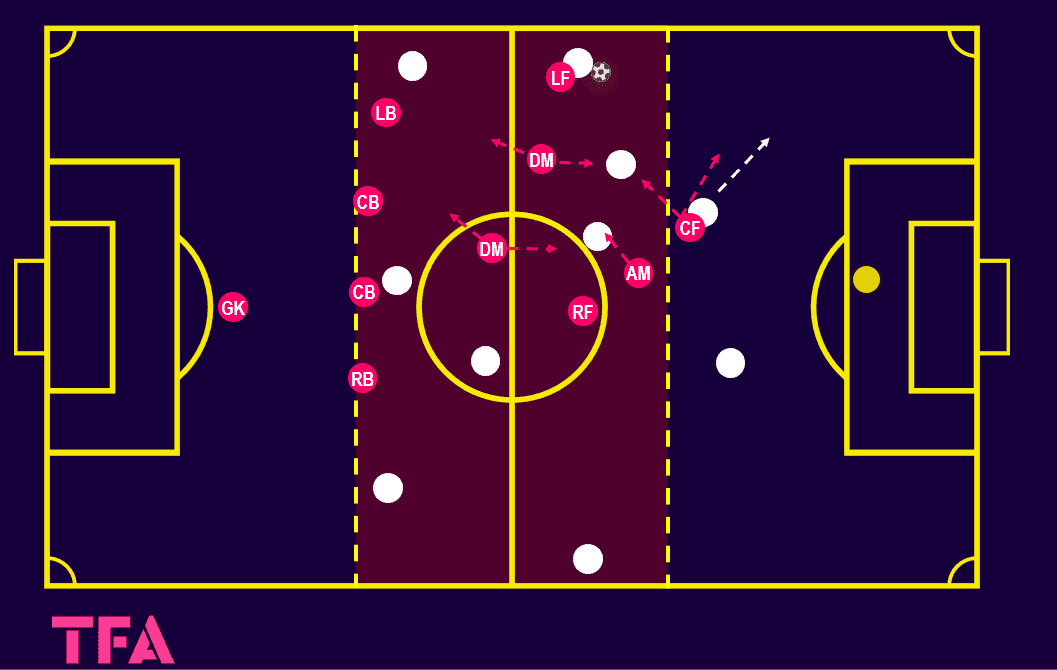
As the ball enters the wide area, the whole block shifts aggressively across the pitch, crowding the area around the ball.
The ball-far wide midfielder moves inside, allowing the central midfielders to get closer to the ball.
As long as the full-back has received with his back to goal, the ball-near central midfielder can stay close to the opposition ball-near midfielder if he shows to receive from his full-back.
Alternatively, if the full-back receives facing forward, the ball-near midfielder may have to defend diagonally underneath his wide player.
In this instance, the ball-near forward could apply pressure from behind whilst his midfielder shields his central defenders.
At this moment, all of the opposition players near the ball are covered, and ideally, the full-back is facing his own goal.
If the defending team can dispose of the fullback or intercept a loose pass, it is in a good position to counterattack.
Depending on where possession is regained, they could play into the feet of one of the two centrally positioned forwards or hit the space behind.
Reacting To The First Line Of Pressure Being Broken
Inevitably, and for various reasons, the opposition will break through the first line of pressure and into a central area at points in the game.
How the central midfielders respond depends on how far the nearest central midfielder is from the ball.
The key is to read the play and be aware of what is around them; reacting appropriately is vital.
Should a central midfielder jump out of position at the wrong time, the ball could be played around him, putting his backline under pressure.
Although teams try to avoid it, there will be times when the opposition can comfortably gain possession behind the first line of pressure.
This occurs when a player receives the ball, takes a touch in the direction they want, and plays with their head up, without an opposing player being able to affect them.
In these scenarios, whether the ball is passed or dribbled into central areas beyond the first line of pressure, the midfield must not overreact.
They can quickly be sliced through if they jump incorrectly in these moments.
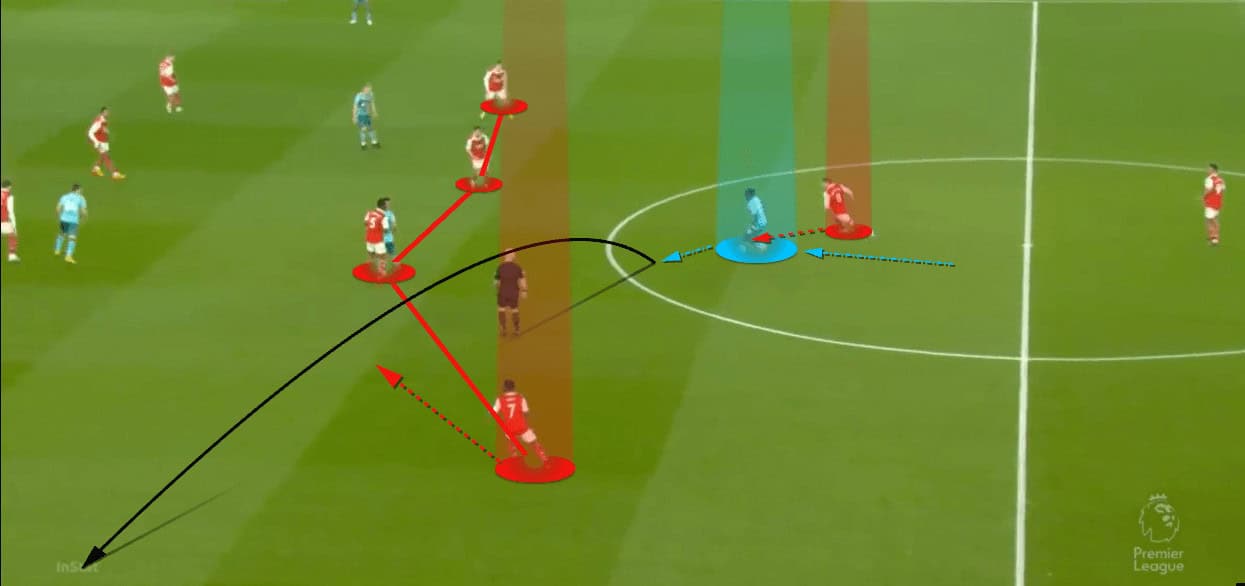
The image above shows Mikel Arteta's Arsenal, playing in a 4-4-2 formation, reacting to Southampton breaking their first line of pressure.
Even Arsenal, which is aggressive when out of possession (and losing at the time), does not simply jump at the ball carrier.
Instead, the Premier League title winners were patient, with the central players holding their ground and the wide midfielders tucking inside.
They ensure the ball cannot be played between them, slowing the game down and encouraging the opposition to play into the wide areas.
When the ball is played wide, the players shift quickly, similarly to what was described in the previous section, into the wide area to block crosses and force the opposition backwards.
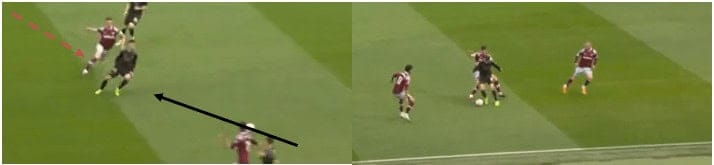
When central midfielders are close enough to their direct opponent to press, they should look to press at an angle, starting from the centre of the pitch.
The above image shows a pass being played into a midfield player from the wide area.
The West Ham United midfielder, the pressing player, predicts the pass and is close to his opponent before he even receives the ball.
The angle at which he presses prevents his opponent from turning his body to face forward, forcing him to take a first touch back in the same direction the ball came from.
This puts the pressing player in control of the player on the ball and forces him to return to where the ball came from.
This play resulted in the West Ham midfielder pushing his opponent all the way to the sideline before his opponent let the ball go out of play for a West Ham throw.
Rondo For Implementing A 4-4-2 Mid-Block
The starting point for implementing any mid-block style is setting a clear line of engagement.
It is vital that the forwards know when to confront the opposition.
If they go too early, the midfield can find themselves having to cover huge areas of ground.
On the other hand, they can become too passive and allow easy first passes into midfield.
The lines should be set based on the attributes of the players available and the qualities of the opposition you are trying to nullify.
Once the lines are set, some fundamentals of how players should react in certain situations can be refined.
The following are examples of exercises that can improve how the forwards apply pressure and the midfielders screen their backline.
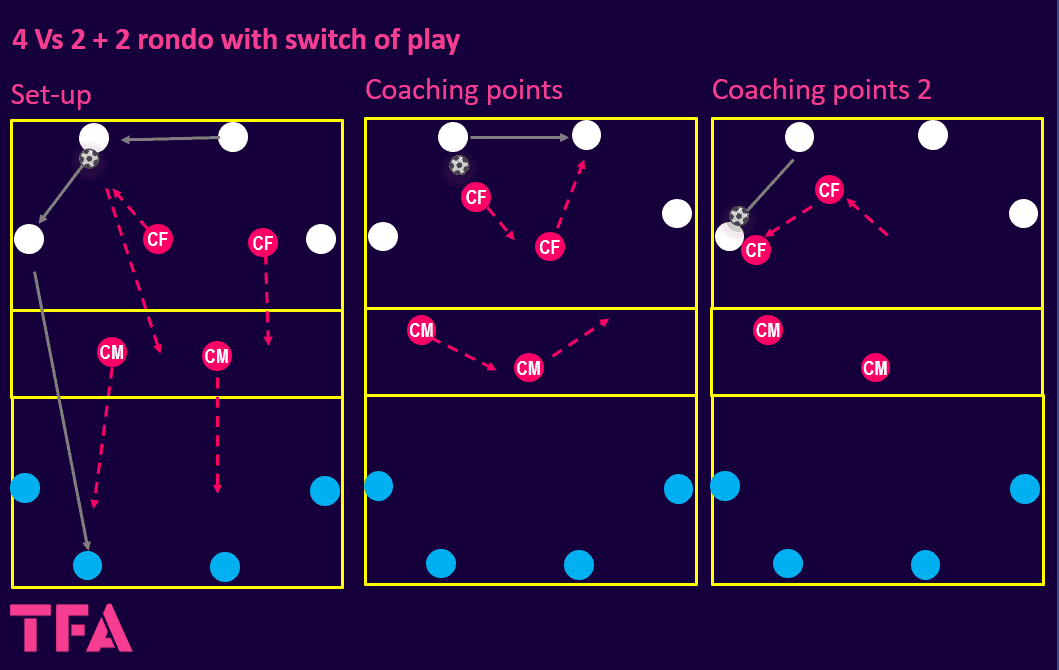
This rondo, which can be incorporated into the warm-up, focuses on the pressing movements of the front two players and the shielding movements of the central midfielders.
Three teams of four are created with two in-possession teams in either end box, plus a defending team.
The in-possession teams should be set up modelling a back four in a condensed area (size depending on the level of the players).
Their aim is to connect a pre-determined number of passes before switching the ball to the opposite box.
The defending team works in pairs, with two players pressing in one end box and two occupying the middle box.
When the ball is switched, the pairs switch roles.
The defending players' aim is not to allow the ball to be advanced to the opposite box.
One team defends for three minutes before switching with another team.
The defending team that allows the fewest switches of play is the winner.
The focus of the forwards should be on when to press the ball and when to defend the space.
They should use counter-movements, with one pressing the ball and the other dropping off to prevent the ball from being played between them.
When they press, they should make the press predictable to allow their midfielders to shift behind them accordingly.
The “midfielders” in the middle box, who can intercept, should be active and moving with the ball.
They, too, should have staggered positioning to prevent the ball from being played between them.
If the ball is transferred to the box behind them, they should react and enter the box quickly.
Instead of timed periods of defending, the rondo can be progressed with transitional defending.
If the pressing team wins the ball, they switch it to the other box.
The dispossessed team then transitions to become the defending team.
This forces the players to react quickly to losing the ball and arrange their defensive shape in “live mode”.
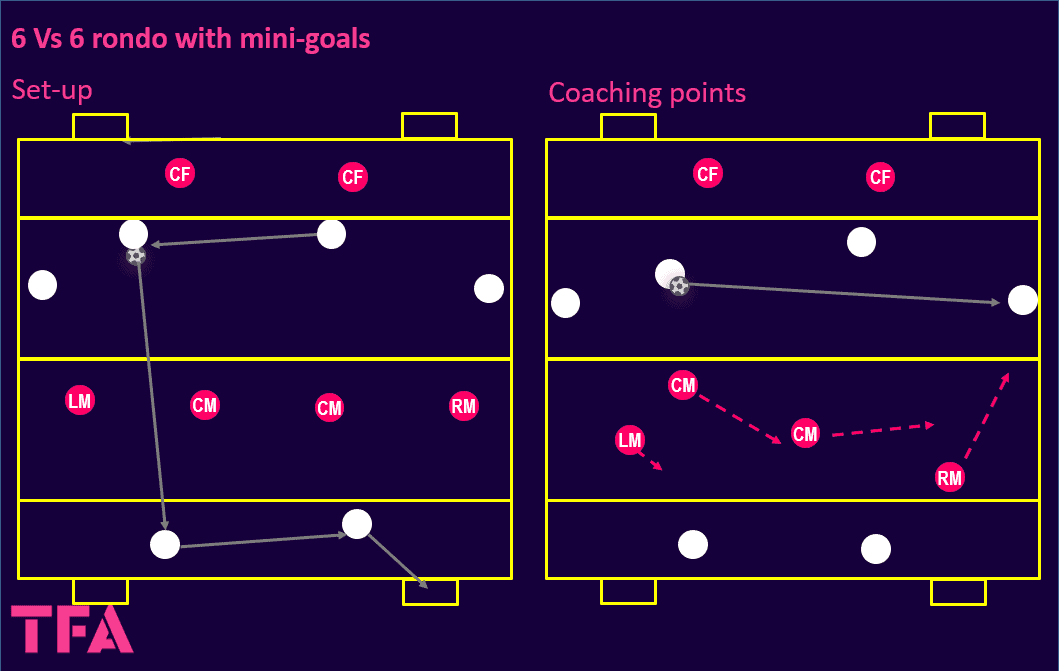
This second rondo focuses on the midfield and how they move and react when the first line of pressure is breached.
The twelve players are now split into two teams of six.
Four midfielders occupy their own central box with the two forwards in the end zones.
The in-possession team aims to advance the ball to its forwards, who must score one of the two mini-goals.
The defending team aims to block through balls and react quickly to any regain of possession, playing forward at the first opportunity.
To maintain a fast pace of play, the middle zone players can only take two touches, while the end players have one touch each.
All players must remain within their designated zones, both when in possession and when out of possession.
The focus of the defending team should be to shift laterally and stagger their positioning.
If done correctly, this will prevent any passes from being played between them.
When able to do so securely, the ball-near player should step towards the ball, with the players beside him dropping off.
This allows them to cover a wider area while preventing balls from being played between them, as they could if they were in the same horizontal line.
The key is to promote patience and synchronisation.
Every player is involved in the defensive structure, and any player acting alone or not doing their assigned job will cause gaps to appear.
This rondo can be progressed by adding width and allowing players to move between different zones.