
![South Africa Vs South Korea [1–0] – FIFA World Cup 2026: Why Possession Didn't Mean Control – Tactical Analysis](https://cdn.mymidnight.blog/77f959f119f4fb2321e9ce801e2f5163/size/w1000/2026/06/South-Africa-Vs-South-Korea-World-Cup-2026-1.png)
South Africa Vs South Korea [1–0] – FIFA World Cup 2026: Why Possession Didn't Mean Control – Tactical Analysis

The final Group A fixture in the 2026 FIFA World Cup carried the pressure of a knockout match.
Mexico entered the final round having won their opening two group-stage matches, with their last group-stage fixture against Czechia taking place simultaneously, leaving South Africa and South Korea to compete for the remaining automatic qualification place.
South Africa required victory to retain any chance of progressing, while South Korea needed only a point.
The tactical contrast was immediate.
Hugo Broos’ South Africa defended with exceptional compactness, discipline and professionalism, while remaining highly dangerous on the counterattack.
Hong Myung-bo’s South Korea controlled possession and displayed technical security, but their approach was often too risk-averse to unsettle an organised defensive block.
This World Cup tactical analysis examines both teams’ structures with and without the ball in South Africa’s 1-0 victory, a result which secured the country’s first-ever appearance in a World Cup knockout stage.
South Africa Vs South Korea Lineups & Formations
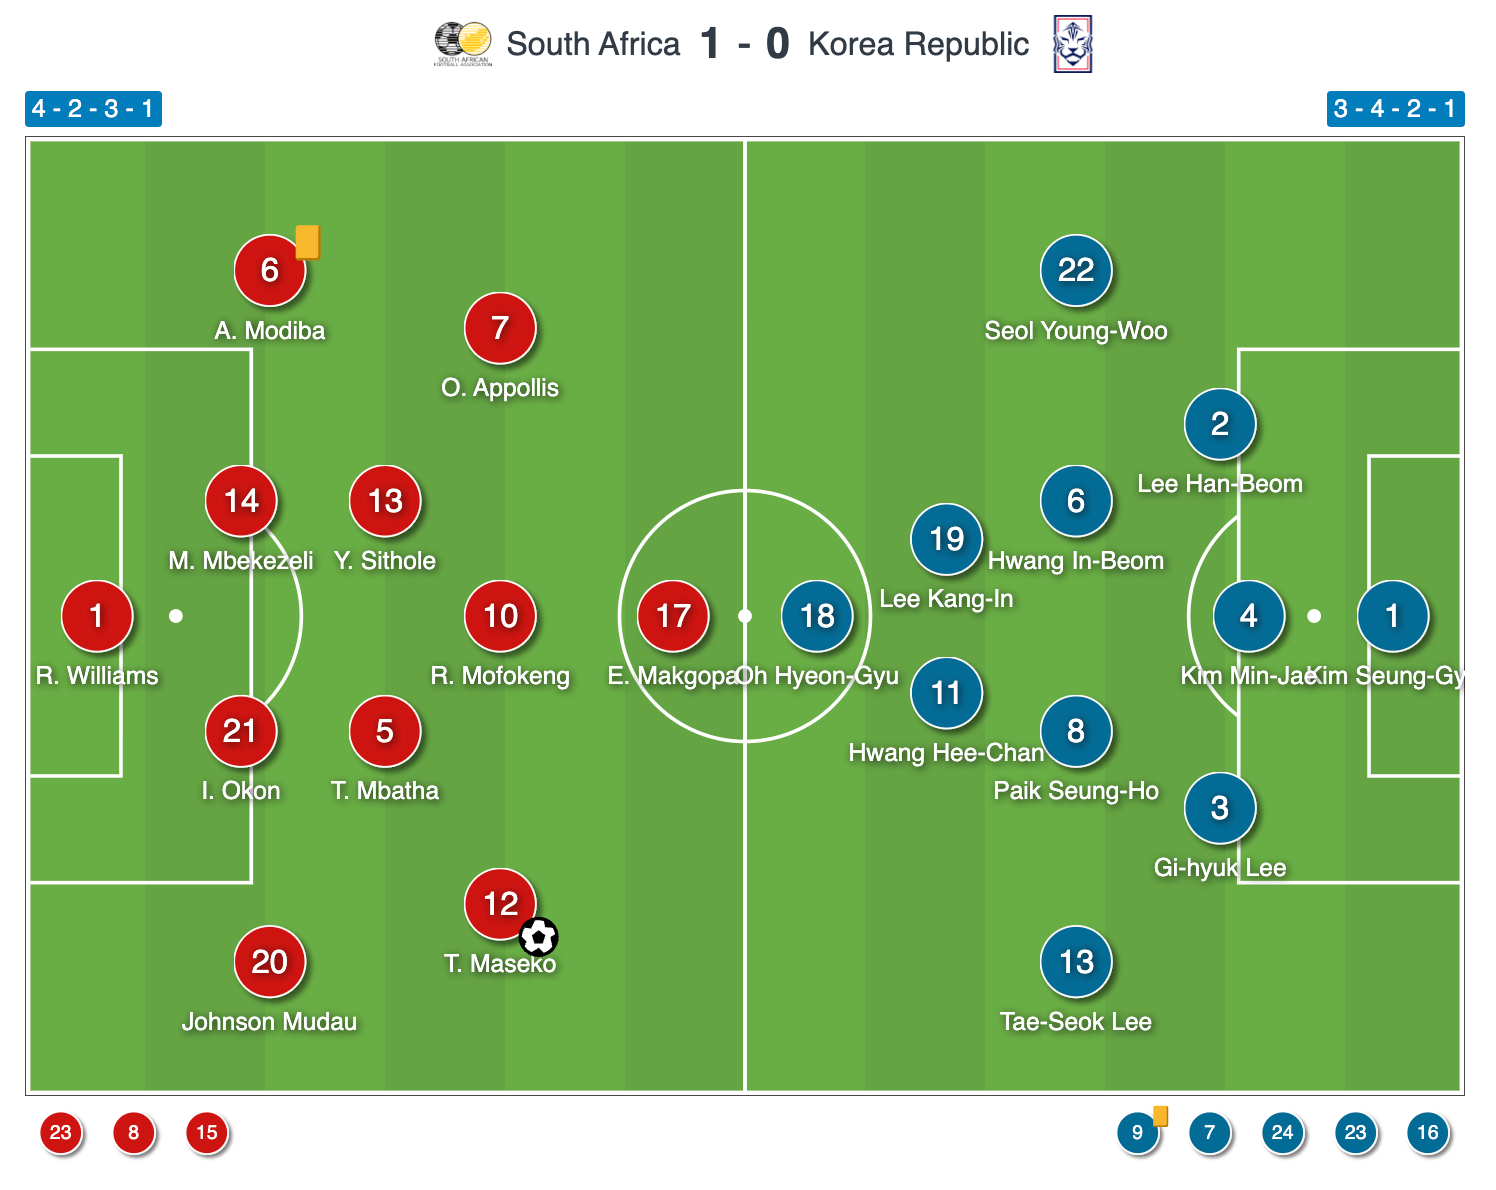
South Africa Lineup Vs South Korea
Hugo Broos set his team up in a base 4-2-3-1 structure, with Ronwen Williams in goal behind a back four consisting of Khuliso Mudau at right-back, Ime Okon at right centre-back, Mbekezeli Mbokazi at left centre-back, and Aubrey Modiba at left-back.
Thalente Mbatha and Yaya Sithole played in central midfield, with Relebohile Mofokeng lining up as the '10', goalscorer Thapelo Maseko at right wing, and Oswin Appollis at left wing, behind Evidence Makgopa up top.
Broos made three substitutions during the match: Tshepang Moremi replaced Oswin Appollis just after the hour mark, Iqraam Rayners replaced Thapelo Maseko in the 75th minute, and Jayden Adams was introduced for Relebohile Mofokeng in the 80th minute.
South Korea Lineup Vs South Africa
South Korea set up in a 3-4-2-1 shape, with Kim Seung-gyu in goal, Lee Han-beom at right centre-back, Kim Min-jae in the middle of the back three and Lee Gi-hyuk at left centre-back.
Seol Young-woo and Lee Tae-seok started at right and left wing-back, respectively, while Hwang In-beom and Paik Seung-ho started in central midfield.
Lee Kang-in and Hwang Hee-chan played just behind Oh Hyeon-gyu up front.
Hong Myung-bo made five substitutions during the match, three of which came at half-time when Son Heung-min, Kim Jin-gyu, and Jens Castrop replaced Hwang Hee-chan, Paik Seung-ho, and Lee Tae-seok.
Just after the hour mark, Park Jin-seob came on for Kim Min-jae.
South Korea's final change saw Cho Gue-sung introduced for Oh Hyeon-gyu.
South Africa Tactics In Possession
South Africa used a staggered midfield three during build-up and in more settled possession, as illustrated in Figure 1.
The back four formed the first line, supported by a midfield three and three advanced forwards, typical of a 4-3-3.
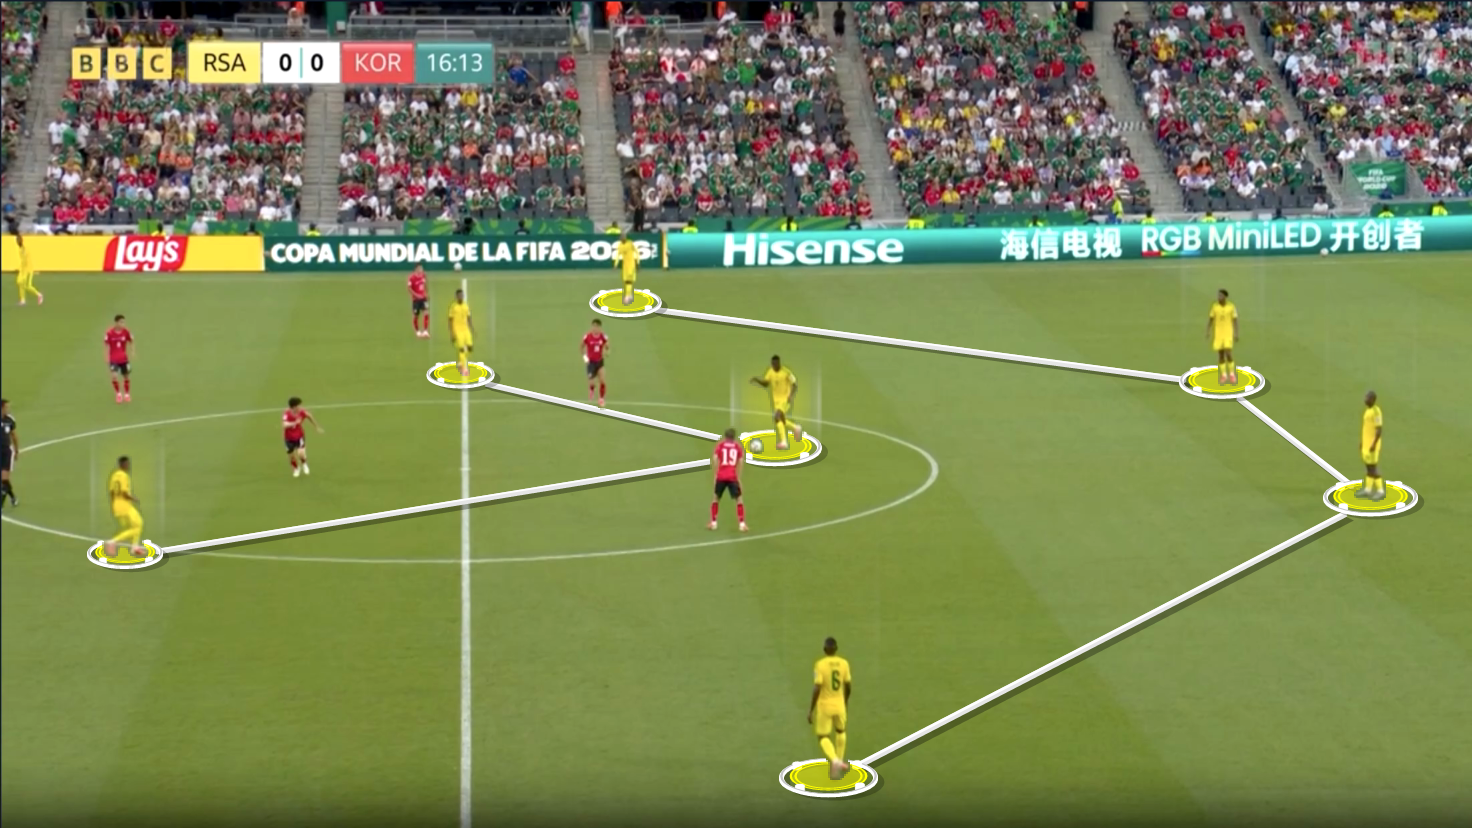
Despite this, they consistently prioritised direct play rather than attempting to progress through short build-up.
This was also evident from goal kicks.
They regularly played towards their high forwards, who were often isolated in 1v1 situations against South Korea’s defenders.
This was a logical response to South Korea’s high, man-oriented press.
When an opponent commits players forward and presses man-to-man, direct passes can bypass the pressure and expose the defenders behind it.
South Africa, therefore, avoided unnecessary risk near their own goal and attempted to move the game into more favourable attacking areas.
Their greatest threat came in transition.
After regaining possession, South Africa combined efficiently with few touches, frequent first-time passes and forward movement.
This allowed them to break quickly before South Korea could recover into a stable defensive structure.
The winning goal came from this type of attack.
South Africa’s speed and simplicity in transition enabled them to create a higher-quality chance than many of South Korea’s longer spells of possession.
South Africa Tactics Out Of Possession
Without the ball, South Africa generally defended in a compact 4-4-2 mid-block, with the wingers dropping deep alongside the central midfielders and the '10' joining the centre-forward to press further upfield; the structure occasionally became a 4-1-4-1.
As demonstrated in Figure 2, the distances between players and units remained small.
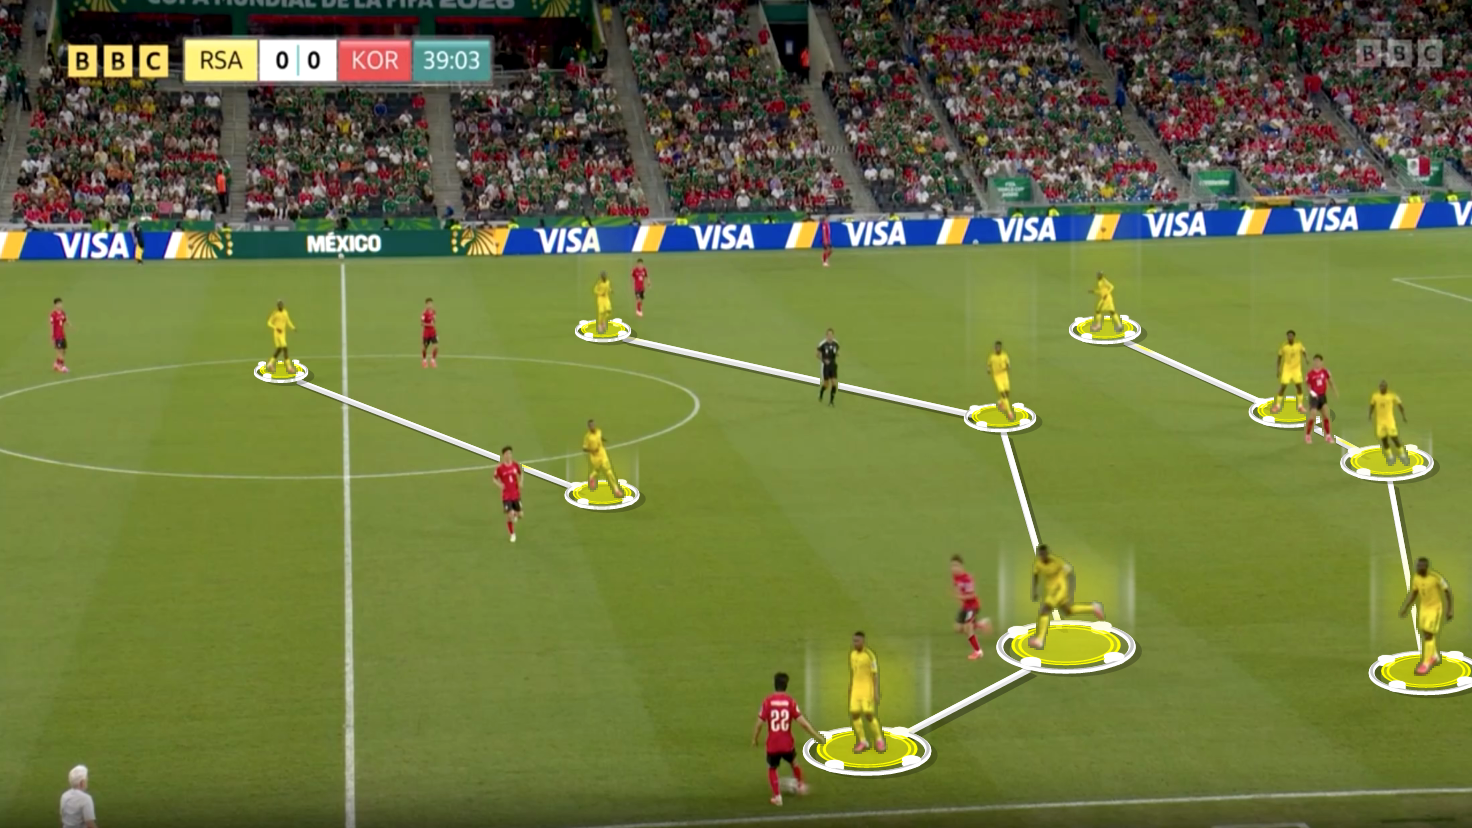
The block was well-drilled and difficult to penetrate.
South Africa protected central spaces, reduced access between the lines and made line-breaking passes difficult.
South Korea’s slow circulation also gave Broos’ side enough time to shift laterally and cover the relevant spaces and channels.
This organisation sometimes allowed South Africa to regain the ball high up the pitch following loose passes during South Korea’s build-up.
Once possession was won, their athletic forwards posed a significant transitional threat.
South Africa did not regularly jump into a full man-to-man press.
This prevented gaps from opening within their structure, although it also reduced pressure on the ball carrier.
Such passivity may be less effective against elite creative players who can exploit additional time in possession, but it worked well in this match.
When South Korea rotated, particularly through vertical movements, South Africa’s defenders were not tempted to follow opponents and disrupt the block.
They defended zonally, remained comfortable without possession and prioritised structural stability over aggressive individual pressing.
South Korea Tactics In Possession
In South Korea's 3-4-2-1, the wing-backs provide the primary width.
This structure gave them consistent occupation across the pitch and enabled secure circulation, although it also placed considerable creative responsibility on the wide players.
Neither wing-back consistently demonstrated the elite 1v1 ability required to make the most of repeated 1v1 situations in wide areas.
South Korea regularly moved the ball into wide areas, allowing the wing-backs to receive in 1v1 situations and face up their direct opponents.
This allowed them to advance possession and stretch South Africa horizontally, but the absence of a high-level dribbler in these positions limited their ability to turn those situations into clear chances.
Greater rotation between the wing-backs and inside forwards may have improved the effectiveness of this approach.
Such movements would have better matched individual profiles to specific zones, allowing South Korea’s more dangerous attackers to receive in wide areas while the wing-backs contributed through supporting runs or underlapping movements.
South Korea enjoyed long periods of controlled possession and demonstrated considerable technical security, but they struggled to translate that control into penetration against South Africa’s compact mid-block.
Their positional structure was highly organised, although at times it became overly rigid, with limited freedom for players to move beyond their prescribed roles.
Consequently, chances were primarily generated through rehearsed patterns, while opportunities for improvisation and individual skill were reduced.
In settled build-up, South Korea commonly used a 3-2 structure.
As illustrated in Figure 3, one of the two midfielders occasionally dropped into the defensive line, changing the structure into a 4-1.
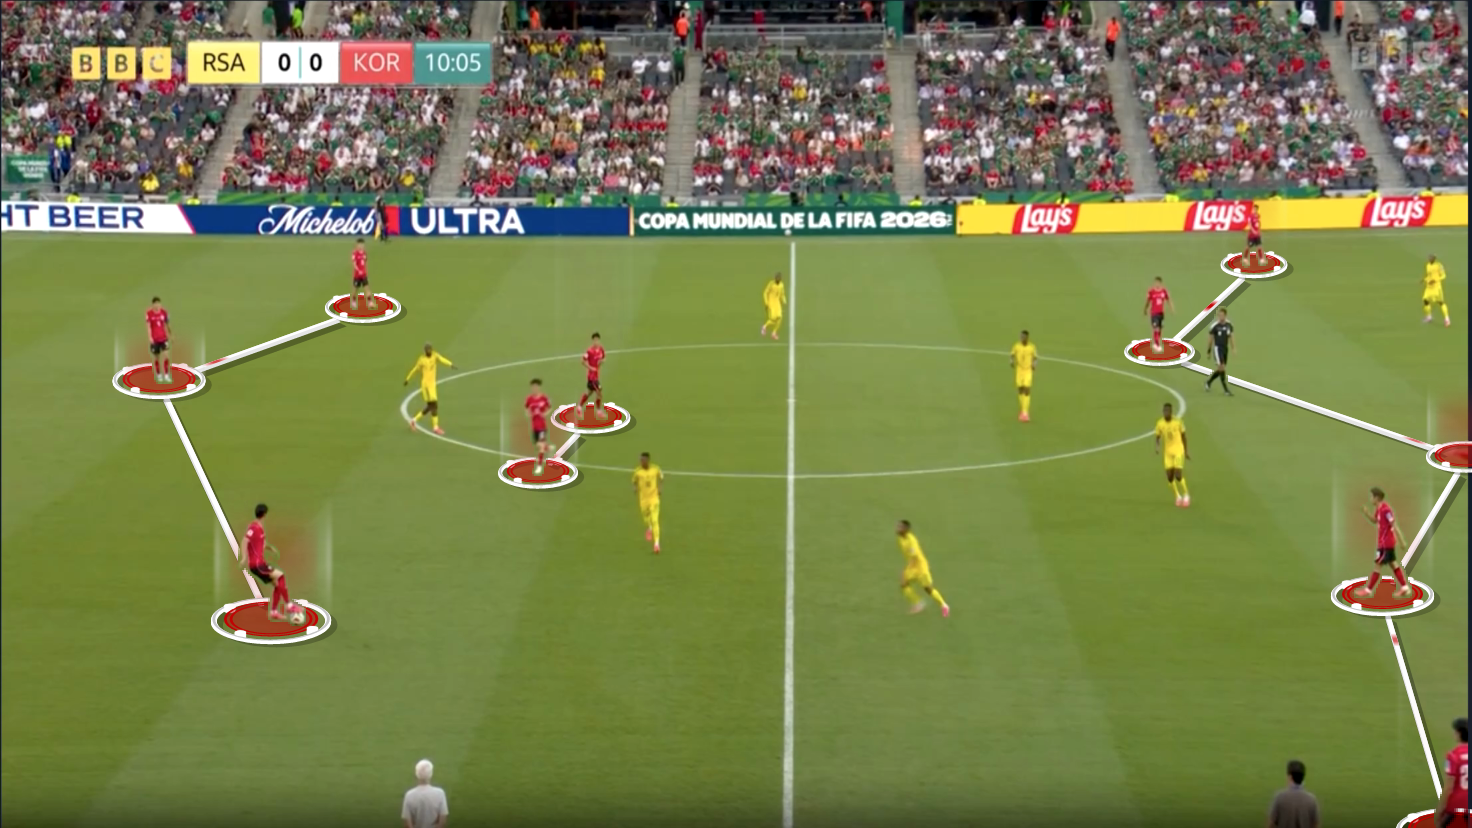
South Korea predominantly attempted to play out from the back, displaying confidence and technical composure under pressure.
In deeper build-up, their shape could become a 4-2-4, with the wing-back advancing into the last line and the outside centre-back moving laterally to operate as a situational full-back.
Higher up the pitch, South Korea moved into a 3-2-5 or 3-1-6, with both wing-backs advancing into the last line.
These structures enabled them to overload South Africa’s defence and maintain sustained pressure in advanced areas.
However, the numerical occupation of the final line did not consistently result in penetration.
A recurring problem was South Korea’s failure to consistently exploit the openings generated by their positional rotations.
Although players moved intelligently away from certain areas, the space they left behind was not always occupied quickly enough by a teammate.
As a result, potentially effective movements lost some of their value, and at times several players converged on the same zones.
South Korea also needed to offer a greater threat in behind during the final third. Most players looked to receive possession to feet, with too few making forward runs to stretch South Africa’s defensive line.
While this supported ball retention, it allowed South Africa to remain compact and defend with greater comfort.
A zonal block is most effectively disrupted by movements that pull defenders away from their positions and create space for teammates to attack.
South Korea attempted these rotations, but they did not always execute the subsequent movement into the space.
Their measured tempo in possession also gave South Africa time to remain compact and shift laterally, particularly because there was limited threat behind the defensive line.
This was especially significant because South Korea frequently attempted to create through wide areas.
Their intention was to shift South Africa horizontally through repeated circulation from one flank to the other, thereby opening spaces within the defensive block.
However, the tempo of their possession was often too slow to achieve this effectively.
South Africa, therefore, had sufficient time to move laterally as a unit, protect the relevant channels and restore their compact shape before Korea could attack the space created.
South Korea Tactics Out Of Possession
South Korea initially defended zonally before transitioning into a man-for-man press when an appropriate trigger emerged.
This enabled them to retain compactness while applying more aggressive pressure at selected moments.
![Uruguay Vs Spain [0–1] – FIFA World Cup 2026: Luis De La Fuente Rest-Defence Tactics Suffocate La Celeste – Tactical Analysis](https://cdn.mymidnight.blog/77f959f119f4fb2321e9ce801e2f5163/size/w600/2026/06/Uruguay-Vs-Spain-World--Cup-2026--2-.png)
![Switzerland Vs Canada [2–1] – FIFA World Cup 2026: Patience Rewards Murat Yakin Tactics – Tactical Analysis](https://cdn.mymidnight.blog/77f959f119f4fb2321e9ce801e2f5163/size/w600/2026/06/Switzerland-Vs-Canada-World-Cup-2026.png)
![England Vs Ghana [0–0] – FIFA World Cup 2026: Why Thomas Tuchel Tactics Couldn't Break The Black Stars Down – Tactical Analysis](https://cdn.mymidnight.blog/77f959f119f4fb2321e9ce801e2f5163/size/w600/2026/06/England-Vs-Ghana-World-Cup-2026.png)
![Norway Vs Senegal [3–2] – FIFA World Cup 2026: Ståle Solbakken Tactics Exploit Pape Thiaw Defensive Gamble – Tactical Analysis](https://cdn.mymidnight.blog/77f959f119f4fb2321e9ce801e2f5163/size/w600/2026/06/Norway-Vs-Senegal-World-Cup-2026.png)
![Argentina Vs Austria [2–0] – FIFA World Cup 2026: The Diego Simeone Influence Behind Messi's Record-Setting Win – Tactical Analysis](https://cdn.mymidnight.blog/77f959f119f4fb2321e9ce801e2f5163/size/w600/2026/06/Argentina-Vs-Austria-World-Cup-2026.png)
![Uruguay Vs Cape Verde [2–2] – FIFA World Cup 2026: What's Gone Wrong For Marcelo Bielsa Tactics? – Tactical Analysis](https://cdn.mymidnight.blog/77f959f119f4fb2321e9ce801e2f5163/size/w600/2026/06/Uruguay-Vs-Cape-Verde-World-Cup-2026.png)
![Tunisia Vs Japan [0–4] – FIFA World Cup 2026: When Tactical Uncertainty Proves Costly – Tactical Analysis](https://cdn.mymidnight.blog/77f959f119f4fb2321e9ce801e2f5163/size/w600/2026/06/Tunisia-Vs-Japan-World-Cup-2026-1.png)
![Germany Vs Côte d'Ivoire [2–1] – FIFA World Cup 2026: Julian Nagelsmann Second-Half Changes Earn Three Points – Tactical Analysis](https://cdn.mymidnight.blog/77f959f119f4fb2321e9ce801e2f5163/size/w600/2026/06/Germany-Vs-Co--te-d---Ivoire-World-Cup-2026.png)