
![England Vs Ghana [0–0] – FIFA World Cup 2026: Why Thomas Tuchel Tactics Couldn't Break The Black Stars Down – Tactical Analysis](https://cdn.mymidnight.blog/77f959f119f4fb2321e9ce801e2f5163/size/w1000/2026/06/England-Vs-Ghana-World-Cup-2026.png)
England Vs Ghana [0–0] – FIFA World Cup 2026: Why Thomas Tuchel Tactics Couldn't Break The Black Stars Down – Tactical Analysis

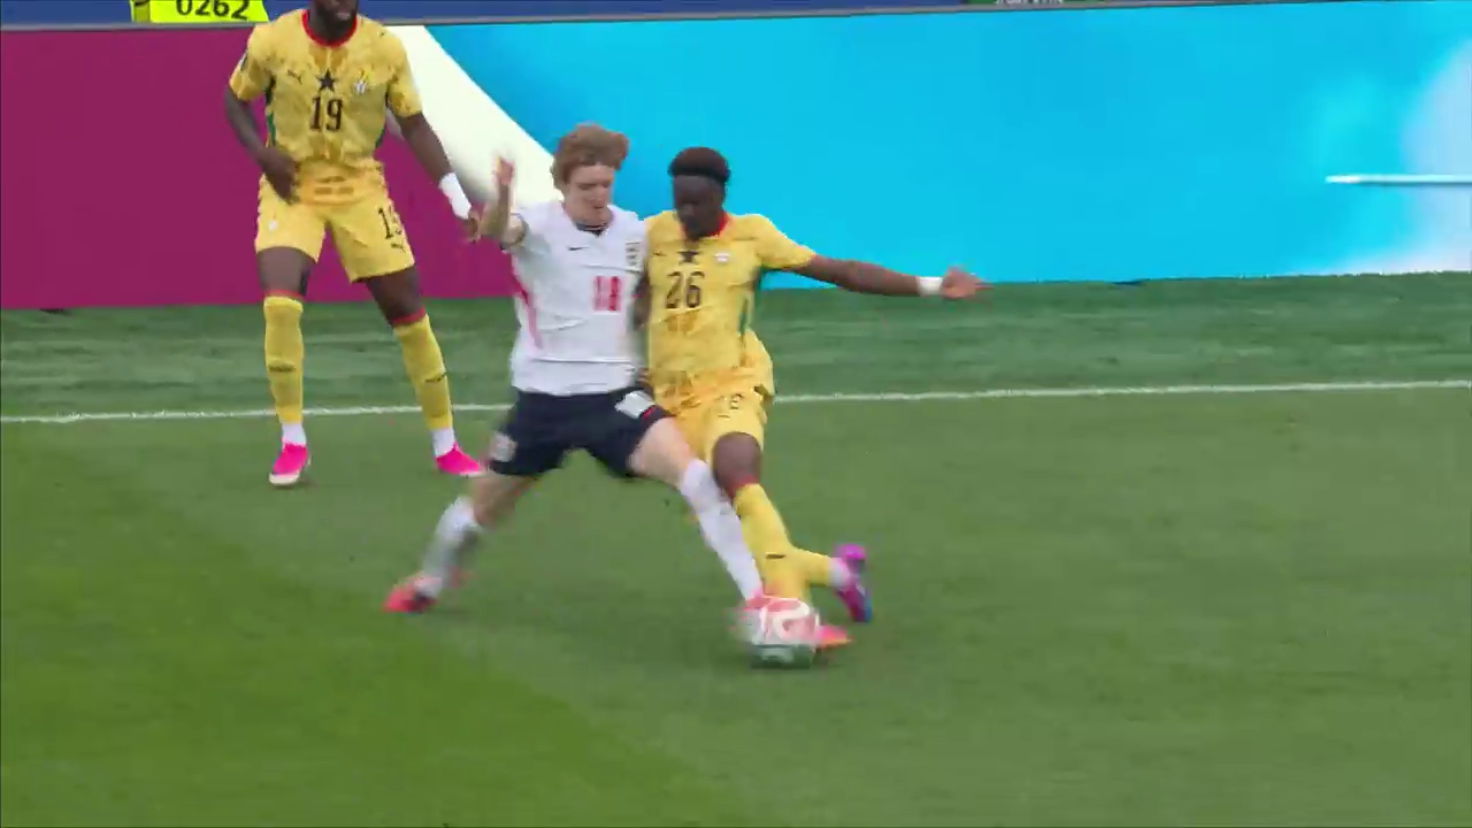
England shared the points after a goalless draw with Ghana in the second round of Group L fixtures at the 2026 FIFA World Cup.
The result complicated matters in the group, particularly after Croatia defeated Panama in the other match of the round.
Ahead of the final group-stage fixtures, England remain top of the standings with four points, level with second-placed Ghana, while Croatia sit third on three points.
Before kick-off at Boston Stadium, England were expected to claim all three points, secure first place in the group, and approach their final match against Panama with greater confidence.
"I still think that we play in one of the most difficult groups in this World Cup.
We had a very difficult first match and a very difficult second match," Thomas Tuchel said after the game.
Despite the lack of goals, the match offered several intriguing tactical themes.
With 79% possession, England controlled the game for long periods.
However, Ghana remained compact and disciplined, working hard to close spaces, disrupt England's attacking mechanisms, and neutralise their key players.
At the same time, Ghana tried patiently to wait for opportunities to launch transitions and threaten whenever possible.
This England vs Ghana World Cup tactical analysis analyses how both sides approached the game and why England were unable to find a way through the Black Stars' defence.
England Vs Ghana Lineups & Formations
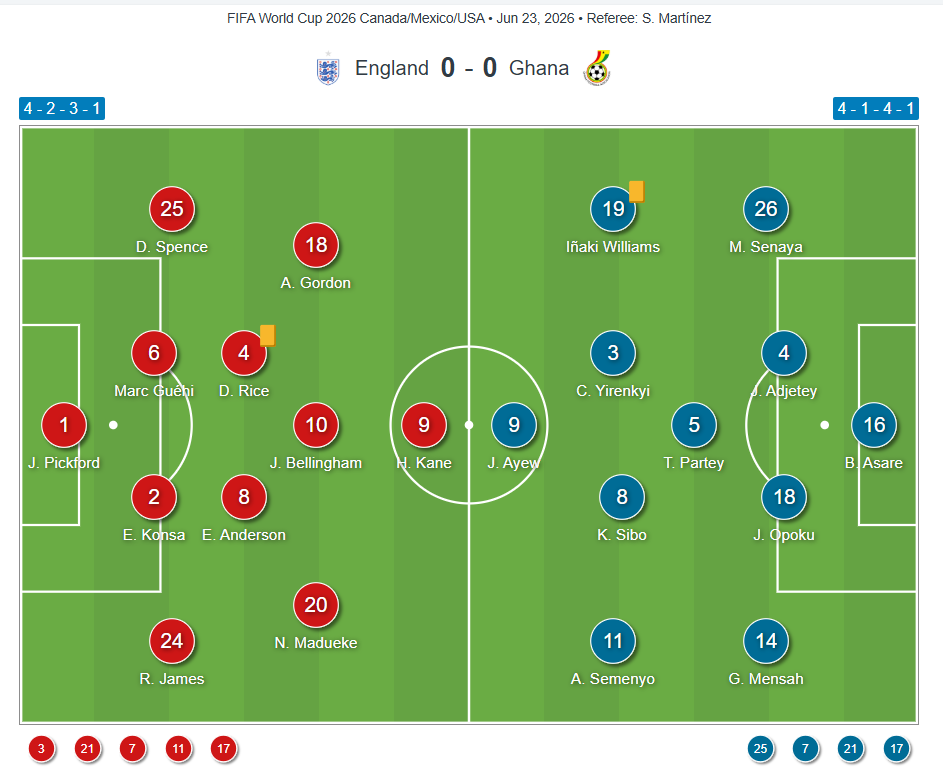
England Lineup Vs Ghana
Thomas Tuchel lined his team up in a 4-2-3-1 formation.
Jordan Pickford started in the net behind the centre-back pairing of Ezri Konsa at right centre-back and Marc Guéhi at left centre-back.
Djed Spence started at left-back, while Reece James started as a right-back.
Elliot Anderson and Declan Rice started together as the two central midfielders.
Anthony Gordon started on the left wing, Jude Bellingham started as the ‘10’, while Noni Madueke started at right wing.
Harry Kane started in his usual place up top as the striker.
Thomas Tuchel made five substitutions in the match.
In the 65th minute, Nico O’Reilly and Bukayo Saka came on for Djed Spence and Anthony Gordon.
In the 74th minute, Eberechi Eze and Morgan Rogers came on for Jude Bellingham and Elliot Anderson.
Marcus Rashford came on for Noni Madueke in the 83rd minute.
Ghana Lineup Vs England
Carlos Queiroz opted for a 4-5-1 system for Ghana's starting XI.
Benjamin Asare started in Ghana's goal behind the defensive line.
Two defenders, with Jerome Opoku as a right center-back and Jonas Adjetey as the left center-back.
Gideon Mensah on the left full-back, Marvin Senaya on the right full-back.
Three midfielders in the centre, with Thomas Partey as the holding midfielder, Caleb Yirenkyi as the right central midfielder, and Kwasi Sibo as the left central midfielder.
Iñaki Williams started on the right wing, and Antoine Semenyo on the left wing.
All behind Jordan Ayew, who operated as a striker.
Carlos Queiroz made five changes during the match.
In the 66th minute, Abdul Fatawu and Prince Kwabena Adu came on for Iñaki Williams and Jordan Ayew.
In the 87th minute, Kojo Peprah Oppong came on for Marvin Senaya.
Abdul Rahman Baba came on for Prince Kwabena Adu in the 90th minute.
England Struggle Against Ghana's Low Block
Ghana were willing to concede possession completely, particularly in the first half.
They defended in a low block that could start slightly higher to keep the defensive line outside the penalty area, but they had no issue dropping deeper to protect the box.
As a result, 66% of England's passes in the first half were played in Ghana's half.
This made it difficult for England to break through Ghana's defensive structure and create clear scoring opportunities.
England enjoyed 78% possession in the first half and attempted six shots.
How many of these six shots were on target?
Zero.
Their total xG from open play and set-pieces in the opening 45 minutes was just 0.31.
In their pressing scheme, Ghana aimed to prevent England from progressing through the centre by cutting passing lanes and blocking access into central areas.
With Thomas Tuchel being well known for creating effective wing play combinations, England were comfortable circulating the ball towards the flanks and looking to create some wing rotations to progress down the wings.
Through rotations in wide areas, they sought to create dangerous situations that could lead to quality crossing opportunities and, ultimately, high-value chances.
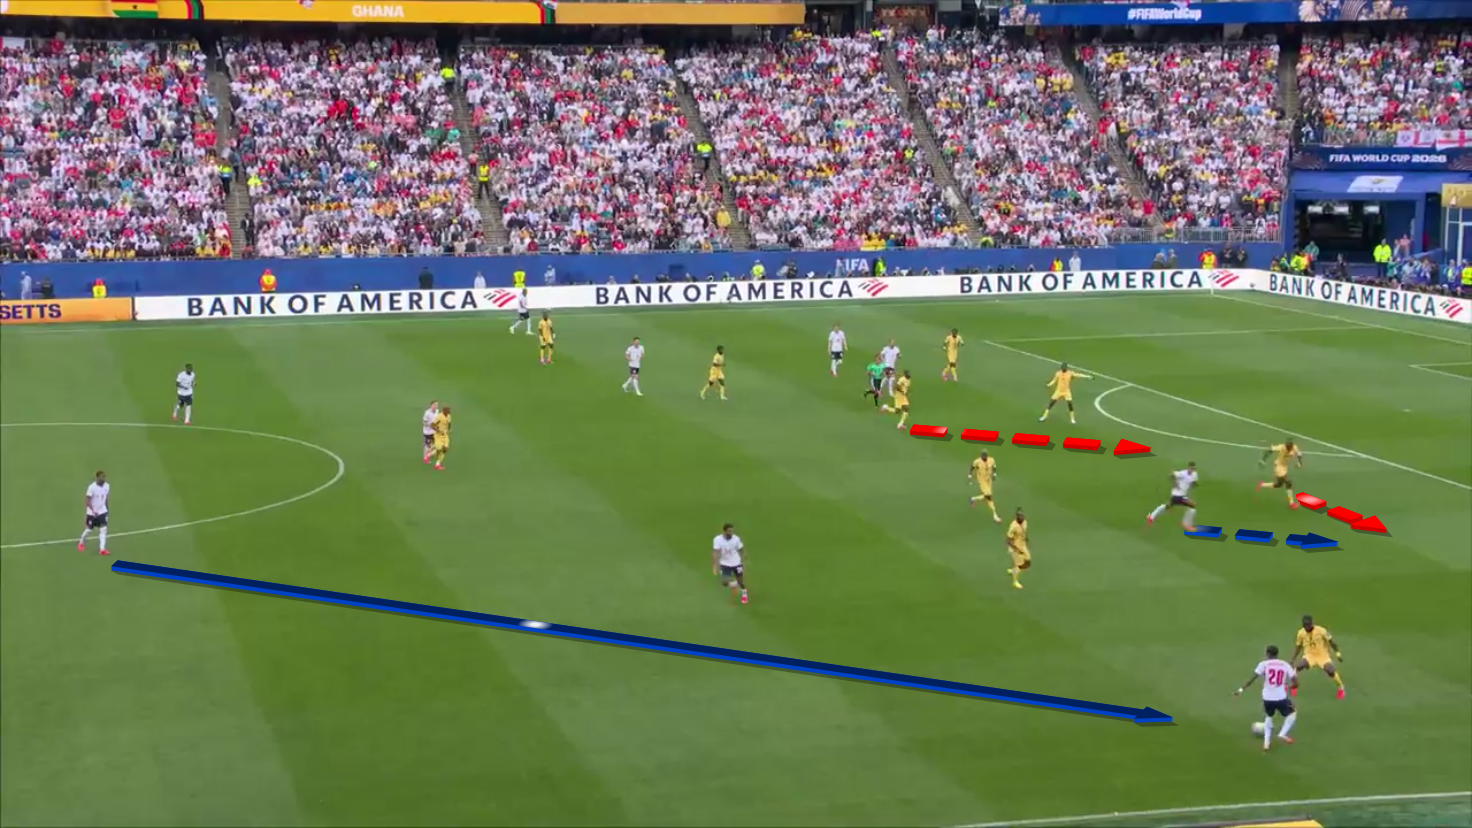
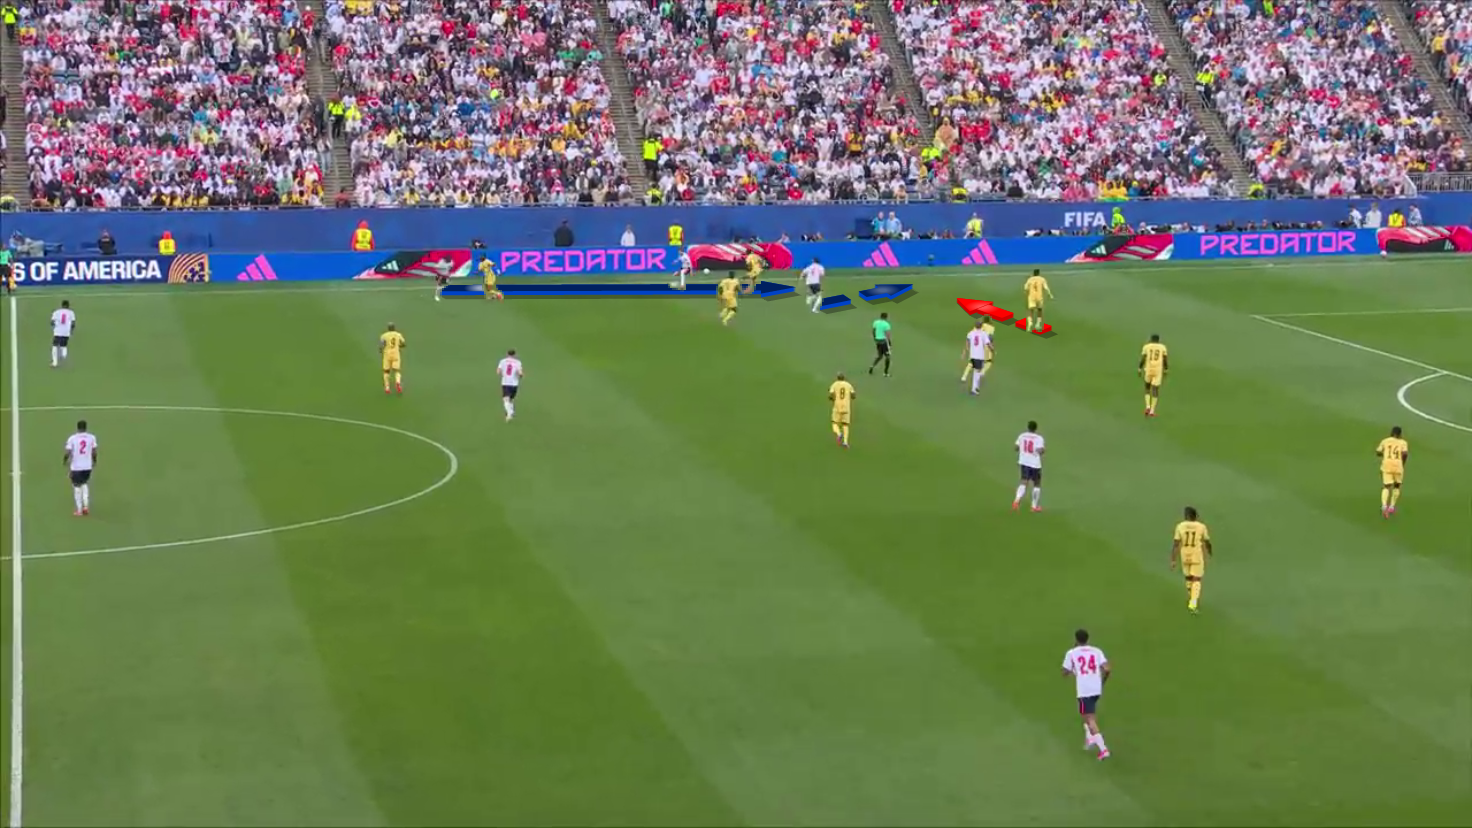
In Figure 1, we can see Ghana's 4-5-1 low block against England's final third phase.
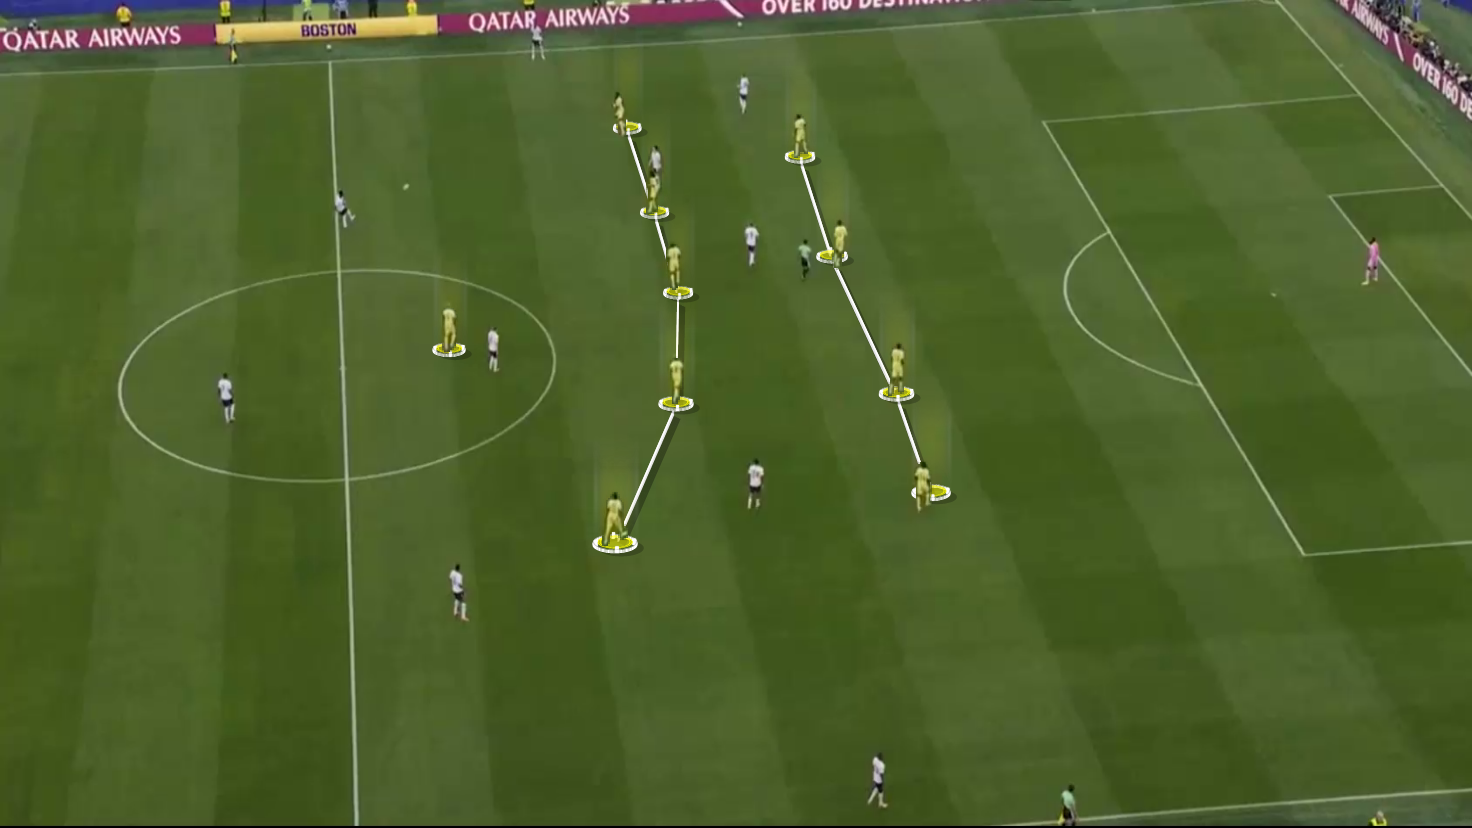
In their final third, England adopted a 4-1-2-3 shape, with Declan Rice moving higher to operate between the lines as an eight alongside Jude Bellingham.
In Ghana's defensive scheme, Jordan Ayew is responsible for Elliot Anderson, while the two eights, Yirenkyi and Sibo, are with Rice and Bellingham.
On the flanks, Iñaki Williams and Semenyo are tasked with defending against England's full-backs, Spence and James.
Whenever England's centre-forward, Harry Kane, dropped deeper, Ghana's holding midfielder, Thomas Partey, took responsibility for tracking him.
In their pressing scheme, Ghana aimed to prevent England from progressing through the centre by cutting passing lanes and blocking access into central areas.
With Thomas Tuchel being well known for creating effective wing combinations, England were comfortable circulating the ball towards the flanks and looking to progress down the wings.
Through rotations in wide areas, they sought to create dangerous situations that could lead to quality crossing opportunities and, ultimately, high-value chances.
Ghana were also prepared to defend wide areas with strong numbers, aiming to control situations on the flanks and deny England the time and space needed to deliver comfortable crosses.
At the same time, they remained ready with their box-defending structure in case England managed to find an opportunity to send the ball into the penalty area.
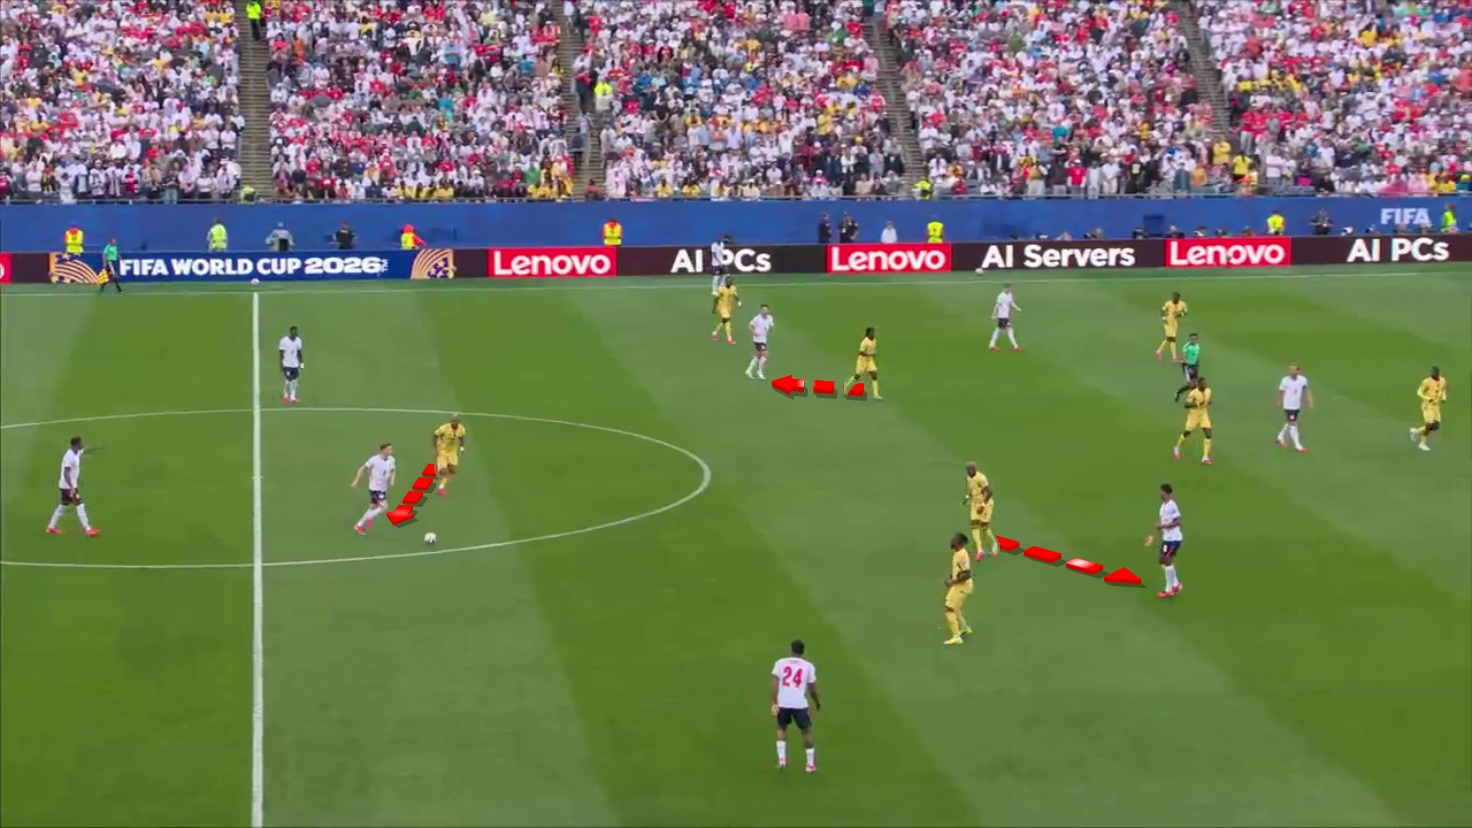
Ghana Wing & Box Defending against England Attacking Wing Play

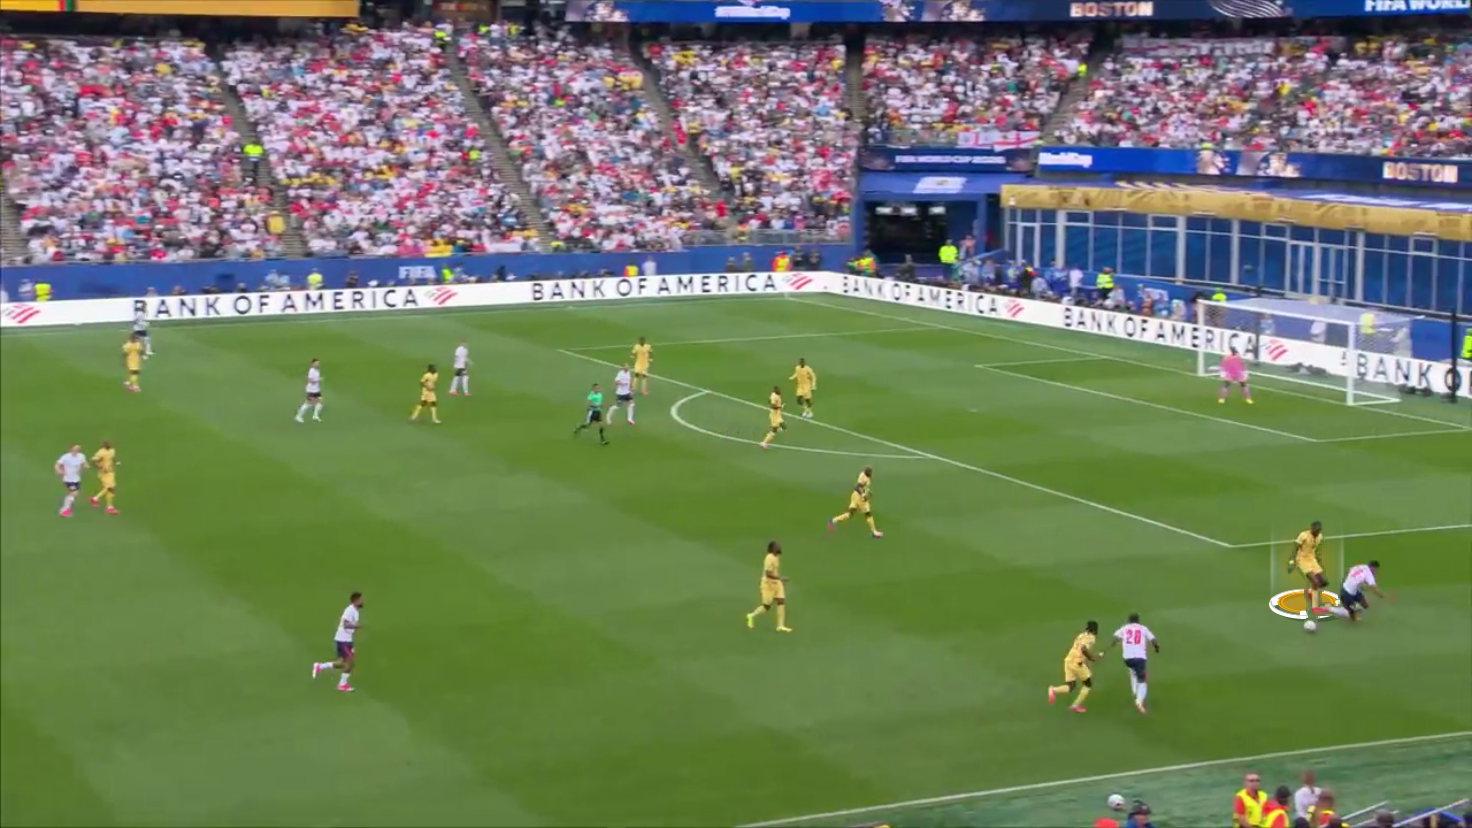
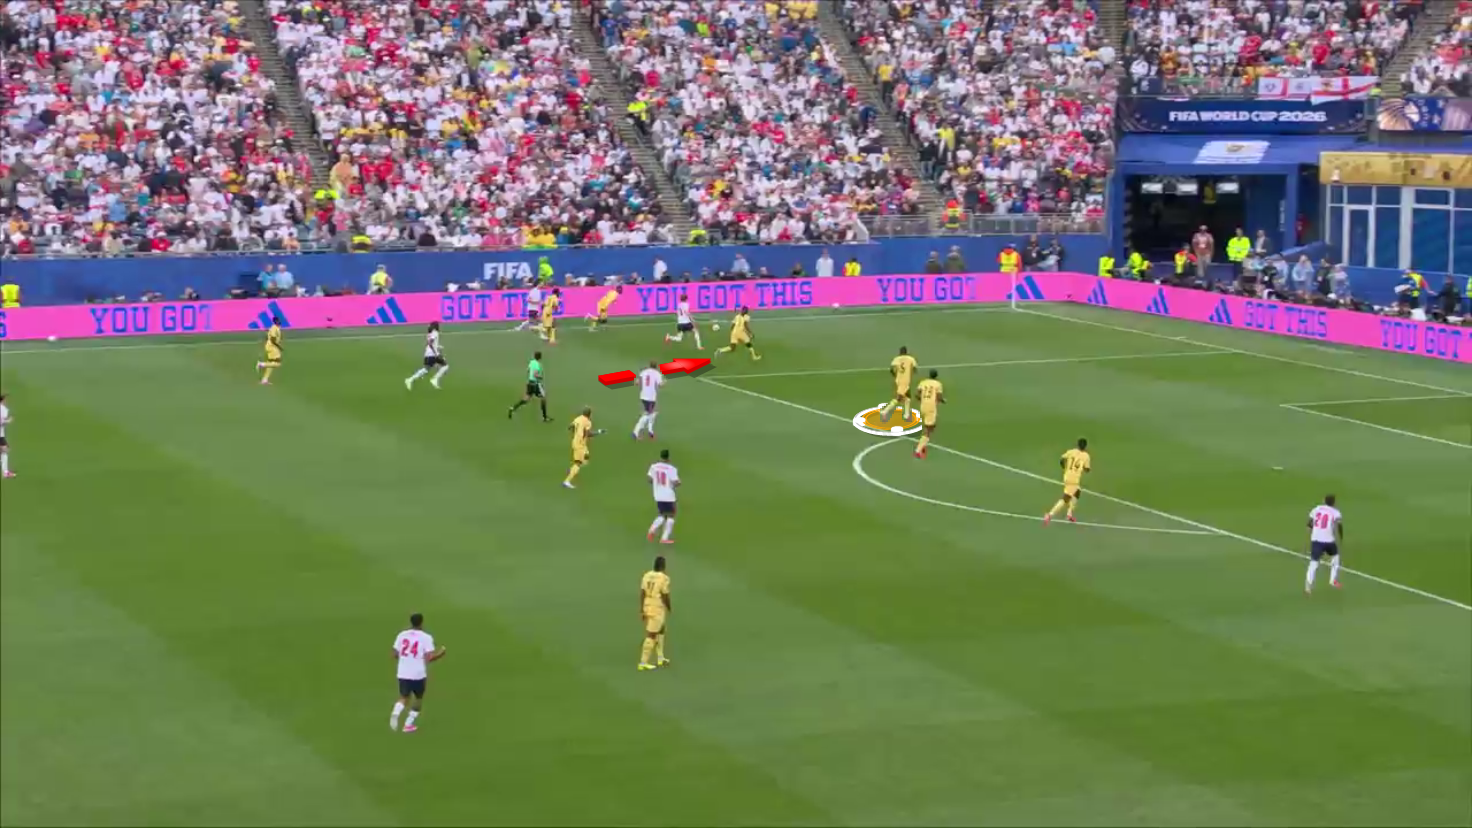
In Figure 4, Ghana's left full-back steps out to press James, while Semenyo tracks Bellingham.
The key detail is that the left centre-back moves out to deal with Madueke, with Thomas Partey dropping into the defensive line to fill the gap inside the box left by the centre-back.
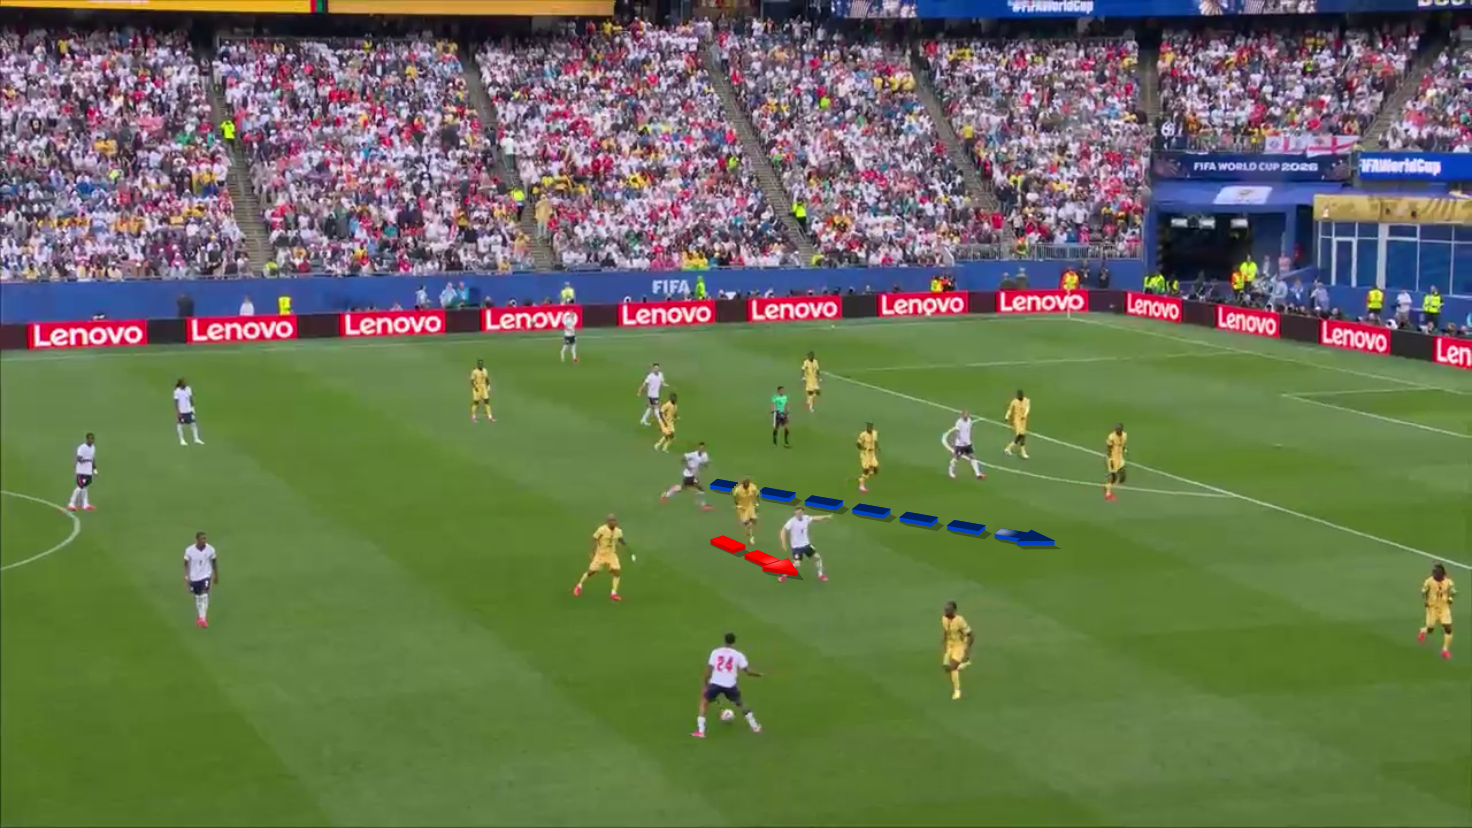
Again, Madueke receives Konsa's pass, and we can see the same defensive structure from Ghana on the wing.
The left centre-back moves out behind his full-back to cover Bellingham's run, while the far-side centre-back signals to Partey to drop into the defensive line and fill the gap left inside the box.
England found it particularly difficult to progress from these situations.
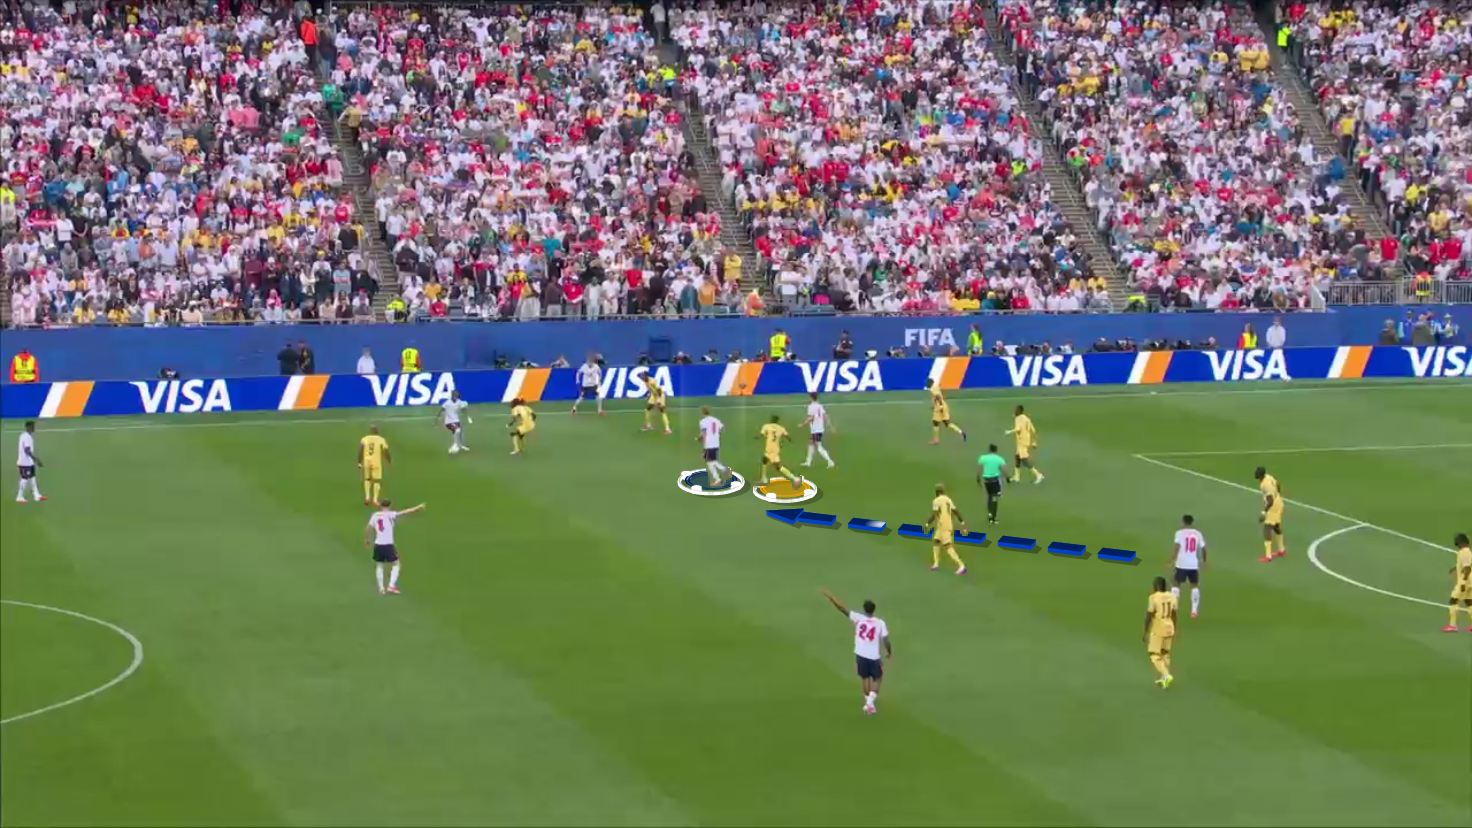
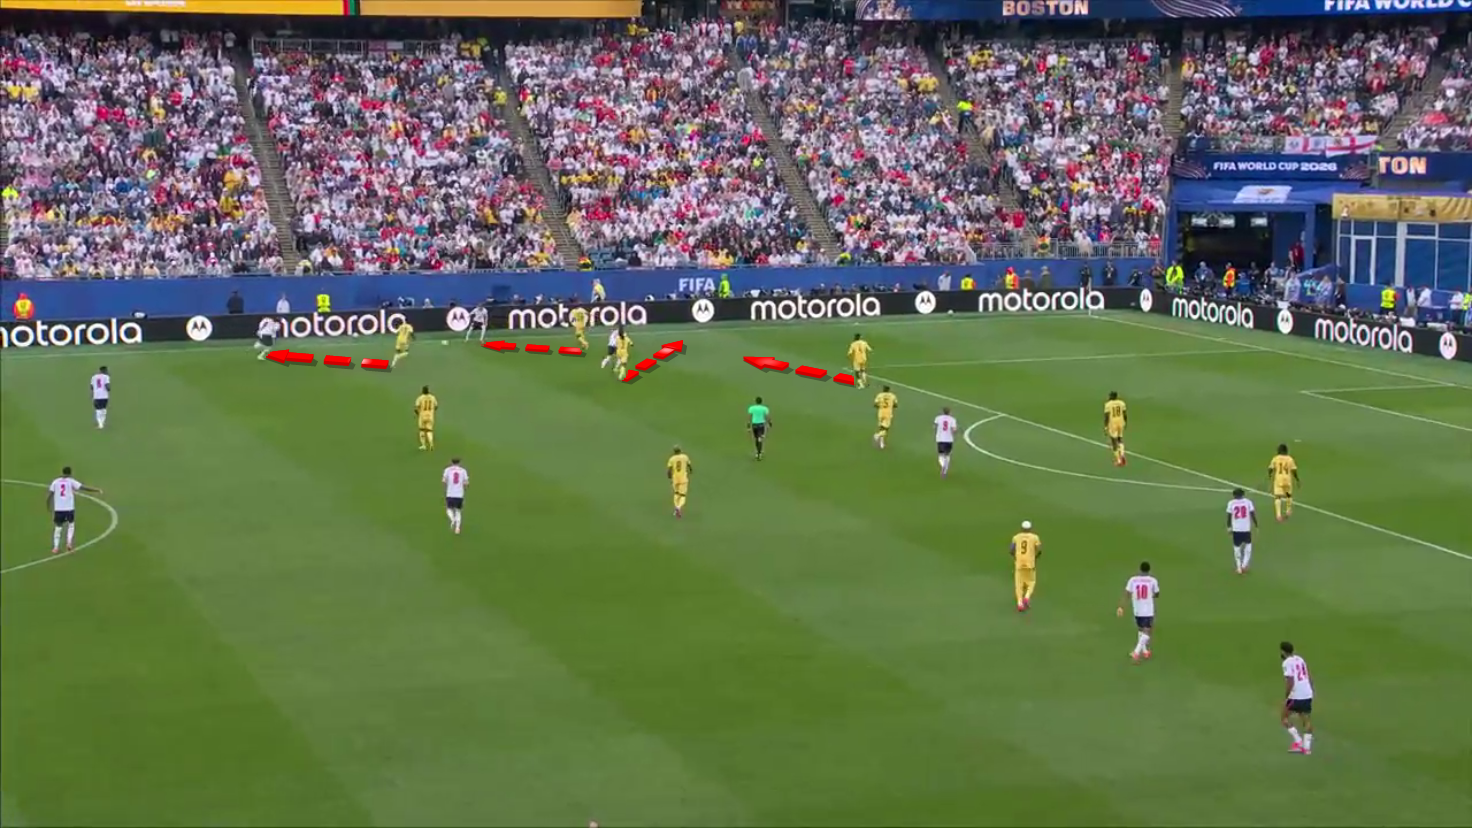
Here, in Figure 6, Bellingham is unable to retain possession, allowing Ghana's left centre-back to use his physicality to dispossess him.
England tried to overcome this issue by positioning Bellingham centrally.
Anderson occupies Ghana's left-sided number eight, Sibo, who would normally close the passing lane to Bellingham, and then signals to James that a pass into Bellingham is available.
James finds Bellingham with the pass, but once again, Bellingham is unable to retain possession under pressure from Ghana's left centre-back.
On the opposite side, England attempted to exploit the space behind Ghana's right full-back through Rice's runs. However, Ghana's right centre-back was always prepared to step out behind his full-back and deal with the threat.
Partey performed the same role on this side, dropping into the defensive line inside the box to cover the gap left by the right centre-back.
Meanwhile, Yirenkyi tracked Gordon's movement.
Once more, Ghana applied the same defensive structure on the wing, preventing England from finding opportunities to progress down the flank.

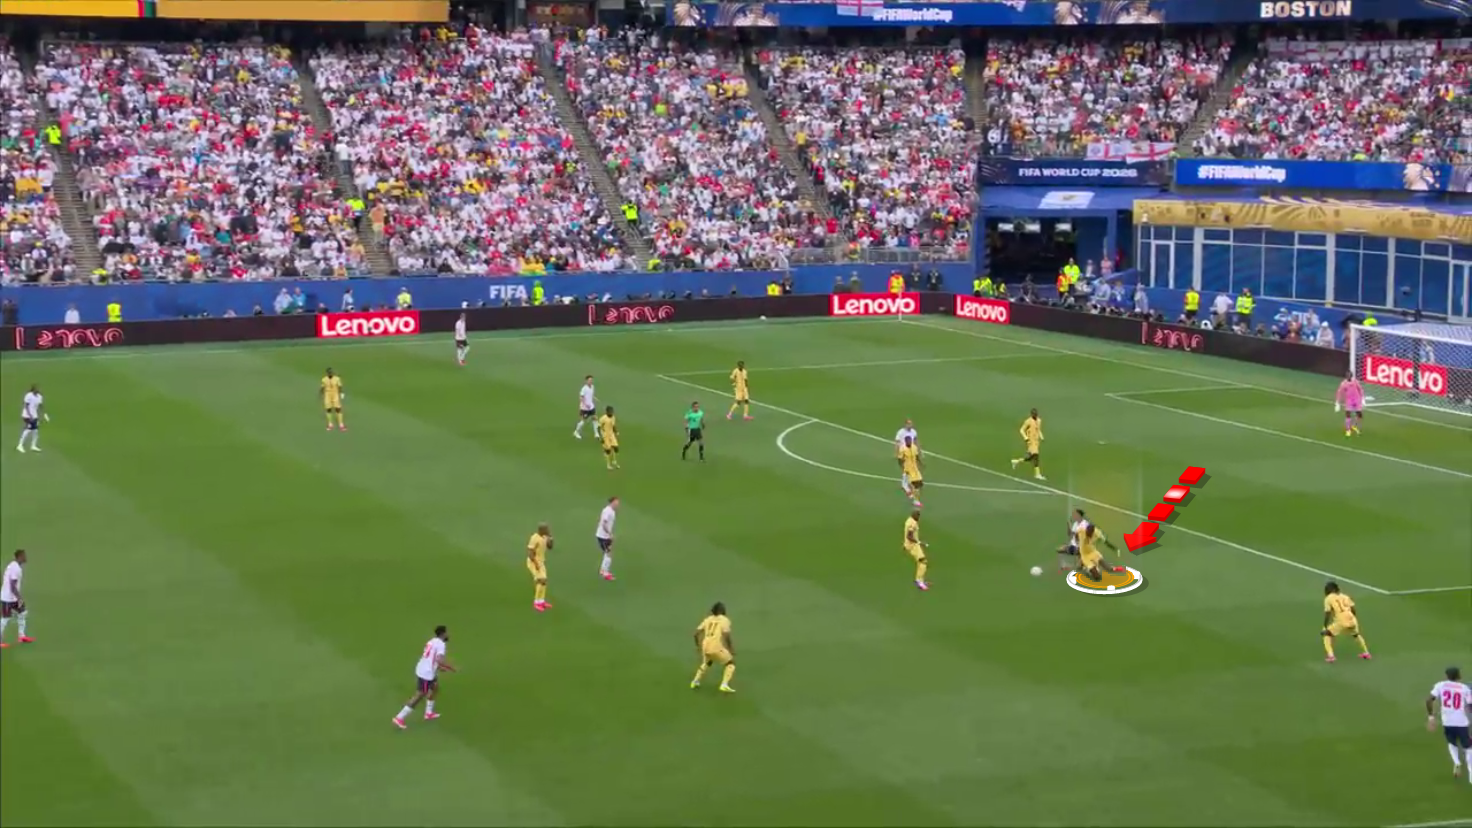
England also faced problems on the left side, as Gordon frequently lost possession.
Here, in Figure 12, after Ghana closed the wing, he cuts inside and looks for Kane, but ends up giving the ball away.
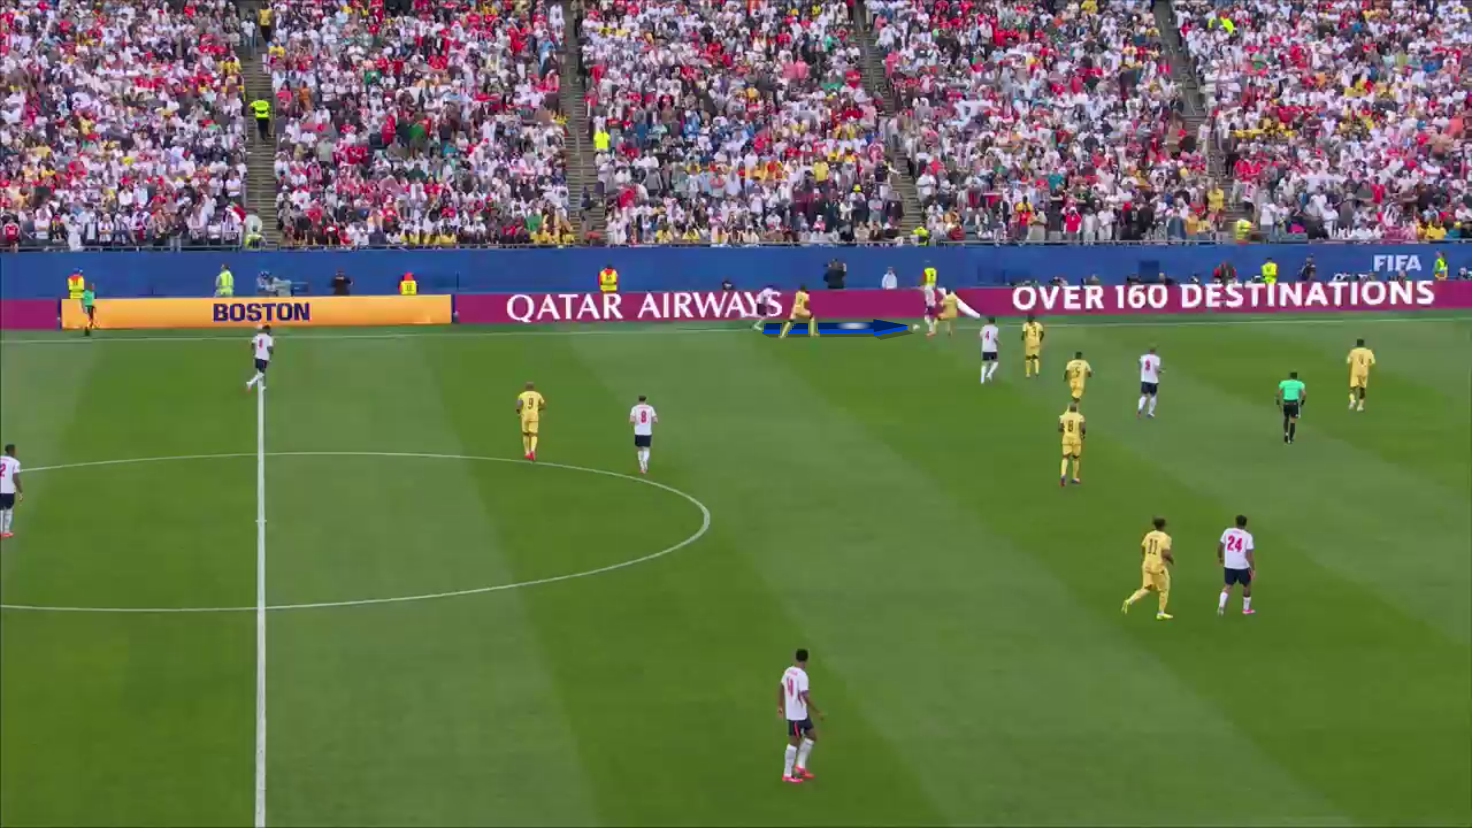
In another situation near the touchline, Gordon loses possession again as he fails to protect the ball under pressure.
![Switzerland Vs Canada [2–1] – FIFA World Cup 2026: Patience Rewards Murat Yakin Tactics – Tactical Analysis](https://cdn.mymidnight.blog/77f959f119f4fb2321e9ce801e2f5163/size/w600/2026/06/Switzerland-Vs-Canada-World-Cup-2026.png)
![Norway Vs Senegal [3–2] – FIFA World Cup 2026: Ståle Solbakken Tactics Exploit Pape Thiaw Defensive Gamble – Tactical Analysis](https://cdn.mymidnight.blog/77f959f119f4fb2321e9ce801e2f5163/size/w600/2026/06/Norway-Vs-Senegal-World-Cup-2026.png)
![Argentina Vs Austria [2–0] – FIFA World Cup 2026: The Diego Simeone Influence Behind Messi's Record-Setting Win – Tactical Analysis](https://cdn.mymidnight.blog/77f959f119f4fb2321e9ce801e2f5163/size/w600/2026/06/Argentina-Vs-Austria-World-Cup-2026.png)
![Uruguay Vs Cape Verde [2–2] – FIFA World Cup 2026: What's Gone Wrong For Marcelo Bielsa Tactics? – Tactical Analysis](https://cdn.mymidnight.blog/77f959f119f4fb2321e9ce801e2f5163/size/w600/2026/06/Uruguay-Vs-Cape-Verde-World-Cup-2026.png)
![Tunisia Vs Japan [0–4] – FIFA World Cup 2026: When Tactical Uncertainty Proves Costly – Tactical Analysis](https://cdn.mymidnight.blog/77f959f119f4fb2321e9ce801e2f5163/size/w600/2026/06/Tunisia-Vs-Japan-World-Cup-2026-1.png)
![Germany Vs Côte d'Ivoire [2–1] – FIFA World Cup 2026: Julian Nagelsmann Second-Half Changes Earn Three Points – Tactical Analysis](https://cdn.mymidnight.blog/77f959f119f4fb2321e9ce801e2f5163/size/w600/2026/06/Germany-Vs-Co--te-d---Ivoire-World-Cup-2026.png)
![Mexico Vs South Korea [1–0] – FIFA World Cup 2026: Javier Aguirre Wing Play Tactics – Tactical Analysis](https://cdn.mymidnight.blog/77f959f119f4fb2321e9ce801e2f5163/size/w600/2026/06/Mexico-Vs-South-Korea-World-Cup-2026.png)
![England Vs Croatia [4–2] – FIFA World Cup 2026: How Thomas Tuchel Tactics Overwhelmed Luka Modrić & Co. – Tactical Analysis](https://cdn.mymidnight.blog/77f959f119f4fb2321e9ce801e2f5163/size/w600/2026/06/England--Vs-Croatia--World-Cup-2026.png)